Jump to content

Printing Directly to Glass


mark

Recommended Posts

Posted · Printing Directly to Glass

Hi All,

While printing onto blue tape works fine I don't like needing to replace it whenever a print sticks to the bed super well and would prefer to be printing on a more consistently flat surface anyway. I've seen other people mention on the forums and elsewhere that they were successful at printing directly to non-heated glass, but they didn't mention what settings they used. With a few tests I've done today it seems to be sticking pretty well when using a temp of 205 but still has a problem with curling every once in a while.

So now for my question: What success have others had at printing directly to cold glass with PLA, and what settings have you tried?

And then for another possibly related question; all of a sudden today I started randomly having problems where bits of the ABS fix kit which I ran through a while ago block the nozzle for a short period of time and then come out in a glob, messing up the print. This is when printing at temps between 195 and 205, which I thought was too low for ABS to melt. Does anyone have a clue why that might be happening, and/or have any idea as to how to fix it?

-Mark

  • Link to post
    Share on other sites

    Posted · Printing Directly to Glass

    AFAIK, PLA will not stick to cold glass, and neither will ABS.

    The recommended glass surface temperature is very similar to the glass-transition temperature of the plastic you are using: PLA needs about 70C, and ABS 110-120C HBP glass temp.

    (In case you care, PLA Tg is 58C)

  • Link to post
    Share on other sites

    Posted · Printing Directly to Glass

    I understand that printing directly to glass isn't recommended, and that it isn't easy to get working, but I refuse to believe it impossible. For example I have successfully done it twice in a row today:

    print_to_glass1.jpg

    print_to_glass2.jpg

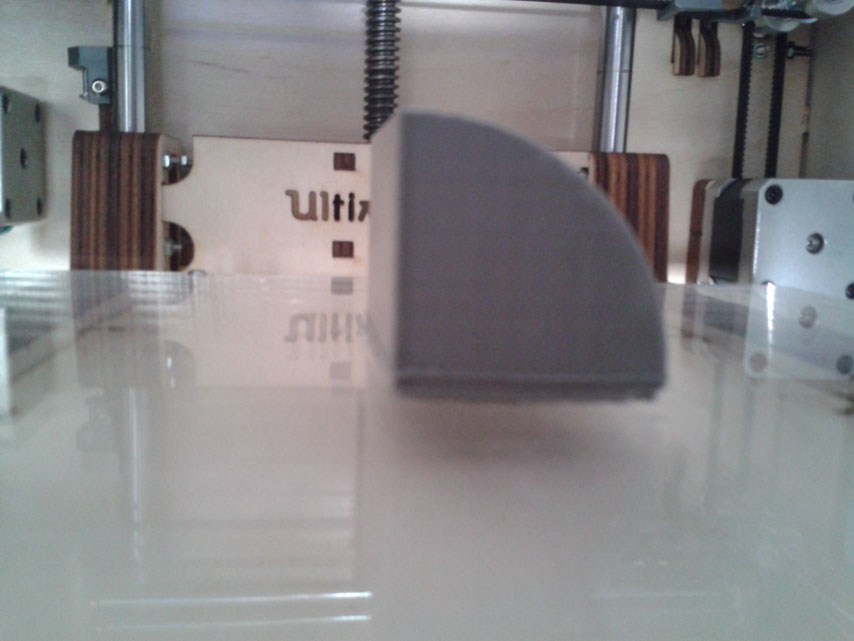
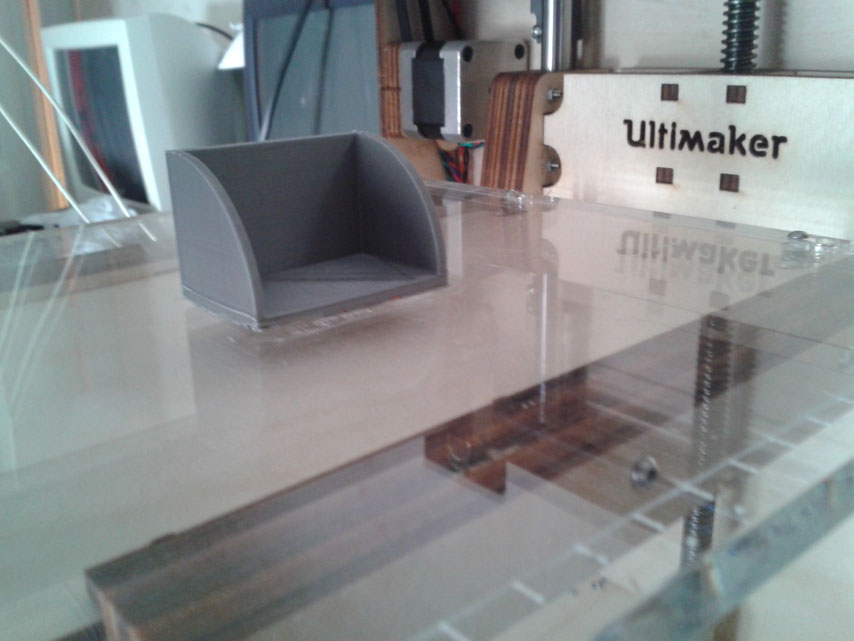
    It might not be entirely clear in the images above (pardon my poor camera) but there was little to no warping in the corners (the first layer was very sparse filament wise due to some residual ABS getting in the way). Granted this was a fairly small print which only took 30 minutes to print, but I think it shows that it is possible, at least for small prints. So far with my tests it seems that the print is more successful if there is slightly less filament being extruded than normal for the first few layers. My guess as to why this is is that when there is more filament extruded it's easier for it to stretch and curl up, but that's just speculation. I'm going to try adjusting the start gcode to get more consistent results (I think I'll start each print by retracting a small amount).

    For anyone interested my current settings in Cura printing PLA are as follows:

    Layer height: 0.2, Wall thickness: 0.6, Print speed: 75, printing temperature: 205, bottom/top thickness: 0.6, fill density: 25, bottom layer speed: 45, travel speed: 130

    These settings aren't perfect yet but are consistently working. I have not sanded or done anything special to the platform. Hope this helps others get off their tape dependence someday :)

    -Mark

  • Link to post
    Share on other sites

    • 2 weeks later...
    Posted · Printing Directly to Glass

    I have also printed directly to cold glass with PLA, both plain and frosted, with and without PVA glue. Really can't give conclusive results yet other than it works if the print is small, less than 30mm, with no curling/warping/popping off. Bigger and parameters such as PVA glue concentration, printing temperature/material(color, provider), can cause unexpected results. Unfortunately, I had to get on to real work with the printer and for now that means blue tape for the size I am printing. I actually have a new problem and that it is sticking too well to the tape and it needs replacing every time :(

  • Link to post
    Share on other sites

    Posted · Printing Directly to Glass

    At the moment I'm still using the PLA that came with my kit. I bought some UltiMachine PLA for when I run out but still have a little ways to go.

    I am having a similar issue with bigger prints not sticking correctly. When I saw the Replicator 2 videos (from MakerBot) my first thought was, "Hey that's a metal UltiMaker!" My second thought was, "Hey they're printing PLA onto a cold build platform without difficulty!" It looks like they have some laser engraving or sanding on their platform to help the PLA stick better. I'm trying to replicate their results by sanding my plate a little with mixed results. I can't tell if I need finer grain sandpaper, or if I haven't sanded enough, or what, but I'll keep trying and let you all know if I come up with something that works.

    -Mark

  • Link to post
    Share on other sites

    Posted · Printing Directly to Glass

    Tried to print on glass, but PLA didn't stick to it.

    However when I used Hairspray on the glass, PLA kept sticking on it.

  • Link to post
    Share on other sites

    Posted · Printing Directly to Glass

    Hairspray is an amazing solution. I'm using it for printing with abs and i've sprayed it on top of kapton tape. So far I've printed four times on the hairspray with absolutely no loss in adhesion. Usually after the third time kapton tape starts to get weaker but not with the hair spray! I am tempted to try directly on aluminum without the kapton, considering your success with glass. Nice job!

  • Link to post
    Share on other sites

    Posted · Printing Directly to Glass

    Does the hairspray have any effect on the bottom layer? Does it change the appearance/texture/etc.?

  • Link to post
    Share on other sites

    Posted · Printing Directly to Glass

    Tried to print on Metal but didn't stick even not with Hairspray. It made a big mess

    When I tried on glass with hairspray the bottom surface was a little rough but mostly shiny

    Also tried PVC but it melted (ofcource but tried it anyway)

    Got the information from Thingiverse: 28787

  • Link to post
    Share on other sites

    Posted · Printing Directly to Glass

    Haven't tried hairspray yet but sounds interesting. So far I scuffed up the build platform with some 450 grit sandpaper and then smoothed it out a bit with some 120 grit sandpaper. I also increased my nozzle temp to 220 (not sure how much that helps but the Replicator 2 is using 230 as their default temp). The results so far have been pretty good:

    3D_Printed_Spool_Arm_thumb.png

    3D_Printed_Klein_Bottle_thumb.png

    The klein bottle was printed using minimal raft. I've found that using a raft typically fixed the printing issues, but of course is a pain to clean up afterwards so I'm not calling it a solution :) . By slowing the first layer speed down to 30 mm/s it does seem to be sticking better.

    -Mark

  • Link to post
    Share on other sites

    Posted · Printing Directly to Glass

    Hi Mark,

    With respect to surface texture, you might want to consider just buying a cut plate of "frosted glass".

    http://www.hwglass.co.uk/glass-stockiest.html


    This has been either sandblasted or etched by the factory. Might do just the job without messing around

    with trying to sandpaper it. Or take it to a local sandblaster.

    I really like the idea of direct to the glass because I am now really fed up with taping all the time.

    Makes setting the height with any prescision impossible too.

    C.

  • Link to post
    Share on other sites

    Posted · Printing Directly to Glass

    There is also this on Thingiverse:

    http://www.thingiverse.com/thing:24172

  • Link to post
    Share on other sites

    Create an account or sign in to comment

    You need to be a member in order to leave a comment

    Create an account

    Sign up for a new account in our community. It's easy!

    Register a new account

    Sign in

    Already have an account? Sign in here.

    Sign In Now
    • Our picks

      • UltiMaker Cura 5.7 stable released
        Cura 5.7 is here and it brings a handy new workflow improvement when using Thingiverse and Cura together, as well as additional capabilities for Method series printers, and a powerful way of sharing print settings using new printer-agnostic project files! Read on to find out about all of these improvements and more. 
         
          • Like
        • 18 replies
      • S-Line Firmware 8.3.0 was released Nov. 20th on the "Latest" firmware branch.
        (Sorry, was out of office when this released)

        This update is for...
        All UltiMaker S series  
        New features
         
        Temperature status. During print preparation, the temperatures of the print cores and build plate will be shown on the display. This gives a better indication of the progress and remaining wait time. Save log files in paused state. It is now possible to save the printer's log files to USB if the currently active print job is paused. Previously, the Dump logs to USB option was only enabled if the printer was in idle state. Confirm print removal via Digital Factory. If the printer is connected to the Digital Factory, it is now possible to confirm the removal of a previous print job via the Digital Factory interface. This is useful in situations where the build plate is clear, but the operator forgot to select Confirm removal on the printer’s display. Visit this page for more information about this feature.
        • 0 replies
    ×
    ×
    • Create New...