Jump to content

UMO: Dual Print Fans + Hotend Fan


Recommended Posts

Posted · UMO: Dual Print Fans + Hotend Fan

Hi guys,

I have been running a hot end of my own design for a while now, but using an external power supply for my hot end fan, and happened to pick a print fan which has lived at the supplied 19v.

I rev'd up my design to be smaller, lighter, stiffer, and much shorter as well. Now seems like a good time to clean up and integrate the electronics.

I am pretty sure that my base electronics are 1.5.7, and I have added the official heated bed kit. I believe this gives me access to constant on 19v and 24v sources. What I am unclear on, is whether I have a 5v extruder fan connection that can be controlled via firmware (on when the hot end is above a set point).

For the hot end fan, I see 3 potential options:


  1. Use the 5v lead if I have it. Could I use this to step the voltage up to 12v? DC Step up
  2. Piggyback, in parallel, on the 12v leads that power the control board fan and hope not to overload it with an additional ~0.1 amps
  3. Grab the always on 19v or 24v leads, and run a step down converter: DC Step down


Any thoughts on this?

For dual print fans:

I will be running 12v 30mm fans (same as above @ ~0.1 amp). I can either wire them in parallel and hope they don't burn up. But I think using the step-down converter above on the normal fan output would be a better solution. My biggest question on that, is if wiring that converter inline with the fan output would cause issues in the PWM fan signal.

Any help is appreciated!

  • Link to post
    Share on other sites

    • 1 month later...
    Posted · UMO: Dual Print Fans + Hotend Fan

    Researched a bit and found:
    The Ultimaker 1.5.7 board bases on Arduino Mega plus a Ultimaker shield:
    http://reprap.org/wiki/Ultimaker's_v1.5.7_PCB

    There is only 1 fan connector:
    UltimakerPCB1.5.4-prototype-2.jpg


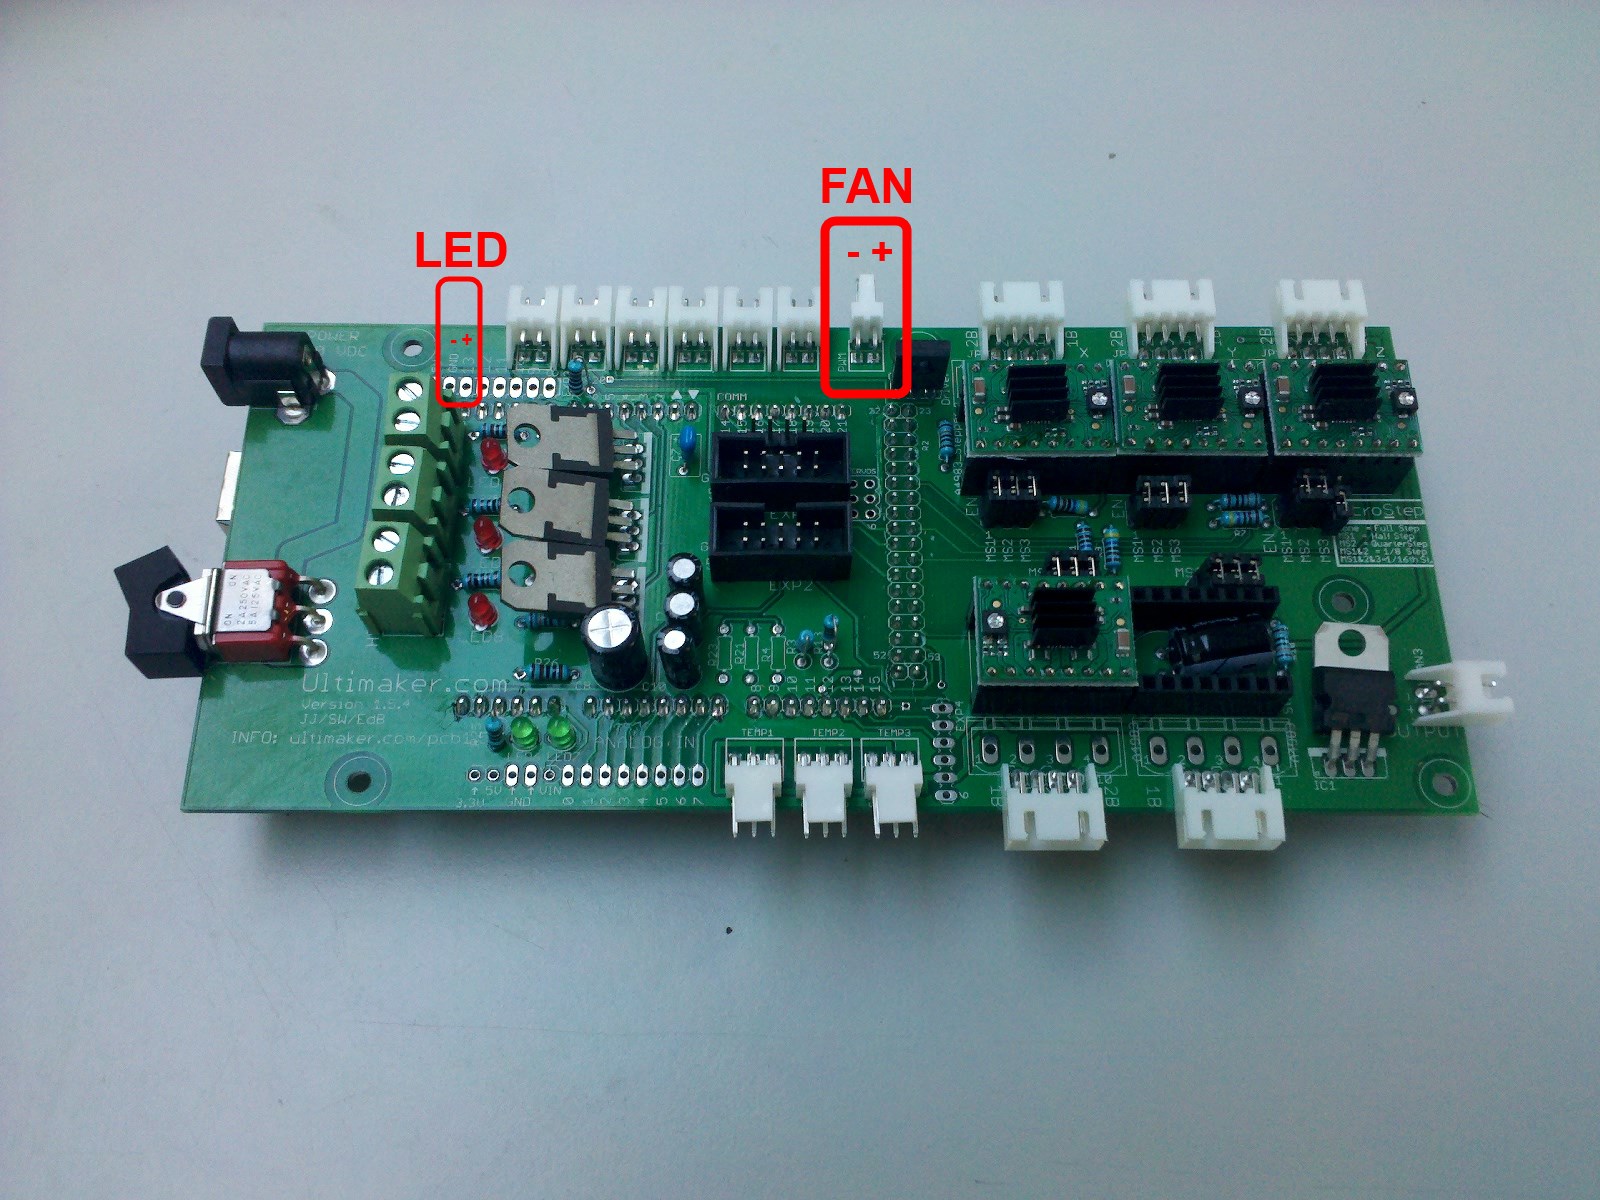
    According to this schematic:
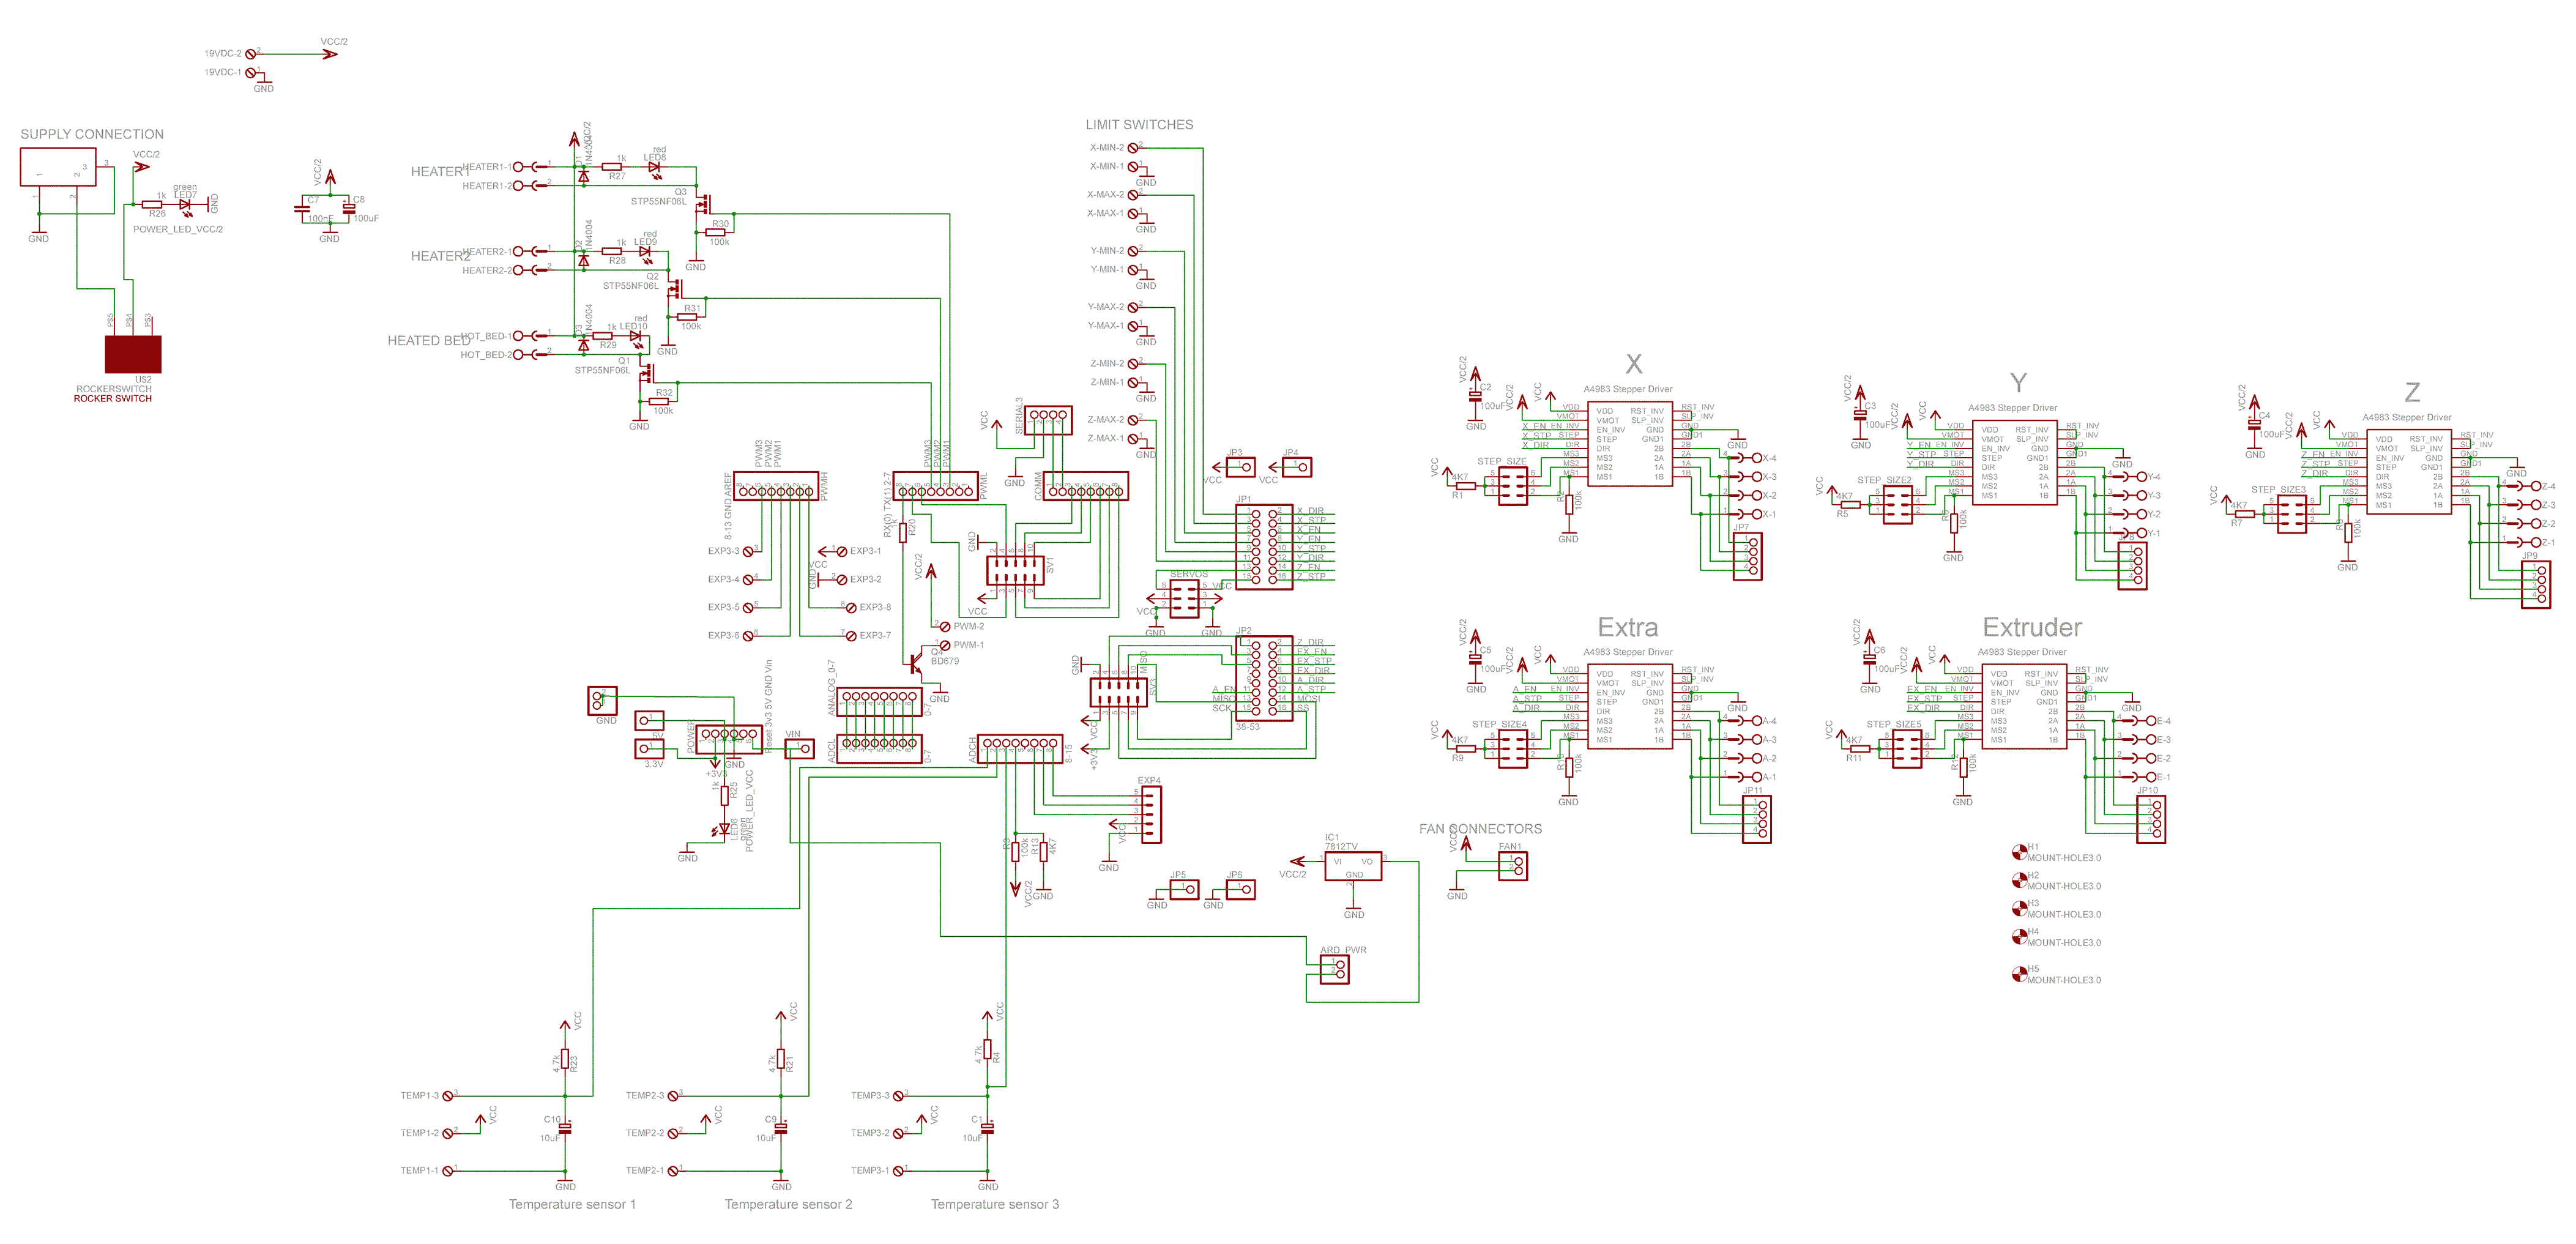
    Arduino-MEGA-Ultimaker-Shield-Sch.png
    and this offer:
    https://www.fablabfactory.com/products/ultimaker-fans?variant=50721821907

    it uses VCC/2 = 12V.

    It is driven off the PWML connector that also serves the heaters.
    And in the above schematic you see that a BD679 darlington transistor drives this:
    http://www.onsemi.com/pub/Collateral/BD675-D.PDF


    The mentioned datasheet says 4A. Which probably refers to the derating diagram which allows 10W of dissipation at 120C.

    As you are planning for a 12V fan, you have an output serving that and 0.1A should not be a problem at all.


    Other than that, maybe this is what you are looking for:


  • Link to post
    Share on other sites

    Posted · UMO: Dual Print Fans + Hotend Fan
    7 minutes ago, lars86 said:

    Thanks for the reply @conny_g


    I'm pretty sure that VCC/2 is 19v on the UMO and that they just found a 12v fan that "lives" at 19v. 


    Oops, you are right. On the top left you see that VCC/2 is 19V.
     

  • Link to post
    Share on other sites

    Posted · UMO: Dual Print Fans + Hotend Fan

    Do you want to have the fan PWM controlled or would it be ok if it simply runs at 12V and that's it?

  • Link to post
    Share on other sites

    Posted (edited) · UMO: Dual Print Fans + Hotend Fan

    The dual print fans should run via the existing PWM circuit. I went ahead and just ran a couple cheap 12v 30mm axial fans, in parallel, on that circuit. So far they have survived. I'm not sure what the worst case is if they fail. It would suck to burn out the transistor if they fail as a short. Not sure if fans ever really do that.


    I'm running a complete external power supply for the hot end fan right now. I would like to clean that up and have a pretty good path to take. I can solder in my voltage step down board, into the UM supply circuit and step down to 12v so that fan has a higher chance of success.


    I'm just curious how those voltage regulator board would handle a PWM signal (for the print fans).

    Edited by lars86
  • Link to post
    Share on other sites

    Posted · UMO: Dual Print Fans + Hotend Fan
    7 hours ago, lars86 said:

    I'm just curious how those voltage regulator board would handle a PWM signal (for the print fans).


    Taking a random small one like this:
    https://eckstein-shop.de/Mini-DC-DC-Step-down-Spannungsregler-MP1584EN-Buck-Power-Module-Outout-08-20V-3A-?curr=EUR&gclid=EAIaIQobChMIqr390P722AIVZirTCh3CswVyEAQYASABEgK3PPD_BwE


    It has a switching frequency of about 1 Mhz, while the board has a PWM frequency of < 38 kHz. That would be ok.
    And the IC on that step down board has a startup / shutdown time of "a few ms" and that kills it, it can't keep pace with any PWM that's much higher than 100 Hz.

    I would not feel comfortable using a step-down powered by a PWM signal.

    What you could do is create a small circuit powered by the step-down (19v > 12V, taking the 19V from somewhere else on the board) using the original fan PWM as input to switch a MOSFET that pulses the 12V output of the step-down. That's a really small circuit out of a MOSFET and a resistor. For 0.1A you could even use a normal small npn transistor (BC337 or something).


  • Link to post
    Share on other sites

    Create an account or sign in to comment

    You need to be a member in order to leave a comment

    Create an account

    Sign up for a new account in our community. It's easy!

    Register a new account

    Sign in

    Already have an account? Sign in here.

    Sign In Now
    • Our picks

      • UltiMaker Cura 5.7 stable released
        Cura 5.7 is here and it brings a handy new workflow improvement when using Thingiverse and Cura together, as well as additional capabilities for Method series printers, and a powerful way of sharing print settings using new printer-agnostic project files! Read on to find out about all of these improvements and more. 
         
          • Like
        • 18 replies
      • S-Line Firmware 8.3.0 was released Nov. 20th on the "Latest" firmware branch.
        (Sorry, was out of office when this released)

        This update is for...
        All UltiMaker S series  
        New features
         
        Temperature status. During print preparation, the temperatures of the print cores and build plate will be shown on the display. This gives a better indication of the progress and remaining wait time. Save log files in paused state. It is now possible to save the printer's log files to USB if the currently active print job is paused. Previously, the Dump logs to USB option was only enabled if the printer was in idle state. Confirm print removal via Digital Factory. If the printer is connected to the Digital Factory, it is now possible to confirm the removal of a previous print job via the Digital Factory interface. This is useful in situations where the build plate is clear, but the operator forgot to select Confirm removal on the printer’s display. Visit this page for more information about this feature.
          • Like
        • 0 replies
    ×
    ×
    • Create New...