Jump to content
UltiMaker Community of 3D Printing Experts

Toothless needs support help!


LePaul

Recommended Posts

Posted · Toothless needs support help!

Yes, Toothless from "How to Train Your Dragon" is a favorite of mine.


And there's a great model (without supports one) on Thingiverse.  (https://www.thingiverse.com/thing:2335797)


However no matter what I've done, the supports fail on the wings on the back


Using the latest Cura.... and really stumped as to how to get this little fella printed successfully!  It's eluded me a few times!


  • Link to post
    Share on other sites

    Posted · Toothless needs support help!

    Why do the supports fail? Are they too small and break off? In this case play with the settings "support horizontal expansion" and "support join distance" until you get a solid block of support.

  • Link to post
    Share on other sites

    Posted · Toothless needs support help!

    Thanks for your reply.


    Yes the supports came off from the base and I know in S3D I can set how many layers are solid.  (I supposed I could have opted for brim too)


    I'll investigate those settings.

  • Link to post
    Share on other sites

    Posted · Toothless needs support help!

    Ok, I've been looking at those settings.


    I think the problem is the foundation.  Even if I set a brim, the supports would be weak.


    It looks like the wings have good support but the base would again be the weak spot.  Can you offer some tips on the Join Distance and Horizontal expansion that might be good to try?


    image.thumb.png.275ae2532a80d57f3c8f785c0cebee2b.png

  • Link to post
    Share on other sites

    Posted · Toothless needs support help!

    I had good results with 10mm for the join distance. Default value for the horizontal expansion is in most cases not so bad but sometimes it does itself create islands on the outside of a print. Then I set it to 0.

  • Link to post
    Share on other sites

    Posted · Toothless needs support help!

    That's interesting.  So there's no way for a set some solid layers first to strengthen the support to the bed?

  • Link to post
    Share on other sites

    Posted · Toothless needs support help!

    Use the per model settings. Put a box or something over then and then choose the highlighted section in the image below.

    You can choose how dense it is.


    PermodelSetting.jpg.3f25f2cb409bb3cb4bf4e8ccd5debeef.jpg

  • Link to post
    Share on other sites

    Posted · Toothless needs support help!

    "Put a box over it"

    Can you elaborate?  Never utilized that feature before

  • Link to post
    Share on other sites

    Posted · Toothless needs support help!
    1 hour ago, LePaul said:

    That's interesting.  So there's no way for a set some solid layers first to strengthen the support to the bed?


    Sure there is. Use a brim made from PVA.

  • Link to post
    Share on other sites

    Posted · Toothless needs support help!
    3 minutes ago, Dim3nsioneer said:


    Sure there is. Use a brim made from PVA.


    Ultimaker 2+    ?

  • Link to post
    Share on other sites

    Posted · Toothless needs support help!
    1 hour ago, LePaul said:

    "Put a box over it"

    Can you elaborate?  Never utilized that feature before

    See if this helps clarify things. Lemme know if it does not ?


  • Link to post
    Share on other sites

    Posted · Toothless needs support help!

    @kmanstudios - but an "infill mesh" does not influence the stability of support structures, right?


    1 hour ago, LePaul said:

    So there's no way for a set some solid layers first to strengthen the support to the bed?


    It depends on the support pattern. I think, "Zig Zag" has always this grid like bottom layer.


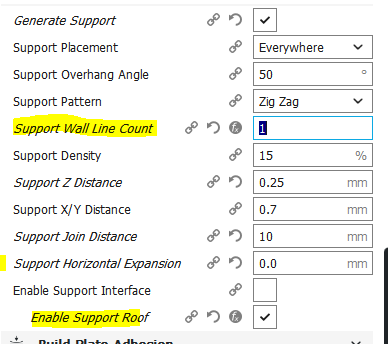
    In general - "zig zag" supports are much more stable if you choose at least one surrounding wall. The setting is called "Support Wall line count". And you should select "Enable support roof".


    support_base.PNG

    support_wall.PNG

  • Link to post
    Share on other sites

    Posted · Toothless needs support help!

    Okay those look promising....here's what I've added in...appreciate your thoughts


    image.png.19aaa56c220817b3cc055388b38f42ca.png

  • Link to post
    Share on other sites

    Posted · Toothless needs support help!

    I do not know if he is generating the support or it came with the model. But you and also use the same field to use the box or other geometry to print as support.

  • Link to post
    Share on other sites

    Posted · Toothless needs support help!
    Just now, LePaul said:

    Okay those look promising....here's what I've added in...appreciate your thoughts


    image.png.19aaa56c220817b3cc055388b38f42ca.png

    OK, he is generating the support.....I thought otherwise.

  • Link to post
    Share on other sites

    Posted · Toothless needs support help!

    This model (refer link) has two versions   Using the one without support

  • Link to post
    Share on other sites

    Posted · Toothless needs support help!
    8 minutes ago, LePaul said:

    Okay those look promising....here's what I've added in..


    Good luck!

    ...and if it doesn't work, you can still use a brim... ?

  • Link to post
    Share on other sites

    Posted · Toothless needs support help!
    9 hours ago, LePaul said:


    Ultimaker 2+    ?


    Mark2 ?

    I see you got some good advices in the meantime.

  • Link to post
    Share on other sites

    Posted · Toothless needs support help!

    I decided to go with brim and the changes I posted above.


    79% into the print and the area that failed previously is working very well.


    I'll let you know how the finished print does but so far (20 hour print), the big problem area seems to be working well.  I think the brim gives a stronger base for the support and added the one wall helped too.


  • Link to post
    Share on other sites

    Posted · Toothless needs support help!

    I just remembered...duhhhhhh, have you tried conical support or towers? They can print a wide base and taper to thin parts at the model itself.


    How is THAT for a delayed reaction?

  • Link to post
    Share on other sites

    Create an account or sign in to comment

    You need to be a member in order to leave a comment

    Create an account

    Sign up for a new account in our community. It's easy!

    Register a new account

    Sign in

    Already have an account? Sign in here.

    Sign In Now
    • Our picks

      • UltiMaker Cura 5.3 stable released
        In this stable release, Cura 5.3 achieves yet another huge leap forward in 3D printing thanks to material interlocking! As well as introducing an expanded recommended print settings menu and lots of print quality improvements. Not to mention, a whole bunch of new printer profiles for non-UltiMaker printers!
          • Thanks
        • 21 replies
      • Here it is. The new UltiMaker S7
        The UltiMaker S7 is built on the success of the UltiMaker S5 and its design decisions were heavily based on feedback from customers.
         
         
        So what’s new?
        The obvious change is the S7’s height. It now includes an integrated Air Manager. This filters the exhaust air of every print and also improves build temperature stability. To further enclose the build chamber the S7 only has one magnetically latched door.
         
        The build stack has also been completely redesigned. A PEI-coated flexible steel build plate makes a big difference to productivity. Not only do you not need tools to pop a printed part off. But we also don’t recommend using or adhesion structures for UltiMaker materials (except PC, because...it’s PC). Along with that, 4 pins and 25 magnets make it easy to replace the flex plate perfectly – even with one hand.
         
        The re-engineered print head has an inductive sensor which reduces noise when probing the build plate. This effectively makes it much harder to not achieve a perfect first layer, improving overall print success. We also reversed the front fan direction (fewer plastic hairs, less maintenance), made the print core door magnets stronger, and add a sensor that helps avoid flooding.


        The UltiMaker S7 also includes quality of life improvements:
        Reliable bed tilt compensation (no more thumbscrews) 2.4 and 5 GHz Wi-Fi A 1080p camera (mounted higher for a better view) Compatibility with 280+ Marketplace materials Compatibility with S5 project files (no reslicing needed) And a whole lot more  
        Curious to see the S7 in action?
        We’re hosting a free tech demo on February 7.
        It will be live and you can ask any questions to our CTO, Miguel Calvo.
        Register here for the Webinar
          • Like
        • 18 replies
      • UltiMaker Cura Alpha 🎄 Tree Support Spotlight 🎄
        Are you a fan of tree support, but dislike the removal process and the amount of filament it uses? Then we would like to invite you to try this special release of UltiMaker Cura. Brought to you by our special community contributor @thomasrahm
         
        We generated a special version of Cura 5.2 called 5.3.0 Alpha + Xmas. The only changes we introduced compared to UltiMaker Cura 5.2.1 are those which are needed for the new supports. So keep in mind, this is not a sneak peek for Cura 5.3 (there are some really cool new features coming up) but a spotlight release highlighting this new version of tree supports.  
          • Like
        • 22 replies
    ×
    ×
    • Create New...