

I'm surprised you aren't interested in taking more donations for the printable files. I'd pay.

I was wondering how you generated the cad files.
Am i right, that you "only" exported the files out of the video game? Or did you do this design yourself (or even for the videogame)?
Sorry to be so rude... i am of course impressed about the work you did(especially on the color!!! Aswell as on the joints!!)
I myself already managed to print some files out of Half-Life 2 due to reading the graphic-card memory. it would be interesting to see what you did!
Anyway what you did, what where u using?
Keep it up!
Ji
It's not directly sanctioned by the game company, though I've done stuff in the past where they didn't mind so I'll keep doing it. 
I was wondering how you generated the cad files.
Am i right, that you "only" exported the files out of the video game? Or did you do this design yourself (or even for the videogame)?
Sorry to be so rude... i am of course impressed about the work you did(especially on the color!!! Aswell as on the joints!!)
I myself already managed to print some files out of Half-Life 2 due to reading the graphic-card memory. it would be interesting to see what you did!
Anyway what you did, what where u using?
It's kind of half half, I started with the game assets, but if you've used game assets before, they're usually fairly poly efficient, which also means they're terrible for printing since they have holes everywhere. They're also not usually mechanically thought out because clipping is fine and dandy in a game. not so much in real life.
So with that, a lot of the 3D process is to clean everything up, fill all the holes and combine what needs to be combined. Then I have to break everything down into pieces that mechanically work together, design the joints and how it comes together. After that, a lot of the model's detail comes from the normal map.. which doesn't translate into printing details so I modeled a lot of the normal map details into the mesh itself.
Once that's complete, there's headscratching process of figuring out how to print the parts with the greatest accuracy/detail without supports. This is kinda what adds a lot of parts onto the build.. some parts I split up just so I wouldn't need to print with supports, or so the top surface is hidden since it's usually not that nice.
Once all that's said and done I print a prototype. Fix up all of the tolerances and then print the actual one. I've had pretty good luck so far I didn't have to really re-print much. The prototype looks almost as good as the real one. (the one without antanas)
It is a very model dependent process. HL models are probably a lot lower poly than mechs and have less moving joints. Though I imagine you would have to go through a similar process.
The mech design itself is from the game, from the exterior, it is like 99% accurate. mesh wise, very different.
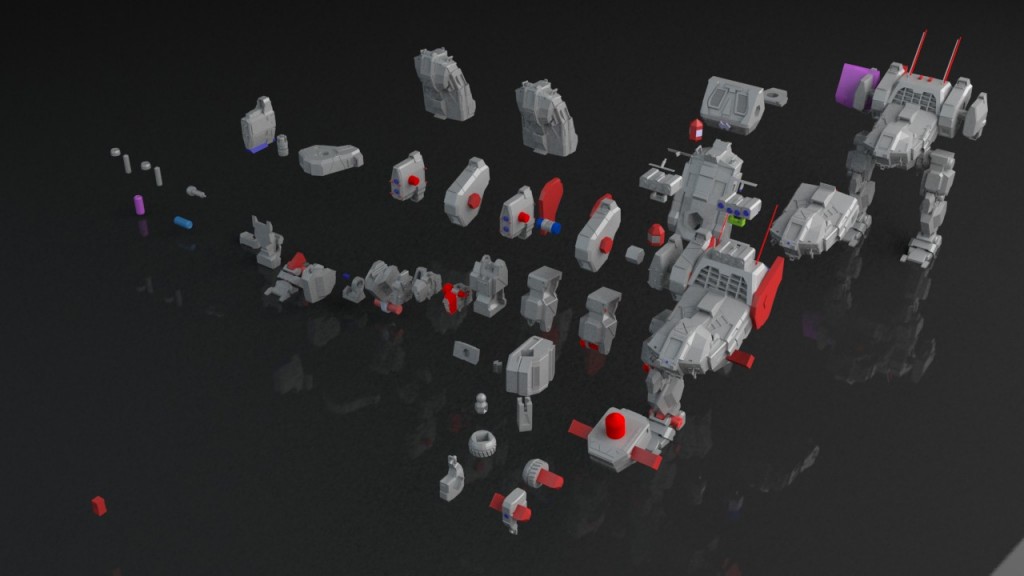
Here's what my 3D looks like by the time I finish cleanup, breaking everything apart, designing joints. etc.
I've posted up the making of on my site now TONS of pictures for those interested in the process.
http://www.redicubricks.com/sarahs-jenner-the-making-of/
This is really cool! Great job!!
I am new to 3d modeling, and have some 3d models I really want to break apart, add connections, etc...
Is there any free tools that are good at this sort of thing?
Right now I am looking at blender and meshmixer. I like 123d Design for making new mechanical parts, but it does not see to do that well for taking existing models apart.
Also, maybe I have not searched for the right things yet, but it seems really hard to handle assemblies in blender. I feel like there should be a way to make custom snap-to points so I can take objects apart, fiddle, and then snap them perfectly back together. I can break them apart in blender, but then fitting them perfectly back together as separate objects seems super fiddly, especially when I want to design linkages for them, etc... Maybe it is just the wrong tool for the job.
If you're talking about taking apart existing game models, your best bet is probably blender as it's more in line with artist 3d software rather than Cad, the cad group of software generally aren't as compatible with poly objects used in games.
Although I don't use blender myself, I'm almost certain it is capable of separating models, adding joints, and modeling linkages as you described. Most of that just requires the basic functions of any 3D package.
These programs are so vast and complex in general that I often take the approach that anything is possible, you just need to find out where the best tool is within the program to accomplish any given task.
The 3D breakdown pictured above should give you a good indication of how I decided to break pieces apart and connect them with joints. The red objects are subtracting objects and the blue objects are additive.

ArunC posted a topic in UltiMaker Cura,


ArunC posted a topic in UltiMaker 3D printers,


Recommended Posts
owen 19
Awesome Valcrow. Well done mate.
Link to post
Share on other sites