


Arachne and "mb cura" do better on thin walls so I think they will also do better on this thin infill. But I'm not certain as the situation is a little different. Similar but different.
Interesting! I was hoping there could be a work around within the same software. Could increasing my model from 5mm to 5.4mm or 5.2mm make a difference or is this all Cura related?
Well you can change your line width a little bit. Assuming you have a 0.4mm nozzle, 0.3mm to 0.6mm line widths are printable. So if you go slightly thicker line widths you should be able to close up that gap mostly. And I think there is an option to ignore the gap if it's below a certain size. Or you can disable infill for this area of the print maybe. Hmm. I guess you'd be disabling skin. So you can disable top or bottom layers for this section of the print potentially.
You aren't going to get the gap size 100% perfect but maybe close enough if you play with the line width.
Normally you shouldn't have to mess with line width to fix this kind of thing but if you are printing 10 or more identical parts then it starts to be worth the trouble.
-
 1
1

10 hours ago, sugarjarcookies said:The Extruder 1 seems to be filling in the centre line and is visible in the print and does not have a matching smooth finish to the shell and inner wall lines.
I guess many people will say: "so what?".
If you want that surface to look better you can try ironing. Ironing only improves top surfaces but I think you implied this was the bottom of your print.

tinkergnome 927
5 hours ago, gr5 said:Or you can disable infill for this area of the print maybe. Hmm. I guess you'd be disabling skin. So you can disable top or bottom layers for this section of the print potentially.
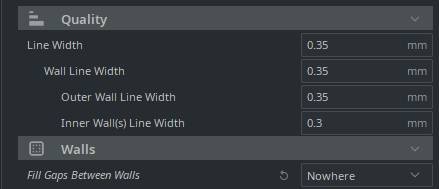
The setting is called "Fill Gaps Between Walls". That's the "small [yellow] strip" in preview. Set it to "Nowhere".
5 hours ago, gr5 said:maybe close enough if you play with the line width.
Yes, choose proper values for "Outer Wall Line Width" and "Inner Wall(s) Line Width". The goal is an even number of lines without gap. That's all.
-
2
5 hours ago, tinkergnome said:
The setting is called "Fill Gaps Between Walls". That's the "small [yellow] strip" in preview. Set it to "Nowhere".
Yes, choose proper values for "Outer Wall Line Width" and "Inner Wall(s) Line Width". The goal is an even number of lines without gap. That's all.

Amazing! Ive adjusted and running a test print now
-
Our picks
-

UltiMaker Cura 5.7 stable released
ArunC posted a topic in UltiMaker Cura,
Cura 5.7 is here and it brings a handy new workflow improvement when using Thingiverse and Cura together, as well as additional capabilities for Method series printers, and a powerful way of sharing print settings using new printer-agnostic project files! Read on to find out about all of these improvements and more.
-
-
- 26 replies
.thumb.jpeg.0b7a05eafc09add17b8338efde5852e9.jpeg)
Picked By
MariMakes, -
-
Release Notes: S-Line Firmware 8.3.0 (Latest)
Dustin posted a topic in Firmware,
S-Line Firmware 8.3.0 was released Nov. 20th on the "Latest" firmware branch.
(Sorry, was out of office when this released)
This update is for...
All UltiMaker S series
New features
Temperature status. During print preparation, the temperatures of the print cores and build plate will be shown on the display. This gives a better indication of the progress and remaining wait time. Save log files in paused state. It is now possible to save the printer's log files to USB if the currently active print job is paused. Previously, the Dump logs to USB option was only enabled if the printer was in idle state. Confirm print removal via Digital Factory. If the printer is connected to the Digital Factory, it is now possible to confirm the removal of a previous print job via the Digital Factory interface. This is useful in situations where the build plate is clear, but the operator forgot to select Confirm removal on the printer’s display. Visit this page for more information about this feature.-
-
- 0 replies
Picked By
MariMakes, -
-

.thumb.jpeg.0b7a05eafc09add17b8338efde5852e9.jpeg)
Recommended Posts
gr5 2,178
Yeah that's a common question and I'm not 100% sure of the answer. I think the new beta version of Cura (version 5.X aka archne) is supposed to do a better job with this exact issue? Maybe? I haven't been paying too much attention but you could download and try that beta version of Cura.
Also the mb version of cura seems to usually do a better job regarding this exact issue. At least it does for my models - not sure of this particular model. You can get that version of cura here:
https://github.com/smartavionics/Cura/releases
The smartavionics version is the same person as burtoogle here on this forum. I have met him personally and he has been contributing (as an outsider) to Cura for many years. I trust his code.
Link to post
Share on other sites