
The material is completely stuck in the tube, I can also feel it's brittle, so I suspect the material has been improperly stored.


The material is completely stuck in the tube, I can also feel it's brittle, so I suspect the material has been improperly stored.
Hi,
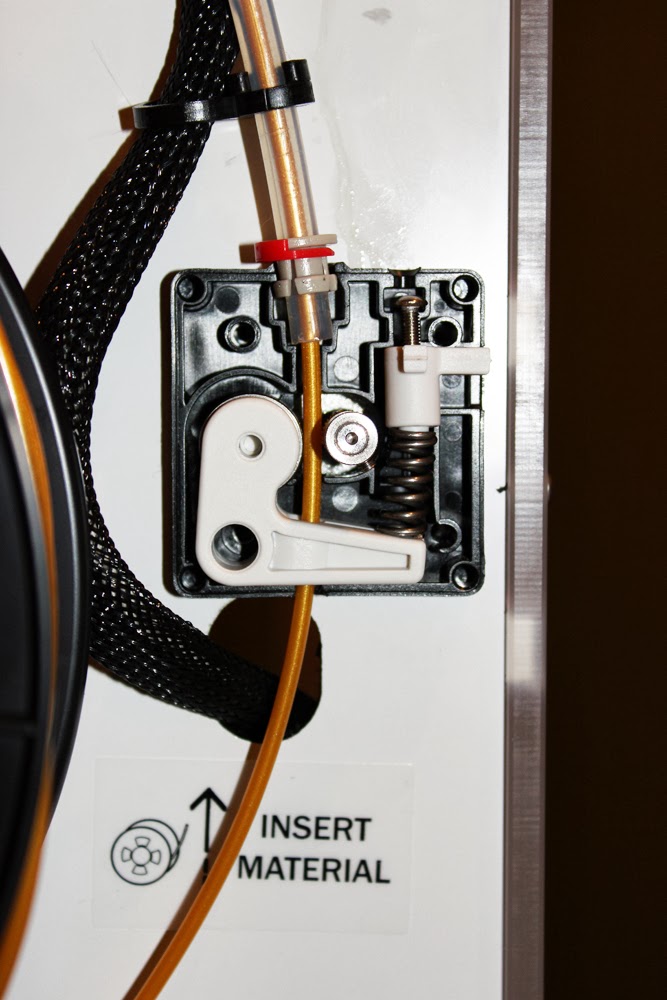
it might be off topic, but your feeder is assembled wrong.
the head of the set screw for the feeder tension must be inside the feeder housing, your's seem to be outside.
That for the feeder tension is incorrect, the indicator normally is placed mid-scale.
Regards
actual video to this topic by CNC Kitchen:
On 5/6/2022 at 7:14 PM, Enigma_M4 said:Hi,
it might be off topic, but your feeder is assembled wrong.
the head of the set screw for the feeder tension must be inside the feeder housing, your's seem to be outside.
That for the feeder tension is incorrect, the indicator normally is placed mid-scale.
Regards
Thanks for both your posts. This issue occured with other filaments too, so it's probably that the feeder is set to feed too tight, so that it ground down the filament instead of feeding it. I will attempt to decrease the tension that the feeder gives.
I found this guide on how to do it:
https://support.ultimaker.com/hc/en-us/articles/360012015880-Material-is-ground-down-by-the-feeder
I will update how it went after I'm done.
Now that I've taken a closer look, I see what you mean by that the tension screw is mounted wrong.
Edited by lukassvenssonThis is what the manual for the printer says to do, but I am unable to do this because the tension screw is mounted wrong.

Since it's not my printer I can't do anything more.
Edited by lukassvenssonAs I wrote in my first post, the set screw is the culprit.
At your feeder, the head of this screw is exposed outside the feeder housing.
But this screw head must be INSIDE the feeder, just below the hole it's sticking out, as seen on the foto of your manual:

If this screw is positioned right, it's supported by the top of the feeder housing and screwing it "out" will increase feeder tension, meaning the indicator going down. Your actual feeder tension is zero.
See this foto:
http://4.bp.blogspot.com/-f1ZVlOl_YcY/UuoslXKMBGI/AAAAAAAADhU/aeLFzASDtCQ/s1600/IMG_5787.JPG
Regards
On 5/16/2022 at 9:34 AM, Enigma_M4 said:See this foto:
http://4.bp.blogspot.com/-f1ZVlOl_YcY/UuoslXKMBGI/AAAAAAAADhU/aeLFzASDtCQ/s1600/IMG_5787.JPG
Regards
Thank you so much Enigma!
Edited by lukassvenssonThis little metal collet belongs where the filament enters the feeder housing. the larger part looking down (outside the housing), the smaller part up.
On 5/16/2022 at 10:08 AM, Enigma_M4 said:This little metal collet belongs where the filament enters the feeder housing. the larger part looking down (outside the housing), the smaller part up.
Thanks!
Edited by lukassvensson
For the UM2+ / UM3-feeder and newer, the middle position is told to be the best, and as the UM2 feeder is very close to the UM3, I'd say try middle position. Light markings on the filament show good tension. If the markings are very deep, reduce tension (scale: up), if it's grinding the filament (like your starting problem), the tension might be too lose, referring to CNC Kitchen's video.
Regards
53 minutes ago, Enigma_M4 said:For the UM2+ / UM3-feeder and newer, the middle position is told to be the best, and as the UM2 feeder is very close to the UM3, I'd say try middle position. Light markings on the filament show good tension. If the markings are very deep, reduce tension (scale: up), if it's grinding the filament (like your starting problem), the tension might be too lose, referring to CNC Kitchen's video.
Regards
Now as soon at the material is fed all the way the feeder is just jacking, unable to feed it through the printhead. I have tried the atomic method to get rid of some filament that was in the printhead, so it's not blocked. Do you think this is a separate issue, or is it caused by too lose tension?
I should explain more in depth, the feeder does accept the material with some help, then it gets to the print head, at which point it stops revolving, and instead makes a jacking motion. It's like the feeder is too weak to properly feed the material anymore.
Edited by lukassvenssonThe upper end of the scale is least tension, the lower end is most tension. the plug with the indicator sits ontop of the tension spring and is pushed down against this spring by the set screw.
What do you mean with jacking? Is the stepper motor skipping (this would be a sign of to much tension), or is the filament slipping (to little tension)?
Do the markings on the filament look like this?
As I'm getting at my wit's end, adjusting the tension gradually to the point where the filament is extruded through the nozzle and the feeder has a good grip is the only thing I can suggest.
Regards
On 5/16/2022 at 11:29 AM, Enigma_M4 said:The upper end of the scale is least tension, the lower end is most tension. the plug with the indicator sits ontop of the tension spring and is pushed down against this spring by the set screw.
What do you mean with jacking? Is the stepper motor skipping (this would be a sign of to much tension), or is the filament slipping (to little tension)?
Do the markings on the filament look like this?
As I'm getting at my wit's end, adjusting the tension gradually to the point where the filament is extruded through the nozzle and the feeder has a good grip is the only thing I can suggest.
Regards
Yes, exactly. The motor is skipping. Now the material wouldn't even eject from the feeder. I will probably give up on this printer and just assume the feeder is broken. Thank you so much for your time and expertise!
Edited by lukassvenssonIt sounds like you are almost there. You can remove the bowden tube at both ends and test 2 things:
1) how much force is needed to extrude filament when you push it in on the top of the printhead manually? Should be roughly around 10N
2) if the feeder is feeding the filament, it should be able to push with roughly 20N (because up to roughly half of the force is lost in the tube)
if your extrusion isn’t working, I suspect one of the two is wrong.
(and I hope you have all settings in Cura default)
 1
1
Hope you have resolved the issue now
Just for future reference here is a guide I wrote a few years back on how to assemble the feeder in case someone stumbles across this topic in the future:
https://support.3dverkstan.se/article/39-feeder-disassembly
As for the filament stopping at the head. This could be as simple as the filament getting stuck in one of the transitions between different sections in the head. Sometimes it can be enough to just grab the bowden tube and wiggling it around a bit from side to side and back and forth to change the direction of the filament slightly.
Another option, if you haven't already, is to cut the filament at an angle so that it has an easier time feeding all the way to the nozzle.
It can also be that you have a small gap between the end of the bowden and the top of the PTFE-part in the head (the little white part in the middle of the head, just under the spring. Make sure the bowden is as far down as it can go.
While a bit unlikely since you have successfully done an atomic (I'm assuming here that the filament you pulled out had a nice sharp point to it in the shape of the inside of the nozzle?) it could also be a worn out PTFE that needs to be replaced. To check, you kinda need to remove it to get a good look at it:
https://support.3dverkstan.se/article/56-replacing-the-ptfe-coupler
As a final note, if you have the budget for it, I would highly recommend the Extrusion upgrade kit for your printer, it will effectively turn it into and Ultimaker 2+ and is a great upgrade IMHO.
1
Thank you for this. This has been helpful to me. The extrusion upgrade kit for my printer really worked.

ArunC posted a topic in UltiMaker Cura,


ArunC posted a topic in UltiMaker 3D printers,


Recommended Posts
lukassvensson 0
I took a closer look at the feeder and it's full of crumbled plastic. This leads me to believe the PLA-plastic was old or dried out. Do you think this is a correct guess?
Link to post
Share on other sites