Jump to content

Bowden Tube Upgrade


Recommended Posts

Posted · Bowden Tube Upgrade

Hello fellow ultimaker,

I have had my printer for a couple weeks now and the bowden tube has started to slip and is clogging my machine about 6 minutes into any print. I would print these items myself, but well it can't print long enough. Would someone kindly print me this: http://www.thingiverse.com/thing:11864

I would prefer 100% infill and black if you have it. ABS or PLA is fine. I would like this as soon as possible since my printing ideas are backing up.

Additionally, if you have another or better idea, don't hesitate. This is the only way I have come up with to fix my printer.

Thanks,

Nathan


  • Link to post
    Share on other sites

    Posted · Bowden Tube Upgrade

    You definitely do not need that. You just need to preload the printhead assembly so that the teeth of the bowden retaining nubbin bite into the bowden more effectively. Also, make another thing like the blue clip, but slightly thicker, out of any material, just to get yourself back to printing.


  • Link to post
    Share on other sites

    Posted · Bowden Tube Upgrade

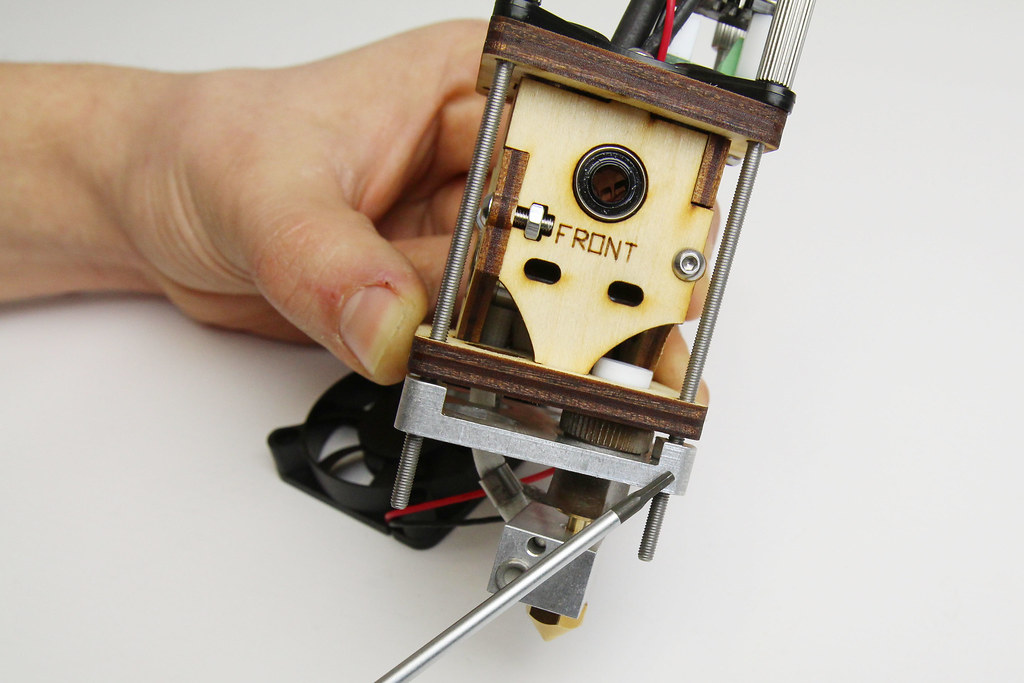
    I believe what Mr. Foley is referring to is the following (I just did it today!) assuming you have a UM1 -

    Basically, unscrew the four long bolts about 3-4mm 2-3mm. The two on the left hold the fan on using nuts which might prevent you from unscrewing those. Loosen the two nuts under the fan shroud.

    Next, while supporting the head assembly with one hand, pull the slack generated by loosening the long bolts down by pulling the aluminum heatsink plate at the bottom of the head. Make sure the heater block and heat break insert moves down with the alu plate.

    Basically you are lengthening the distance from the top plywood to the place with the Bowden tube seats in the heat break.

    Next, push the Bowden retainer part down.

    Then feed 3-4mm 2-3mm more of the Bowden tube in the head so that is seats firmly into the plastic heat break connected to the heater block.

    Now, while applying pressure to keep the Bowden tube seated firmly in the heat break, pull the Bowden retainer up and put the clip in.

    Finally, slowly tighten the four long screws back up bring the alu plate up those 3-4mm 2-3mm. Tighten a little on one bolt, then the next then the next and so on.

    As you tighten you should notice the Bowden retainer rising as the extra 3-4mm 2-3mm of tube you push in is being pushed back out. As it rises, it is clamping on the tube with significant force.

    The retainer will almost rise to a point that the clip doesn't do much as the tube is preloading the retainer upwards forcing it into the locked position.

    Install the clip but you will see that it isn't serving much purpose.


  • Link to post
    Share on other sites

    Posted · Bowden Tube Upgrade

    I'd be careful with that approach, anon. 'Lifting the clip while pushing down the tube', and 'tightening the thumbscrews after fixing the bowden' are both ways to ensure that the Bowden is fully seated and cannot move. But if you do both, you're putting a lot of extra force on the Bowden end. That might cause it to deform, and it's also putting extra force on the teflon coupler, which will encourage it to deform as well... causing more problems in the long run. You really only need to do one or the other, not both - or at least not to the extent of trying to compress the Bowden by as much as 4mm.


  • Link to post
    Share on other sites

    Posted · Bowden Tube Upgrade

    Now that you mentioned it, I didn't pull the retainer up. Just push the Bowden down with the retainer IN THE DOWN position. Then tighten the screws. As the screws are tightened, the retainer will rise into the position where it clamps the Bowden tube with a little preload.

    Sorry, I've been trying to help but I have been giving bad advice instead.

    Thanks for catching it illiminarti.


  • Link to post
    Share on other sites

    Posted · Bowden Tube Upgrade
    Link to post
    Share on other sites

    Posted · Bowden Tube Upgrade

    I had the same problem(I was missing the blue clip) and used another printer to print the bowden clamp. Works perfect!


  • Link to post
    Share on other sites

    Create an account or sign in to comment

    You need to be a member in order to leave a comment

    Create an account

    Sign up for a new account in our community. It's easy!

    Register a new account

    Sign in

    Already have an account? Sign in here.

    Sign In Now
    • Our picks

      • UltiMaker Cura 5.7 stable released
        Cura 5.7 is here and it brings a handy new workflow improvement when using Thingiverse and Cura together, as well as additional capabilities for Method series printers, and a powerful way of sharing print settings using new printer-agnostic project files! Read on to find out about all of these improvements and more. 
         
          • Like
        • 18 replies
      • S-Line Firmware 8.3.0 was released Nov. 20th on the "Latest" firmware branch.
        (Sorry, was out of office when this released)

        This update is for...
        All UltiMaker S series  
        New features
         
        Temperature status. During print preparation, the temperatures of the print cores and build plate will be shown on the display. This gives a better indication of the progress and remaining wait time. Save log files in paused state. It is now possible to save the printer's log files to USB if the currently active print job is paused. Previously, the Dump logs to USB option was only enabled if the printer was in idle state. Confirm print removal via Digital Factory. If the printer is connected to the Digital Factory, it is now possible to confirm the removal of a previous print job via the Digital Factory interface. This is useful in situations where the build plate is clear, but the operator forgot to select Confirm removal on the printer’s display. Visit this page for more information about this feature.
          • Like
        • 0 replies
    ×
    ×
    • Create New...