Jump to content

Heated bed temperature


yeshead

Recommended Posts

Posted · Heated bed temperature

Hello guys,

My first post because I have a problem but that is usually the case with new users :D .

The problem that i have is that Cura gives me the wrong tempeture for the heated bed (nothing done yet so it should be arond 20 degrees room temperature).

It gives a tempeture of 147 degrees celcius (i think because everuthing in cura is in Celsius).

I have the following hardware:

I have the Ultimaker original and because it does not have a heated bed, I made one myself.

I have build everything as told in a lot of posts thus a relay, seperate power supply, heatbed MK2 (see also picture)

ultimaker%20bed%20connections.png

The sensor for the heated bed is :

100k Glass sealed NTC Thermistor with PTFE sleeving 1 pcs

Details:

Operating Temperature: -40 / +300°C

Resistance Tolerance: 1%

Technology: Metal Oxide

Package Type: Throught Hole

Resistance: 100K

Type: Variable Resistor

@25C: 100K

R25/50C: 3990K

Tolerance: 1%

Glass Bread Diameter: 2.0 ± 0.2 mm

Leads: Dumet Wire 0.21 mm

Leads Lenghte: 32 ± 5 mm

Category: Glass sealed NTC Thermistor

I have made a firmware file through marlins builder (http://marlinbuilder.robotfuzz.com/).

I have chosen different settings for "Heated bed temperature sensor:".

The one's i tried for example:

1: 100k thermistor - best choice for EPCOS 100k (4.7k pullup)

6: 100k EPCOS - Not as accurate as table 1 (created using a fluke thermocouple) (4.7k pullup)

51:100k thermistor - EPCOS (1k pullup)

The numbers are refering to the linenumbers in the HEx file (thermal settings).

Everything looks fine but the temperature is not.

Before I try to print it would be nice if the temperature gives the right one.

I have a second thermocouple (through another device so it is NOT connected to the printer of what so ever) to check the temperature of the heated bed (just for test until the printer works fine) and this one gives me 22 degrees so the NTC should give me the same more or less but not 147!.

Has anyone of you a clou to what this problem can be?


  • Link to post
    Share on other sites

    Posted · Heated bed temperature

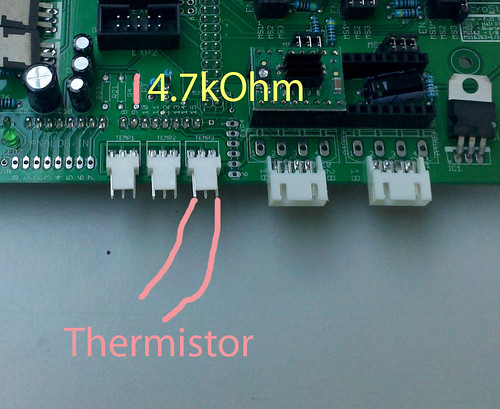
    The resistor (4.7 kOhm) is attached as indicated, see also picture here that i took from the wiki of ultimaker (this one is better to view):

    9190518639_1cb929b392.jpg

    I have checked if the resistor has the right resistance.

    If I use the choice "1: 100k thermistor - best choice for EPCOS 100k (4.7k pullup)" the temperature is much higher (I thought 278 but i'm not sure anymore but much more that's for sure).

    If i put a finger on the glass plate for some time, it looks that the thermistor is register it because it changed a little in temperature (2 degrees).


  • Link to post
    Share on other sites

    Posted · Heated bed temperature

    Does anyone know where to look at to tackle this failure?

    Because of this I can't use my printer and because I don't know where to look what causes this much too high bed temperature (printer has not printed so the temp. should be at room temp.).

    Is it hardware of because of the (wrong?) firmware?

    I have tried several settings in the firmware and they get all a different heated bed temperature but none is right .

    Can I something do with a table to rever to (to calcuate the temp?).

    I hope you guy's can help me out.


  • Link to post
    Share on other sites

    Posted · Heated bed temperature

    It should be closer than that. But none of the tables match your thermister exactly. But you should get within 20C.

    First you need a table of resistance to temperature conversion for your part. Honestly it might be easier to order a different thermistor. I looked for 5 minutes but couldn't find a table for your part.

    The B25/50C of 3990K tells you the shape of the curve. It is saying you can use a Beta value of 3990K and it will be reliable for temperature between 25C and 50C. That's good because your heated bed won't be much hotter than that (100C?).

    None of the resistors here have that beta:

    http://reprap.org/wiki/Thermistor

    Really you should be able to find a datasheet from the manufacturer.

    STEP 2:

    Turn on power and measure the voltage across the thermistor. The voltage formula is:

    vtherm = (Rtherm/(4700+Rtherm) X 5V

    Or solving for Rtherm

    Rtherm = 4700 V / (5-V)

    So in other words at 25C Rtherm should be 100K and vtherm should be 4.775 volts.

    Make sure all that is working - make sure the voltage is correct for room temp. I suspect that step will fail - I suspect your 4.7k is loose or is actually 4.8k or something. Or one of your wires is not a good connection.

    Once you figure all that out it's time to fix the table. Unfortunately your thermister doesn't match any of the tables. You will have to make your own table. The tables are in thermistortables.h. You can edit this file easily and insert your own table. It comes with instructions and reprap.org has spreadsheets for calculating a table also I think.

    Then you have to build Marlin:

    First get the source code files here:

    https://github.com/ErikZalm/Marlin

    Then edit Configuration.h – this is by far the hardest step and it's not bad. I recommend you go here:

    http://marlinbuilder.robotfuzz.com/

    and use that website only to get the Configuration.h file. Then run winmerge or some other diff program to compare the latest ErikZalm version of Configuration.h to the one from robotfuzz which is usually a few months behind. Edit the ErikZalm version to match the robotfuzz generated version. Make any other edits as necessary. It sound complicated but it is extremely clear and well commented. Sometimes with paragraphs of explanation.

    configuration.h file detailed explanation:

    http://airtripper.com/1145/marlin-firmware-v1-basic-configuration-set-up-guide/

    Then you need to build Marlin. There are instructions that come with the erik zalm download in the "README.md" text file.

    Basically you download and install arduino ide:

    http://arduino.cc/en/main/software

    Then copy the sanguino software as explained in README file. Open Marlin.ino file in Arduino IDE by double clicking it (not pde file as stated in README - I think that's old). Select board as "Mega 2560" as explained in README file. Go to "file" "preferences" and select "verbose output" so you can find your hex file. Then build it by clicking the check box in the upper left corner. At the bottom you will see it compiling Marlin. At the end of this it says where the hex file is. If you are currently connected to your UM through USB you can just click "file" "upload" and you are done! But you should locate that hex file and save it somewhere along with the Configuration.h file used to create it so you can recreate the same version with maybe one change. Also you can upload the hex file using Cura in expert menu.

    Alternatively you can build Marlin with somewhat more detailed step by step instructions the command line way (which I don't prefer):

    http://www.extrudable.me/2013/05/03/building-marlin-from-scratch/


  • Link to post
    Share on other sites

    Posted · Heated bed temperature

    Hey Guys,

    I'm really glad that I found this topic.

    I have bought a heated bed kit (http://www.ebay.com/itm/Heated-Bed-Kit-for-Ultimaker-Reprap-3d-Printers-MK2-PCB-Aluminium-plate-/161157442118?pt=LH_DefaultDomain_0&hash=item2585bb6a46), with a proper power supply. My problem is that i don't know which thermistor should i choose at http://marlinbuilder.robotfuzz.com/ firmware generator, and which slot should I solder how big resistance onto.

    After giving it the first try it said that the bed temp is 357 °C, at room temp (without the resistance soldered).

    Thanks for your help, regards

    Denes


  • Link to post
    Share on other sites

    Posted · Heated bed temperature

    You need to have the resistor solder in. Any reading without it is going to be wrong.


  • Link to post
    Share on other sites

    Posted · Heated bed temperature

    It has been a while that i posted this topic.

    @gr5....

    I have measured the voltage over the resistance with the power on.

    The room temperature was 18 degrees celsius and i measured a voltage of 3,81 Volt.

    The resistance could not be measured with the power on but when I disconnected the power, the resistance measured (the resistance was still soldered to the board) was 105 kOhm.

    To check if the resistance is correct, i have to cut out the resistance but before I do that, i would like to know if your opinion is still that the resistance is not the correct one.

    To cut out the resistance and replace it it is a lot of work so therefore i would first like to know if it is better to do so.

    Another thing i would like to know which thermistor is better to use.

    You said that there was no datasheet for my thermistor so if you have a better one that i can order in the Netherlands, please let me know.


  • Link to post
    Share on other sites

    Posted · Heated bed temperature

    Ok a little it of theory.

    The schematic.

    +5

    |

    -

    | |

    | | R pullup

    | |

    -

    |

    + ---- Messure

    |

    -

    | |

    \ Th R thermistor

    | |

    -

    |

    Gnd

    The value of a thermistor is usualy messures at 25 degree celsius.

    In youre case 100 K. Just messure it with a good multimeter.

    Wat would you messure in the above schematig?

    I = U / (Rp + Rth)

    Um = I * RTh

    Um = Rth * U / Rp+Rth)

    Um = 100000 * 5 / 100000 + 4700

    This is about 4.77 volt.

    What happens wen the termistor heats up?

    The resistans drops.

    Then te voltage on M drops too.

    When the thermistor is 4k7 ohm, the voltage is 2.5 volt.

    4.7 K is the ideal operating point. From the top of my head i don't know what temp that is.

    What if the you short the thermistor?

    Youre reading is 0 volt and you think it is very hot.

    What is the thermistor is open or removed?

    You messure a high voltage and think it is cold.

    Another clue is the replacement thermistor.

    With this the reading is normal.

    So I think you have a short in the wireing to the thermistor.

  • Link to post
    Share on other sites

    Posted · Heated bed temperature

    Is your problem already solved?

  • Link to post
    Share on other sites

    Posted · Heated bed temperature

    If he had a short he would get 0V or 5V, right? Not 3.81V.


    i have to cut out the resistance


    You can measure resistance while only cutting one side of the resistor out of the equation. The easiest way to do that is to remove the thermistor which shouldn't be soldered in but is connected by 2 wires under 2 screws. No cutting necessary.


  • Link to post
    Share on other sites

    Posted · Heated bed temperature

    Yes you are right.


    If he had a short he would get 0V or 5V, right? Not 3.81V.


    For the OP. What colour code is the resistor?

  • Link to post
    Share on other sites

    Posted · Heated bed temperature

    voltage to ultimaker = R/(4.7k + R) * 5V (R is thermistor resistance)

    Solving for R we can calculate the resistance of the thermistor: R= 4.7k*Vout / (5 - Vout)

    or R= 4.7*3.81 / (5 - 3.81) = 15K

    That would imply a 15K thermistor.

    Or assuming the thermistor is correct we can check the "4.7K" resistor and get that it is closer to 47k ohms.

    So something is definitely wrong. Either the thermistor is closer to 10k or the 4.7k is actually more like 47k.


  • Link to post
    Share on other sites

    Posted · Heated bed temperature

    As far as parts in netherlands - google "rep rap thermister" or use ebay or some other "store". Make sure it's one (e.g. epcos) that is associated with "rep rap" preferably one that specifically is mentioned in the Marlin source code in the thermistor tables .h file.


  • Link to post
    Share on other sites

    Posted · Heated bed temperature

    I was planning to make a step by step list with what to do to solve his problem, but if he is not responding than it has no use.

  • Link to post
    Share on other sites

    Posted · Heated bed temperature

    I know what you mean! There's just too many steps and his problem probably only requires 10% the use of the steps! Because you have to think of 30 possible problems. So lets just wait for him to do a little work.


  • Link to post
    Share on other sites

    Create an account or sign in to comment

    You need to be a member in order to leave a comment

    Create an account

    Sign up for a new account in our community. It's easy!

    Register a new account

    Sign in

    Already have an account? Sign in here.

    Sign In Now
    • Our picks

      • UltiMaker Cura 5.7 stable released
        Cura 5.7 is here and it brings a handy new workflow improvement when using Thingiverse and Cura together, as well as additional capabilities for Method series printers, and a powerful way of sharing print settings using new printer-agnostic project files! Read on to find out about all of these improvements and more. 
         
          • Like
        • 16 replies
      • S-Line Firmware 8.3.0 was released Nov. 20th on the "Latest" firmware branch.
        (Sorry, was out of office when this released)

        This update is for...
        All UltiMaker S series  
        New features
         
        Temperature status. During print preparation, the temperatures of the print cores and build plate will be shown on the display. This gives a better indication of the progress and remaining wait time. Save log files in paused state. It is now possible to save the printer's log files to USB if the currently active print job is paused. Previously, the Dump logs to USB option was only enabled if the printer was in idle state. Confirm print removal via Digital Factory. If the printer is connected to the Digital Factory, it is now possible to confirm the removal of a previous print job via the Digital Factory interface. This is useful in situations where the build plate is clear, but the operator forgot to select Confirm removal on the printer’s display. Visit this page for more information about this feature.
          • Like
        • 0 replies
    ×
    ×
    • Create New...