Jump to content

Glass plate not flat


axsdenied

Recommended Posts

Posted · Glass plate not flat

After having issues with printing a large enclosure (200x200mm), eventually I noticed that the glass plate is not flat. In the direction of the width of the printer the middle seems to be almost 0.5mm lower than the edges. The biggest "dip" happens about 50mm from the edges which explains why I did not have problems with the smaller prints. The surface of the printed enclosure follows the curvature of the glass.

It is difficult to see the gap between the ruler and the glass plate in the photo but if you zoom in, look around 100mm and 200mm mark (the gap is similar around 150 but not quite visible in the photo).

IMG 20150126 002718

In the other direction the plate is almost perfectly flat - this also rules out that my ruler is not straight.

The printer is about a month old (bought brand new via Australian reseller). What to do? Is it worth chasing up warranty and with who? What kind of glass is it? Can I buy it somewhere local?


  • Link to post
    Share on other sites

    Posted · Glass plate not flat

    Also,

    When I received my heated bed upgrade, I noticed some protruding screws from the heating plate.

    I shortened the screw heads a little, and they now are flush with the heating-plate,

    thus the glass plate is in better contact with the heating plate.

    I guess it is now a better situation for flatness and heating the glass plate.


  • Link to post
    Share on other sites

    Posted · Glass plate not flat

    I noticed some protruding screws from the heating plate


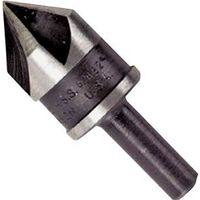
    This is extremely common and annoying that UM doesn't fix this before shipping. But the fix is very easy and cheap - use a normal drill bit or better get one of these coutnersink bits - they are very useful for other projects as well:

    1690056.jpg

    If that doesn't fix it, flip the glass over and if the curve goes the other way then it must be the glass. You can get a free glass plate from UM support (even though you bought through a reseller). So that's always an option.

    Also you can buy your own glass -it's not expensive. Every country has houses and buildings with glass windows and every town (that is full of buildings with windows) has a local glass store where they custom cut window panes and such. They can custom cut a piece for you and even grind the corners smooth all for the cost of a few fancy cups of coffee. You don't have to get tempered but that's what Ultimaker uses. More importantly you need to get it the correct thickness to fit the clips and for strength (typical window panes are much thinner).


  • Link to post
    Share on other sites

    Posted · Glass plate not flat

    Thank you for your replies.

    1. The back of the glass is curved the same way... or is it the other way :smile:

    Anyway, it is concave on one side and convex on the other so glass is clearly "bent".

    Using the back would be even worse for lifting of edges as that way the space between the head and glass would be larger at corners.

    2. Several screw heads are sticking out. This is a great tip as clearly the glass plate does not make a good thermal contact with the heater plate.

    I will countersink the holes a bit more but the difficulty is that removing the heating plate will void the warranty (need to remove the sticker)... or work in a really awkward position.

    This got me thinking so I measured the glass temperature using a thermocouple (I squashed it very well to get a good thermal contact). I set the plate to 70 degrees and when the UM2 told me that it was ready, the temperature on the glass was ranging between 35 and 45 degrees. It took at least another 5 min before it reached 65-ish degrees and stabilised there.

    So:

    - If temperature of the bed is critical (ABS, XT) I will wait few min after bed is heated up before starting a print.

    - Temperature seems to be 5 degrees off. I measured temperature of the build plate and it varies between front and back by 5-10 degrees (using IR thermometer as well to confirm). So the next step is a door... and a roof...

    Anyway, thank you again for your replies. This forum and people on it are the best help I have ever seen!!!


  • Link to post
    Share on other sites

    Posted · Glass plate not flat

    I have the older UM2's before they added the sticker. Are you saying you can't countersink without removing the sticker?

    That sucks. Although I believe if you call them, explain the problem, tell them you promise to be careful, they will tell you to go ahead and countersink the screws. And probably send you a new glass plate also. They are very nice. Just might take 4 days for them to get back to you. You might want to call - their english is fantastic and they often respond immediately to a phone call if it's roughly 9am to 5pm netherlands time (that's probably until 11pm your time I would guess).

    I'm not sure but I think the 5C drop is normal and basically expected. That's why a given bed temp on one printer might be different than on another (it depends if you print on aluminum plate or glass, fan speed, other factors).

    I always print 110C for ABS. 50C for PLA.


  • Link to post
    Share on other sites

    Posted · Glass plate not flat

    I'm not certain but I think that sticker means "you can take the sticker off without voiding warranty but only if you call us first so we can explain in detail the many ways you can break the thing and what to be really really careful about". But I could be wrong.


  • Link to post
    Share on other sites

    Posted · Glass plate not flat

    I managed to countersink the holes a bit better without removing the heater cable (and the sticker). The cable is just long enough to reach outside the UM2 enclosure so I was able to do it with a hand drill.

    Unfortunately I did not measure the time but I would say it takes a bit longer before the printing starts now which would imply that more heat is transferred to the glass plate. I did measure the glass temperature and it is at least 5 degrees higher at the end of warming up phase than before countersinking. It still takes few more minutes before the glass reaches equilibrium.

    This may be an useful option in the firmware, to be able to set "delay time" between heating of the plate and the start of printing. Or an automatic pause until a button is pressed. I tried manually pausing it last night but it printed half if a brim before the actual pause.

    I know that with ABS and enclosed printer people manually heat plate and wait 10min so that the air in the enclosure warms up.

    Thanks again for the tip!!!

  • Link to post
    Share on other sites

    Posted · Glass plate not flat

    I always preheat. I like to be there for the initial "purging of the nozzle" and to see the initial brim or skirt go down to check that it is the right thickness. The procedure is always varying but typically I will:

    When I have a model to be printed...

    MAINTENANCE ADVANCED BED_TEMP set to 50C. Nozzle set to 100C to 150C. Then grab the SD card and go upstairs to my main computer and stick it in. Then I do the slicing, look at it carefully, adjust a few parameters, check slice view, save to hard drive and also SD card. Usually when I get back to the printer it's been sitting there at least 3 minutes - sometimes 10 minutes and is almost ready to print.

    I wish that ON POWER UP ONLY - Marlin would have a menu option "PREHEAT" on home screen. I almost always do this first thing when powering on the machine. 95% of the time.


  • Link to post
    Share on other sites

    Posted · Glass plate not flat

    Oh by the way - once you select PRINT and choose a gcode file, if you go to the TUNE menu and set temps there, you can walk away for as long as you want and it won't start printing until you exit the TUNE menu.


    • Like 1
    Link to post
    Share on other sites

    Posted · Glass plate not flat

    My bed differs many mm from side to side in the back end, impossible to print on.

    Also extrusion problems cant even print in 0,40*0,1*20mm/s or anything else for that matter, and tried all the fixes i found on the big all knowing web.


  • Link to post
    Share on other sites

    Posted · Glass plate not flat

    My bed differs many mm from side to side in the back end, impossible to print on.


    If you read above, there are 3 possible causes - you need to figure out which one it is (rods not parallel, screws pushing up on glass or bad glass). All 3 are easily and quickly fixed, the glass itself best to get from customer support.


    Also extrusion problems cant even print in 0,40*0,1*20mm/s o


    Could be nozzle is not at the temp you think - that's printing quite slow though.

    More likely you have a bad isolator that needs drilling out or a nozzle that needs cleaning. The easiest fix is the cold pull for the nozzle (also known as atomic method):

    http://umforum.ultimaker.com/index.php?/topic/4118-blocked-nozzle/?p=33691


    If that doesn't work it may require disassembling the print head and burning out anything in there. Check the white teflon isolator while it's apart by passing curved raw filament through it and checking for high friction.


  • Link to post
    Share on other sites

    Posted · Glass plate not flat

    If you read above, there are 3 possible causes - you need to figure out which one it is (rods not parallel, screws pushing up on glass or bad glass). All 3 are easily and quickly fixed, the glass itself best to get from customer support.

    Could be nozzle is not at the temp you think - that's printing quite slow though.

    More likely you have a bad isolator that needs drilling out or a nozzle that needs cleaning. The easiest fix is the cold pull for the nozzle (also known as atomic method):

    http://umforum.ultimaker.com/index.php?/topic/4118-blocked-nozzle/?p=33691


    If that doesn't work it may require disassembling the print head and burning out anything in there. Check the white teflon isolator while it's apart by passing curved raw filament through it and checking for high friction.

    Hello, not to be rude, but i have donne and checked all the above, and no problem with the nozel, no prob with the isolator, however dont khnow if this mather but the machine itself isent level, one leg is 5mm above the table thinking the rods is atatched to the sides, and if it isent eavenly assembeld sould that make the "nozel" go in a up and down motion and drag the plate and not the bed being uneven, sorry my bad english.

    // Joakim


  • Link to post
    Share on other sites

    Posted · Glass plate not flat

    I'm just going to start by saying I love my Ultimaker 2 and the guys at Ultimaker UK are all great and very helpful.

    But, I've had 3 build plates for my printer, first that came with the U2 was perfectly flat, but I had a little bit to much heat on the bed and the print ripped up bits off glass.

    Ordered a new one, arrived and put it on my surface table. Carefully measured it with my mitutoyo vernier and had a high point of almost 0.5mm

    This was fine for small prints not for anything over 25/30mm either side of the centre point.

    Ultimaker kindly sent me a replacement which had the same problem, only not as bad.

    Spoke to them and the said I should be using a raft to print on, but I don't won't rough prints on the bottom.

    As this printer can print at 20Microns, if the glass isn't flat, it's never going to work.

    Might try and find a glass supplier who can guarantee a minimum tolerance on warp.

  • Link to post
    Share on other sites

    Posted · Glass plate not flat

    Are you sure it's the glass? and not something else? Is the glass flat if you remove it from the printer? It's very very rare for glass to be warped - especially since it's so easy to warp it by having a screw stick up too much. I had to counter sink my 3 leveling screw head holes.

  • Link to post
    Share on other sites

    Posted · Glass plate not flat

    On my bed the two sides where the glass it's cliped (front) the level it's always 0.12-0.15 different than the center and the sides near the bottom. Could that be by the screws? I bough 2 additio al glasses from ultimaker and both do the same problem so I suppose the problem it's this. The think it's that near the clips the bed it's lower and on the center and front center it's higher. By drilling the screw holes this could or couldn't be fixed?

  • Link to post
    Share on other sites

    Posted · Glass plate not flat

    Purchase a countersink like this one - you will find it useful for other things also:

    l_90392.jpg

    • Like 1
    Link to post
    Share on other sites

    Posted · Glass plate not flat

    Hi gr5,

    I was assembling my 2 new umo+ (one it's a hybrid but most of the important stuff it's from ultimaker).

    And I finally saw what you mean (sorry It's the first time I assembly one of this machines, so fun btw).

    Left it's the bed that did come with the heated bed upgrade for umo, right it's the bed that was with the umo+ full diy kit.

    FullSizeRender-1.thumb.jpg.35f6be95cf92454c6e2d4bc0b2564815.jpg

    FullSizeRender-2.thumb.jpg.940681125876a9c6435cb7d84178f32b.jpg

    IMG_6372.thumb.JPG.84108ad30ad14e9de91707e2d9547140.JPG

    I ordered the drill bit a week ago but amazon didn't delivered as promised, so I'll wait to finish the bed assembly. Thanks @gr5

    FullSizeRender-1.thumb.jpg.35f6be95cf92454c6e2d4bc0b2564815.jpg

    FullSizeRender-2.thumb.jpg.940681125876a9c6435cb7d84178f32b.jpg

    IMG_6372.thumb.JPG.84108ad30ad14e9de91707e2d9547140.JPG

    • Like 1
    Link to post
    Share on other sites

    Posted (edited) · Glass plate not flat

    Well the problem on the new beds wasn't what was curving up mine. The screws where perfect bellow the level (on my main machine not the bed of the photos). So I 'brute force' it pressing down the frontal center (that area was 0.15mm up on the central front). Now the glass sits perfectly flat over the heating bed and the leveling stays at the same on all the areas. I have now a gap of 0.01-0.02 with the gauge but the bed seems to heat just nice (checked with thermal camera).

    Edited by Guest
  • Link to post
    Share on other sites

    Create an account or sign in to comment

    You need to be a member in order to leave a comment

    Create an account

    Sign up for a new account in our community. It's easy!

    Register a new account

    Sign in

    Already have an account? Sign in here.

    Sign In Now
    • Our picks

      • UltiMaker Cura 5.7 stable released
        Cura 5.7 is here and it brings a handy new workflow improvement when using Thingiverse and Cura together, as well as additional capabilities for Method series printers, and a powerful way of sharing print settings using new printer-agnostic project files! Read on to find out about all of these improvements and more. 
         
          • Like
        • 18 replies
      • S-Line Firmware 8.3.0 was released Nov. 20th on the "Latest" firmware branch.
        (Sorry, was out of office when this released)

        This update is for...
        All UltiMaker S series  
        New features
         
        Temperature status. During print preparation, the temperatures of the print cores and build plate will be shown on the display. This gives a better indication of the progress and remaining wait time. Save log files in paused state. It is now possible to save the printer's log files to USB if the currently active print job is paused. Previously, the Dump logs to USB option was only enabled if the printer was in idle state. Confirm print removal via Digital Factory. If the printer is connected to the Digital Factory, it is now possible to confirm the removal of a previous print job via the Digital Factory interface. This is useful in situations where the build plate is clear, but the operator forgot to select Confirm removal on the printer’s display. Visit this page for more information about this feature.
          • Like
        • 0 replies
    ×
    ×
    • Create New...