did you try putting the glass bed in the freezer?
maybe blue tape next time.
Ed
did you try putting the glass bed in the freezer?
maybe blue tape next time.
Ed
Super! i actually came here after some time to see if anyone had a decent dual fan upgrade for the original utimaker, mainly due to the odd fan voltage. many thanks
Hi Ed,
The second attempt worked like a charm, printed it with bed 60, no glue, pops right off at room temperature
im still flomoxed by the wiring. after taking my fan off my ultimaker origonal, the fan that came with the ultimaker and that works perfectly fine, it says 12V on it, but everyone is saying you need 24V fans?
I used 12v
I used 12v
Yeah but please explain that they give you quite the week to adjust them.
24V fans can handle better 19V than 12V fans. Also not all 12V fans will work, some when connected to 19V will just die.
Personally I would install cut down voltage if you want to plug 12V on a umo. Or just 24V fans
Also it's very important than the fans have pwm, not all the sellers list that spec.
If I can give you a hand here I am.
Edited by Guest
I used 12v
Yeah but please explain that they give you quite the week to adjust them.
24V fans can handle better 19V than 12V fans. Also not all 12V fans will work, some when connected to 19V will just die.
Personally I would install cut down voltage if you want to plug 12V on a umo. Or just 24V fans
Also it's very important than the fans have pwm, not all the sellers list that spec.
If I can give you a hand here I am.
my point was my ultimaker was already on a single 12V fan, not a 24 v one,and works perfectly fine.
Sure @0235 One 12V fan, the one from Ultimaker works. The thing it's that if you use x2 of the same model I remember (can't find it) some posts concerning about the power use and heat on the transistor of the umo 1.5.7 board. I really can't find it sorry.
There are 12v fans that work, would x2 of the same model fan work? Don't know, I only have umo+ boards. I know that for example @Lepaul went on the route of buying other x2 12v fans that do work, with some tweaking like:
- Slow Fan PWM
- He can run the fans from 0/255 to 14/255 that's the range to have them from off to full air.
- He can't use fankickstart (that's actually an advange since some fans need a 'kick' to start spinning, for example mines 40x40x20 24v fans or the 30x30x10 12V (soldered in series not parallel so they consume 24v) um2 fans.
For the 'Slow Fan PWM', if you ever need it, @Amedee did set that option on the Experimental Firmware generator https://bultimaker.bulles.eu/experimental/
So why Ultimaker used a 12V fan on a 19V plug? No idea, probably they did choose a model that does work perfectly, but I don't think that they designed to use that fans x2 times, but also I can't know. What I mean it's that, it might (or not) break something on your board.
@0235 and @neotko , sorry for not posting more completely...earlier in this thread I detailed what I did.
0235, like neotko says, it can be done but you have to watch out for two things...
1) amps
2) pwm
I found some 12v fans that fit, low amp and fit the shroud he designed. I also picked out that had a large CFM flow....in hindsight I might have opted for something less powerful
I can't recall what the max amperage is for the connection the UMO has?
I followed neo's steps. I had to do some fine tuning with the firmware settings (Neo I think Amedee's steps on on my forum, might be handy for this thread?)
Basically you can get an error on the first layer the first time the fan comes on...using the Slow PWM and other steps solves this.
So becuse i have brought a second identical fan to what i already have it should be ok, iw ill just need to do some tweaks when i upgrade my marlin firmware?
I also saw someone on thingiverse that due tothe extra power draw, you may need to add a heatsink to the "12V voltage regulator on the UM motherboard" anyone know where this is? Im at a complete loss when electronics involve more than soldering model railway power conections
You found a matching fan? Nice?
My stock fan had a bad bearing, so it had to go...i slight tap made the chattering stop...but that wouldn't work forever.
I did what neo details, spliced the second fan into the first. If the second fan has a connector, snip it off and solder into first. When you finish that, pay attention to where your wiring rests....you don't want it near the heat/sensor wire.
Thanks @LePaul ! Yeah @0235 I did read the same about the heatsink. Sincerely I can't know, I never had a umo board to play with, it might or not work, it might or not break. It's the 'schrodinger fan' scenario. Also, a year & a half ago I didn't knew a thing about soldering, and men isn't that hard in the end, but ofc I had to learn because I broke stuff toying with it
I wonder if someone with more experience installing a second fan on their umo could share his experience. Also, worse case you could get the x2 fans of LePaul, he already did all the pain experience of tunning and setting all up. Also @LePaul yea link away the more info the better!
Okay....
Here the Link on my forum, showing the steps I went through with Amedee to tune the firmware
And as you can see, it's a bit of a process but we had fun along the way learning
I was using @neotko's fan shroud since quite some time, but with the time it tended to deform, the fans are pushing on the brackets and these were too flexible (in nGen).
So I had the idea of milling a fan support in fiber glass instead of using a printed one. This is much more rigid.
First print: total success, my best robot ever
That's a really good idea. Is that one-piece drawing available? I could mill that on the CNC and eliminate that "droop" (Im using 50mm fans tho)
Edited by GuestI was using @neotko's fan shroud since quite some time, but with the time it tended to deform, the fans are pushing on the brackets and these were too flexible (in nGen).
So I had the idea of milling a fan support in fiber glass instead of using a printed one. This is much more rigid.
First print: total success, my best robot ever
I think I should have some time tomorrow to fix the fancap hopes when prints. Also if anyone wants to use this fancap is the 'beta' untested, that uses the same airflow of the umo+2 fancaps I use on my printers (did spend a lot of time on airflow simulations to finish it).
Sounds good! Thanks!
I also saw someone on thingiverse that due tothe extra power draw, you may need to add a heatsink to the "12V voltage regulator on the UM motherboard" anyone know where this is? Im at a complete loss when electronics involve more than soldering model railway power conections
This answer is probably overdue, but that statement does not make any sense.
The 12v regulator on 1.5.7 boards is only there to power the Arduino and nothing else.
The fan gets plain 19v through a BD679 transistor which can easily take a couple of amps at saturation.
I was using @neotko's fan shroud since quite some time, but with the time it tended to deform, the fans are pushing on the brackets and these were too flexible (in nGen).
So I had the idea of milling a fan support in fiber glass instead of using a printed one. This is much more rigid.
First print: total success, my best robot ever
Updated the Youmagine design with v3 versions for amedee's mod
Edited by GuestUpdate. @Amedee made a very interesting mod for this fancap, so I adapted a bit to his specs the untested design v2 and now is a v3, it cools much better than the basic design but is only for 40x40 fans (IMO the best ones)So added this two files. The 'Scalable tops' Can be scaled to the user need, if you use Cura, do 'Merge' then scale the part to your needs. If you use S3D, just group and do the same.
For Amedee Mod Umofancap40x40v3.STL – 1.2 mb
I was using @neotko's fan shroud since quite some time, but with the time it tended to deform, the fans are pushing on the brackets and these were too flexible (in nGen).
So I had the idea of milling a fan support in fiber glass instead of using a printed one. This is much more rigid.
First print: total success, my best robot ever
Updated the Youmagine design with v3 versions for amedee's mod
Update. @Amedee made a very interesting mod for this fancap, so I adapted a bit to his specs the untested design v2 and now is a v3, it cools much better than the basic design but is only for 40x40 fans (IMO the best ones)So added this two files. The 'Scalable tops' Can be scaled to the user need, if you use Cura, do 'Merge' then scale the part to your needs. If you use S3D, just group and do the same.
For Amedee Mod Umofancap40x40v3.STL – 1.2 mb
@Amedee if you give me the height that you used to extrude the top so it fits for you I can just change it. Anyhow, with the modular top it should be very easy to add/remove/scale it's z
Edited by Guest@neotko -- I added 1.5mm
But I can do it easily, it is just a quick extrude, and I'll import it anyway in Fusion to check that it all fits before printing.
I have printed now about 10 hours of PLA close to the bed without much fan with this test shroud printed in Polymaker PC-Max and so far no sign of deformation. Obviously we need longer runs at higher temps, but so far so good.
Also the fiberglass holder is much more rigid than the previous printed parts (I initially planned to mill it in carbon, but I had no plate in stock, so I went to fiberglass (G10), much cheaper and apparently good enough for that)
I'll do a fa cap reprint with your latest version tomorrow.
Recommended Posts
Top Posters In This Topic
45
22
14
10
Popular Days
Apr 18
14
Apr 17
13
May 13
12
Sep 4
10
Top Posters In This Topic
neotko 45 posts
Titus 22 posts
amedee 14 posts
LePaul 10 posts
Popular Days
Apr 18 2016
14 posts
Apr 17 2016
13 posts
May 13 2016
12 posts
Sep 4 2016
10 posts
Posted Images
LePaul 331
It was a long ride for sure.
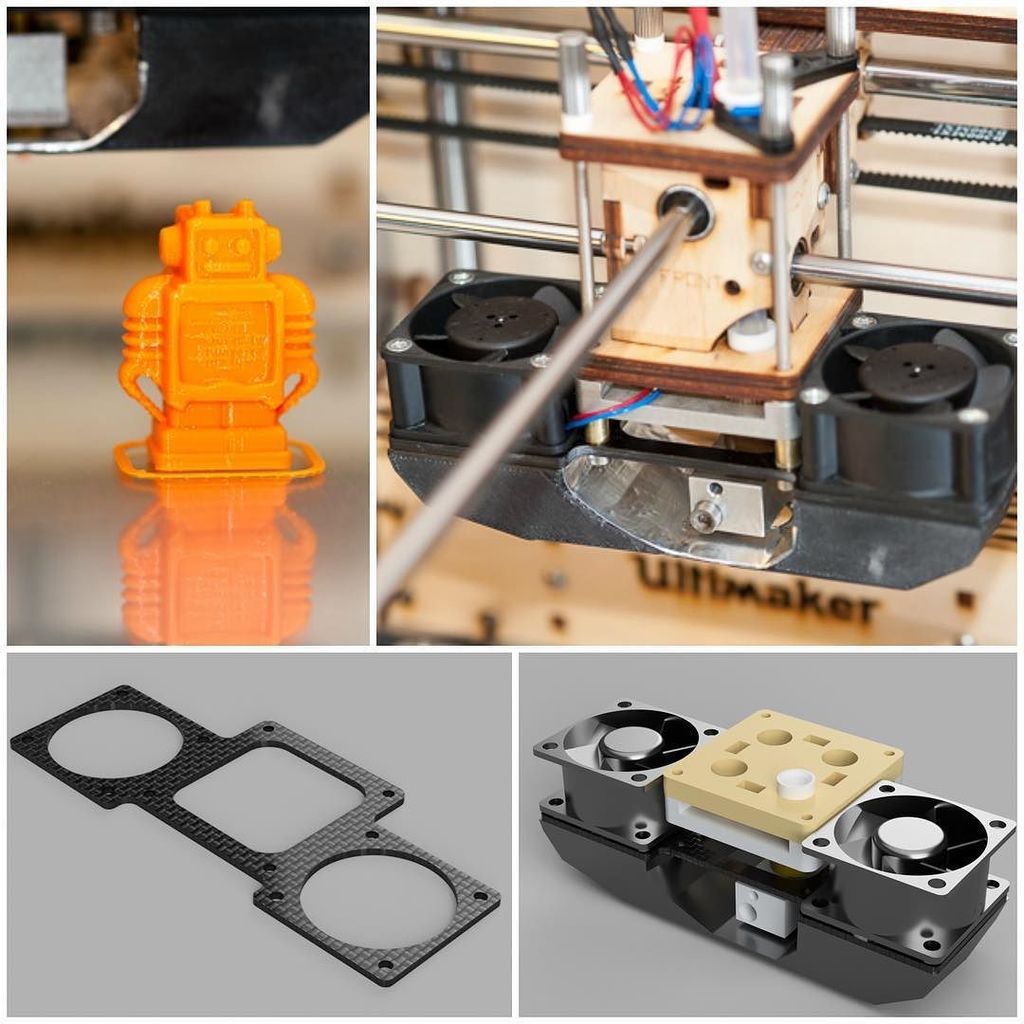
Trouble making the shroud with XT-CF20 was tough. I may give the Carbon Filament filament another try and make a better shroud with a smaller opening (I made mine a little too big). Colorfabb gave me some detailed settings to try out.
I definitely went way outside my comfort zone on this upgrade and I'm glad I did so.
And I certainly have a lot of envy for those who have shiny new Ulitmaker 2+ that printer this nice out of the box
Link to post
Share on other sites