


Oh yeah, you can do text too of course

Excellent guide! I'll definitely refer back to it when I start printing christmas presents :-)
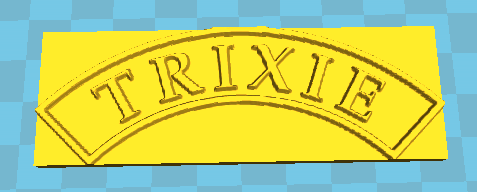
Thanks for the instructions, cool dude :wink: , but that's not what I was after. Here's a picture of a name plate for a model steam traction engine:

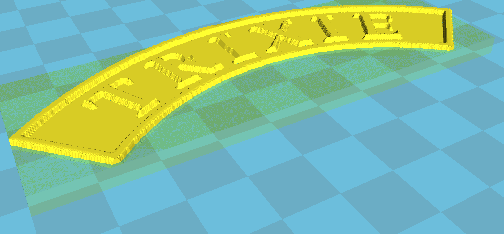
Here's what Cura produces:
I want the model to follow the outline of the name plate.
( by the way, mine is a microsoft-free home, so I couldn't have used zsurf anyway :-| )
Well that's easy! First make it so that in the image, the space around the letters is not the same color as outside the curved area. For example the letters and border could be black, the background white and the spac around the letters could be gray. Or a very light gray.
Then pull it into cura like you already did and under "advanced" "quality" "cut off object bottom" set this to maybe .1mm or 1mm or whatever it takes to get rid of that outer area.
Trouble is, I need the base & that's what causes the rectangle ( I'm using Height 1.5 & base 4 ) & that's what I want to follow the profile of the border. If I cut off the bottom, I just cut a bit off the base :-| .
I could do as you suggest then print a seperate base from another model then stick them together, bit it would be good to print it all in one.
( the object of the exersise by the way, is to produce patterns for sand casting name plates )
You could always just model it... just stating the obvious here 
took me 4 minutes in inventor, so excuse the non perfect nature

I thought at first that Cura had an easy way to produce these name plates but it seems that it will only do rectangular plates. The problem with modelling is that each vertical side ( including the sides of the letters ) need a draught ( a slight slope ) to allow it to come out of the sand. The way I've achieved that to date is with a CNC mill using a tapered cutter. The smoothing function in Cura produces the draught beautifully with Light Smoothing. All I need to do is run a file over the outside edges.
Those letters do have a draft of 10 degrees 
You could always add some fillet as well to smooth sharp edges. Anyways, it was just an attempt to illustrate how quickly you could design one up, and there are several free CAD programs available, if price was an issue.
Trouble is, I need the base & that's what causes the rectangle ( I'm using Height 1.5 & base 4 ) & that's what I want to follow the profile of the border. If I cut off the bottom, I just cut a bit off the base
No. You don't get it. The reason you print *gray* around the letters is so that the curved part is HIGHER than the rectangular base. Then you use that "cut off object bottom" to cut off the rectangular part but *not* the curved base. Just try it - put a 50% gray around the letters - in the curved section.
You can also create a slope to the letters by blurring the edges of the text slightly and having that be a dark gray. Although you say Cura already takes care of this.
Those letters do have a draft of 10 degrees
You could always add some fillet as well to smooth sharp edges. Anyways, it was just an attempt to illustrate how quickly you could design one up, and there are several free CAD programs available, if price was an issue.
I use Varicad. There's no easy way to add draft to text ( in fact it's quite a long process to create 3D text!) Inventor, again, is windows. Perhaps I need to look more at modelling software rather than cad.
No. You don't get it. The reason you print *gray* around the letters is so that the curved part is HIGHER than the rectangular base. Then you use that "cut off object bottom" to cut off the rectangular part but *not* the curved base. Just try it - put a 50% gray around the letters - in the curved section.
You can also create a slope to the letters by blurring the edges of the text slightly and having that be a dark gray. Although you say Cura already takes care of this.
I understand what you're saying. Here's what I get:
So yes, I've lost the rectangle, but I've also lost the base, so the model iis too thin to use as a pattern :-|
Ugg. It's all very simple math. Lets say you use 50% gray for the color around the text. Lets say you want a base of B (in mm) and a total height from top of letters to bottom of A (in mm). Here's how you do it:
when importing the image set base, height, and cutoff values depending on formula below...
A = cura_base+cura_height - cutoff
B = cura_base+cura_height*0.5 - cutoff (0.5 comes from 50% gray color - change to 0.1 for 90% white color etc.)
cutoff must be > cura_base
Solving backwards...
A-B = cura_height*0.5
cura_height = ( A - B )*2 <-- this is mandatory - the only absolute
set cura_height to ( A - B )*2
calculate base_minimum = B - cura_height/2
if base_minimum<0 then use cura_base=0 and cutoff= -base_mininum
if base_minimum>0 then use cura_base=base_minimum and cutoff = B - cura_base+cura_height/2
Example:
I want B=2 (baseplate thickness) and A=5mm (total thickness)
set Cura height to ( A - B )*2 or 6mm (set when importing image)
cura_base to 0mm (set when importing image)
cutoff = cura_height/2 - B = 6/2-2 = 1mm (set in advanced quality settings)
It's easier to do specific examples than to do the formulas. Just remember your cura_height should be set first based on grayscale level and difference in desired base height versus text height. Once that unknown is solved the last two are simple.
I use Varicad. There's no easy way to add draft to text ( in fact it's quite a long process to create 3D text!) Inventor, again, is windows. Perhaps I need to look more at modelling software rather than cad.
You are creating images so you should be looking not at CAD software but maybe microsoft Word (if you have it) which has a "word art" feature which can bend text into an arc like this with any font. Or photoshop which can easily blend the edges of the text into gray regions. I'm not sure how to bend text into a circle pattern like this easily in photoshop.
Ugg. It's all very simple math. Lets say you use 50% gray for the color around the text. Lets say you want a base of B (in mm) and a total height from top of letters to bottom of A (in mm). Here's how you do it:
when importing the image set base, height, and cutoff values depending on formula below...
A = cura_base+cura_height - cutoff
B = cura_base+cura_height*0.5 - cutoff (0.5 comes from 50% gray color - change to 0.1 for 90% white color etc.)
cutoff must be > cura_base
Solving backwards...
A-B = cura_height*0.5
cura_height = ( A - B )*2 <-- this is mandatory - the only absolute
set cura_height to ( A - B )*2
calculate base_minimum = B - cura_height/2
if base_minimum<0 then use cura_base=0 and cutoff= -base_mininum
if base_minimum>0 then use cura_base=base_minimum and cutoff = B - cura_base+cura_height/2
Example:
I want B=2 (baseplate thickness) and A=5mm (total thickness)
set Cura height to ( A - B )*2 or 6mm (set when importing image)
cura_base to 0mm (set when importing image)
cutoff = cura_height/2 - B = 6/2-2 = 1mm (set in advanced quality settings)
It's easier to do specific examples than to do the formulas. Just remember your cura_height should be set first based on grayscale level and difference in desired base height versus text height. Once that unknown is solved the last two are simple.
Ah! I understand ( I think). You are not using a base, just using the black/white contrast to set the overall height & the greyscale to set the depth of the text. Clever :???:
Thanks for taking the time to explain.
You are creating images so you should be looking not at CAD software but maybe microsoft Word (if you have it) which has a "word art" feature which can bend text into an arc like this with any font. Or photoshop which can easily blend the edges of the text into gray regions. I'm not sure how to bend text into a circle pattern like this easily in photoshop.
I use inkscape. Dead easy to bend text. Enter the text normally. Add the curve you want. Select both the text & the curve & Text->Add to path.
Could some one please point out where I find the function for making a model from a picture in Cura? I have version 14.07 (the latest?) loaded. I have been hunting through the tabs etc but can not locate it.
Thanks.
just load in a jpg.
If you want a lithopane, then choose "load model file..." and then choose a photo.
If you want to photograph, say your dog and then print out a 3d version of your dog you need dozens of pictures (where the dog doesn't move) and you can use 123dcatch. It's free. Google it.
That's too cool!
Just downloaded 123D catch, and 15 minutes later, already have a pretty good handle on how it works. Very simple program. Here is the Buddha from the tutorial/samples I tried at standard resolution (high resolution is also available)

Will be trying one of my children's heads later on to see how that goes. You can load the objects in to Mudbox or blender and tweak even more.
Thanks, very cool indeed

For 3D scanning just use this program: http://skanect.occipital.com/%C2%A0
And a cheap xbox 360 kinect sensor (I did buy mine uset for almost nothing).
I have scanned my kid, and printed here out. Is it amazing! 3D scanning is for everyone!
Thank you very much for the info.
I have managed a "lithopane" butterfly on top of a jewellery box for my niece. A great help.
Ended up printing this from pictures over the weekend. Took 50 pics of my sons head while moving around him, uploaded to 123D catch, and voila! Not bad considering the program is free.

As far as I know the easiest and fastest way to do this is using www.selva3d.com
It does just that. Super straightforward tool. I love it

ArunC posted a topic in UltiMaker Cura,


ArunC posted a topic in UltiMaker 3D printers,


Recommended Posts
solid-print-3d 30
OK, becasue I'm such a cool dude, I'm going to show you how to do this
-If you don't have these, get them, they're free
Download Zsurf4 http://www.cadforum.cz/cadforum_en/download.asp?fileID=1129
Download blender http://www.blender.org/download/
Download any free software that will convert IGES to OBJ (freecad is supposed to do this) http://www.freecadweb.org/
Here are the steps in picture format. I'm limited to a 2 dimensional screen or else I'd make a cool pop-up book
It's really as simple as what the pictures say. The hardest part for some will be converting the .igs file that Zsurf generates to a .obj file format
I tried to keep this as simple as I could. For reference, I use Keyshot to convert the .igs to .obj
So in summary,
-Edit image to a nice gray-scale bump map, save as .bmp
-open that .bmp in Zsurf. Mess with settings. Hit "Process"
-Convert the ".srf.igs" that Zsurf just created to .obj (using whatever program you like to convert)
-open Blender. Import .obj. Right click on cube that blender loads by default and delete it. Right click on your project and switch from object mode to edit mode. Go to the right and click on wrench. Got to modifiers and choose solidify. Enter in a value for how thick you would like it. Export to .stl
-Open .stl in cura. apply your magic
Done.
It really sounds more complicated than it is, but after doing it about 3 times, you'll see that it's actually very easy.
At this point, you're either very confused or you are benefiting from this. Either way, I accomplished something tonight
Link to post
Share on other sites