

I highly recommend banana XY blocks such as these. Very good precise tension adjustment.
The original..
http://www.thingiverse.com/thing:45236
or remixed
https://www.youmagine.com/designs/ultimaker-xy-blocks-with-banana-tensioner-remix

I highly recommend banana XY blocks such as these. Very good precise tension adjustment.
The original..
http://www.thingiverse.com/thing:45236
or remixed
https://www.youmagine.com/designs/ultimaker-xy-blocks-with-banana-tensioner-remix
Could you post a picture of these parts please, as I am having trouble figuring out which ones you mean?
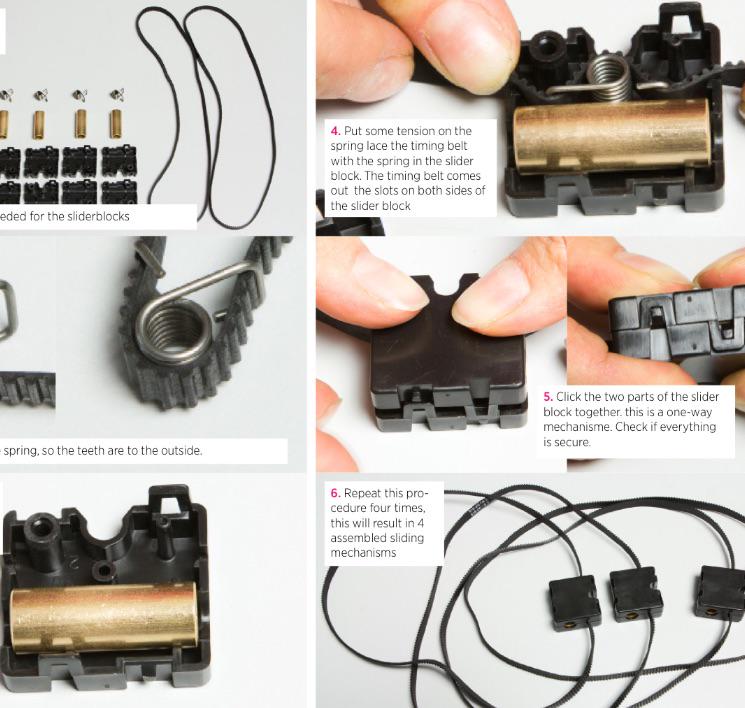
sorry for the long delay, here is a photo of the springs. I made a few attempts to install them on the assembled belts, but gave up. I think the only way I could get these one would have been to put them in place when I was putting the belts and rods on in the fist place.

It is tough to get them on, but it is possible. It is also easy to damage the belts a little bit in the effort (at least I did). IIRC, It helps to over extend the springs on a bench first (in the direction they would have to be sprung for installation.) Just trying to put them strait on is super difficult.
Hmm, I think those were not included in my UMO+ kit! I've since printed out http://www.thingiverse.com/thing:19892 wave belt tensioners from thingiverse, they work a treat and are easy to install. Only had to use 1 so far though on the back belt, the other belts are tight enough.
Did you use your fingers? Or pliers? You definitely want 2 pairs of pliers to install those springs - probably "needle nose" pliers. Right tool for the right job.
Hi I just got my UMO+ from Imakr (assembled) and they left me 2 bags with items. The 'timing belt spring 1681 x4' and other think.
Where exactly must I place it? Any photo for a bignoob like me?
Also. What is the 'Metal cable clamp 1514 x1'? And where does it go?
They forgot to put the calibration sticks that are used to align x/y so for now I can't print 
Edit. Photo of the 2 little bags
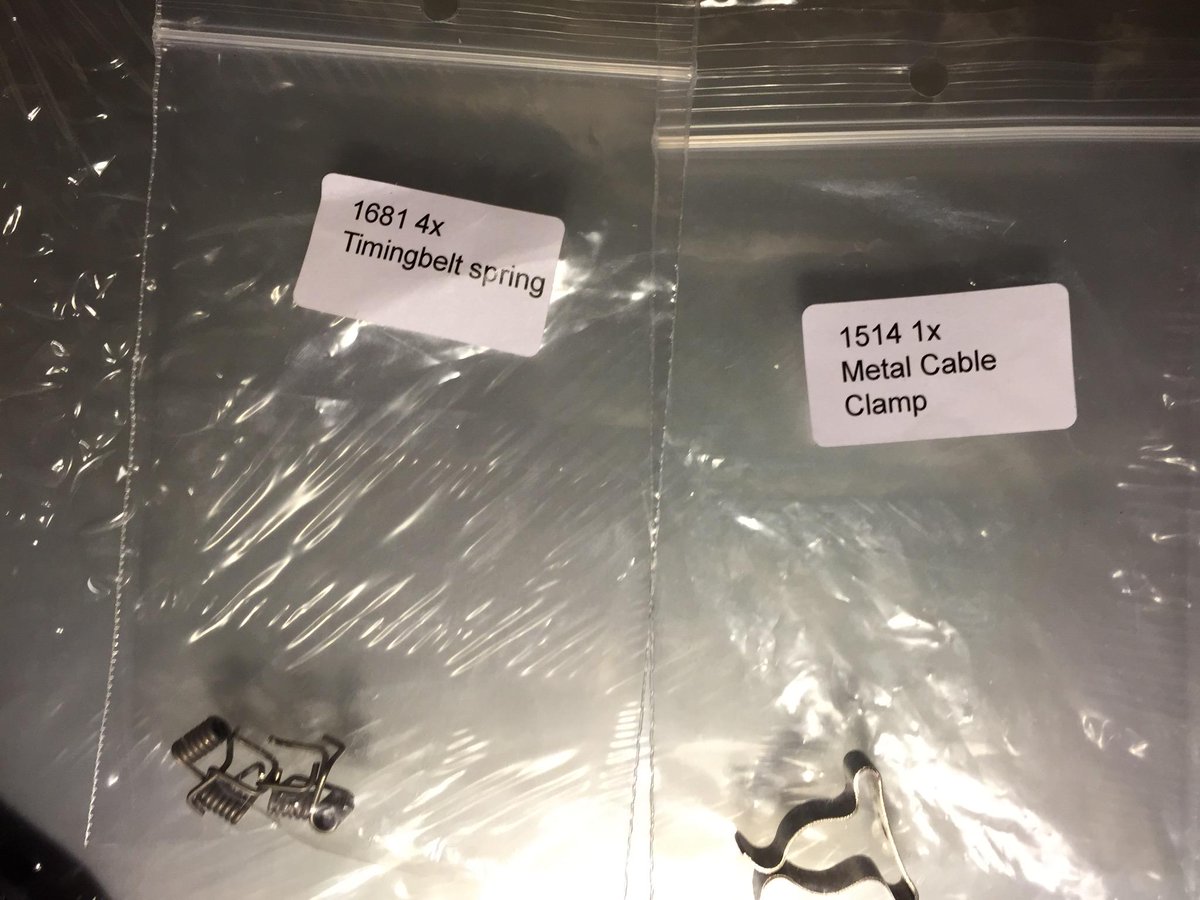
Ok I found the 'documentation' on that Timingbelt spring...
It's ofc, on somewhere else, on the Ultimaker 2 Assembly Manual
um2 assembly manual V1.1 _english.pdf
So I place them just outside like any other tensioner from youimagine or it's better to open everything?...
Btw if anyone can tell me where the Metal cable clamp goes...
about the tentioners, on the UM+ there is no "inside" to the slider blocks, so you would need to put them on the outside of the belt just like any other tentioner printed from youmagine. I also use the microwave V2 model from here (they are great): https://www.youmagine.com/designs/microwave
about the cable clamp. I just put mine on the side to hold the heated bed cables as shown in this image:
https://ultimaker.com/img/ultimaker_original/quality1.jpg
I don't think it's super important to have that clamp...it's not in the assemble notes for the UM+
the sticks are nice, and hopefully they aligned it enough for you to use it for now. I never go sticks with my original and have been using these wonderfull things ever since:
http://www.thingiverse.com/thing:26684
oh and I noticed this too (never used it)
https://www.youmagine.com/designs/adjustable-axis-alignment-tool
Problem it's that the x/y are visually out of alignment on my ultimaker so I can't print yet. I'm gonna make this weekend a simple alignment tool with lego (got like 2 boxes of technics)
Great info on the clamp, didn't saw that photo, that does clear thinks up
That microwave tensioner seems kinda cool, and neat the idea to be able to place more in the future using very little space.
Thanks a bunch!
I would align them as best as you can by eye.
Once you get it halfway kind of acceptable. Print some spacer sticks. Just make sure you print them all in the same exact orientation. As long as they are identical, it doesn't matter if they are both skewed a little. Then use those to properly align your printer.
BTW, it is much easier to align everything when the sticks have several positions. Otherwise you can wind up with the set screws where you can't tighten them.
Also, don't over-tighten the set screws or the sprockets will get bent out of round and cause problems.
I've tried a few belt tensioners on my UMO over the last 2-1/2 years. I always come back to simple modified (bent) clothespin springs. I'd like to have a set of the newfangled official UM springs, because they have a nice and deep square shaped hook on them so they should stay put on the belts very well. Also, they don't require custom trial and error bending like clothespin springs.
The nice thing about the springs is they can be bent to supply the desired tension and then they will maintain it in "set and forget" mode for a very, very long time!.
The tension of my timing belt is loose. No springs! I have gone outside housing to increase tension, and I'm ordering a new belt. Any other suggestions?

ArunC posted a topic in UltiMaker Cura,

.thumb.jpeg.0b7a05eafc09add17b8338efde5852e9.jpeg)
Dustin posted a topic in Firmware,


Recommended Posts
peetersm 124
I had no idea what those springs were for. Thanks, I'll give them a try.
Link to post
Share on other sites