Jump to content

Rough edges on overhangs


samhenderson27

Recommended Posts

Posted · Rough edges on overhangs

Hi there i am after some advice on printing this piece. It has a really steep angle and i am not sure if i will be able to print it or not. Take a look at my test piece which didn't go so well.

Maybe i just need to get the temperature and speed just right?

Using UM2 with Ultimaker PLA

Many thanks.


2015 01 14 21.58.17


Capture1


Capture


  • Link to post
    Share on other sites

    Posted · Rough edges on overhangs

    Hi Sam,

    Can you provide a bit more info about your print settings? Speed, layer height, nozzle temp.

    Try printing slow and at low temp. With a layer height of 0.1mm and speed of 30mm/s you can put the temp around 195-205C.

    If you have the default UM2 fan mount I suggest you turn the model 180 degree so the overhang part get better cooling (the left side cool bethe than the right side).

  • Link to post
    Share on other sites

    Posted · Rough edges on overhangs

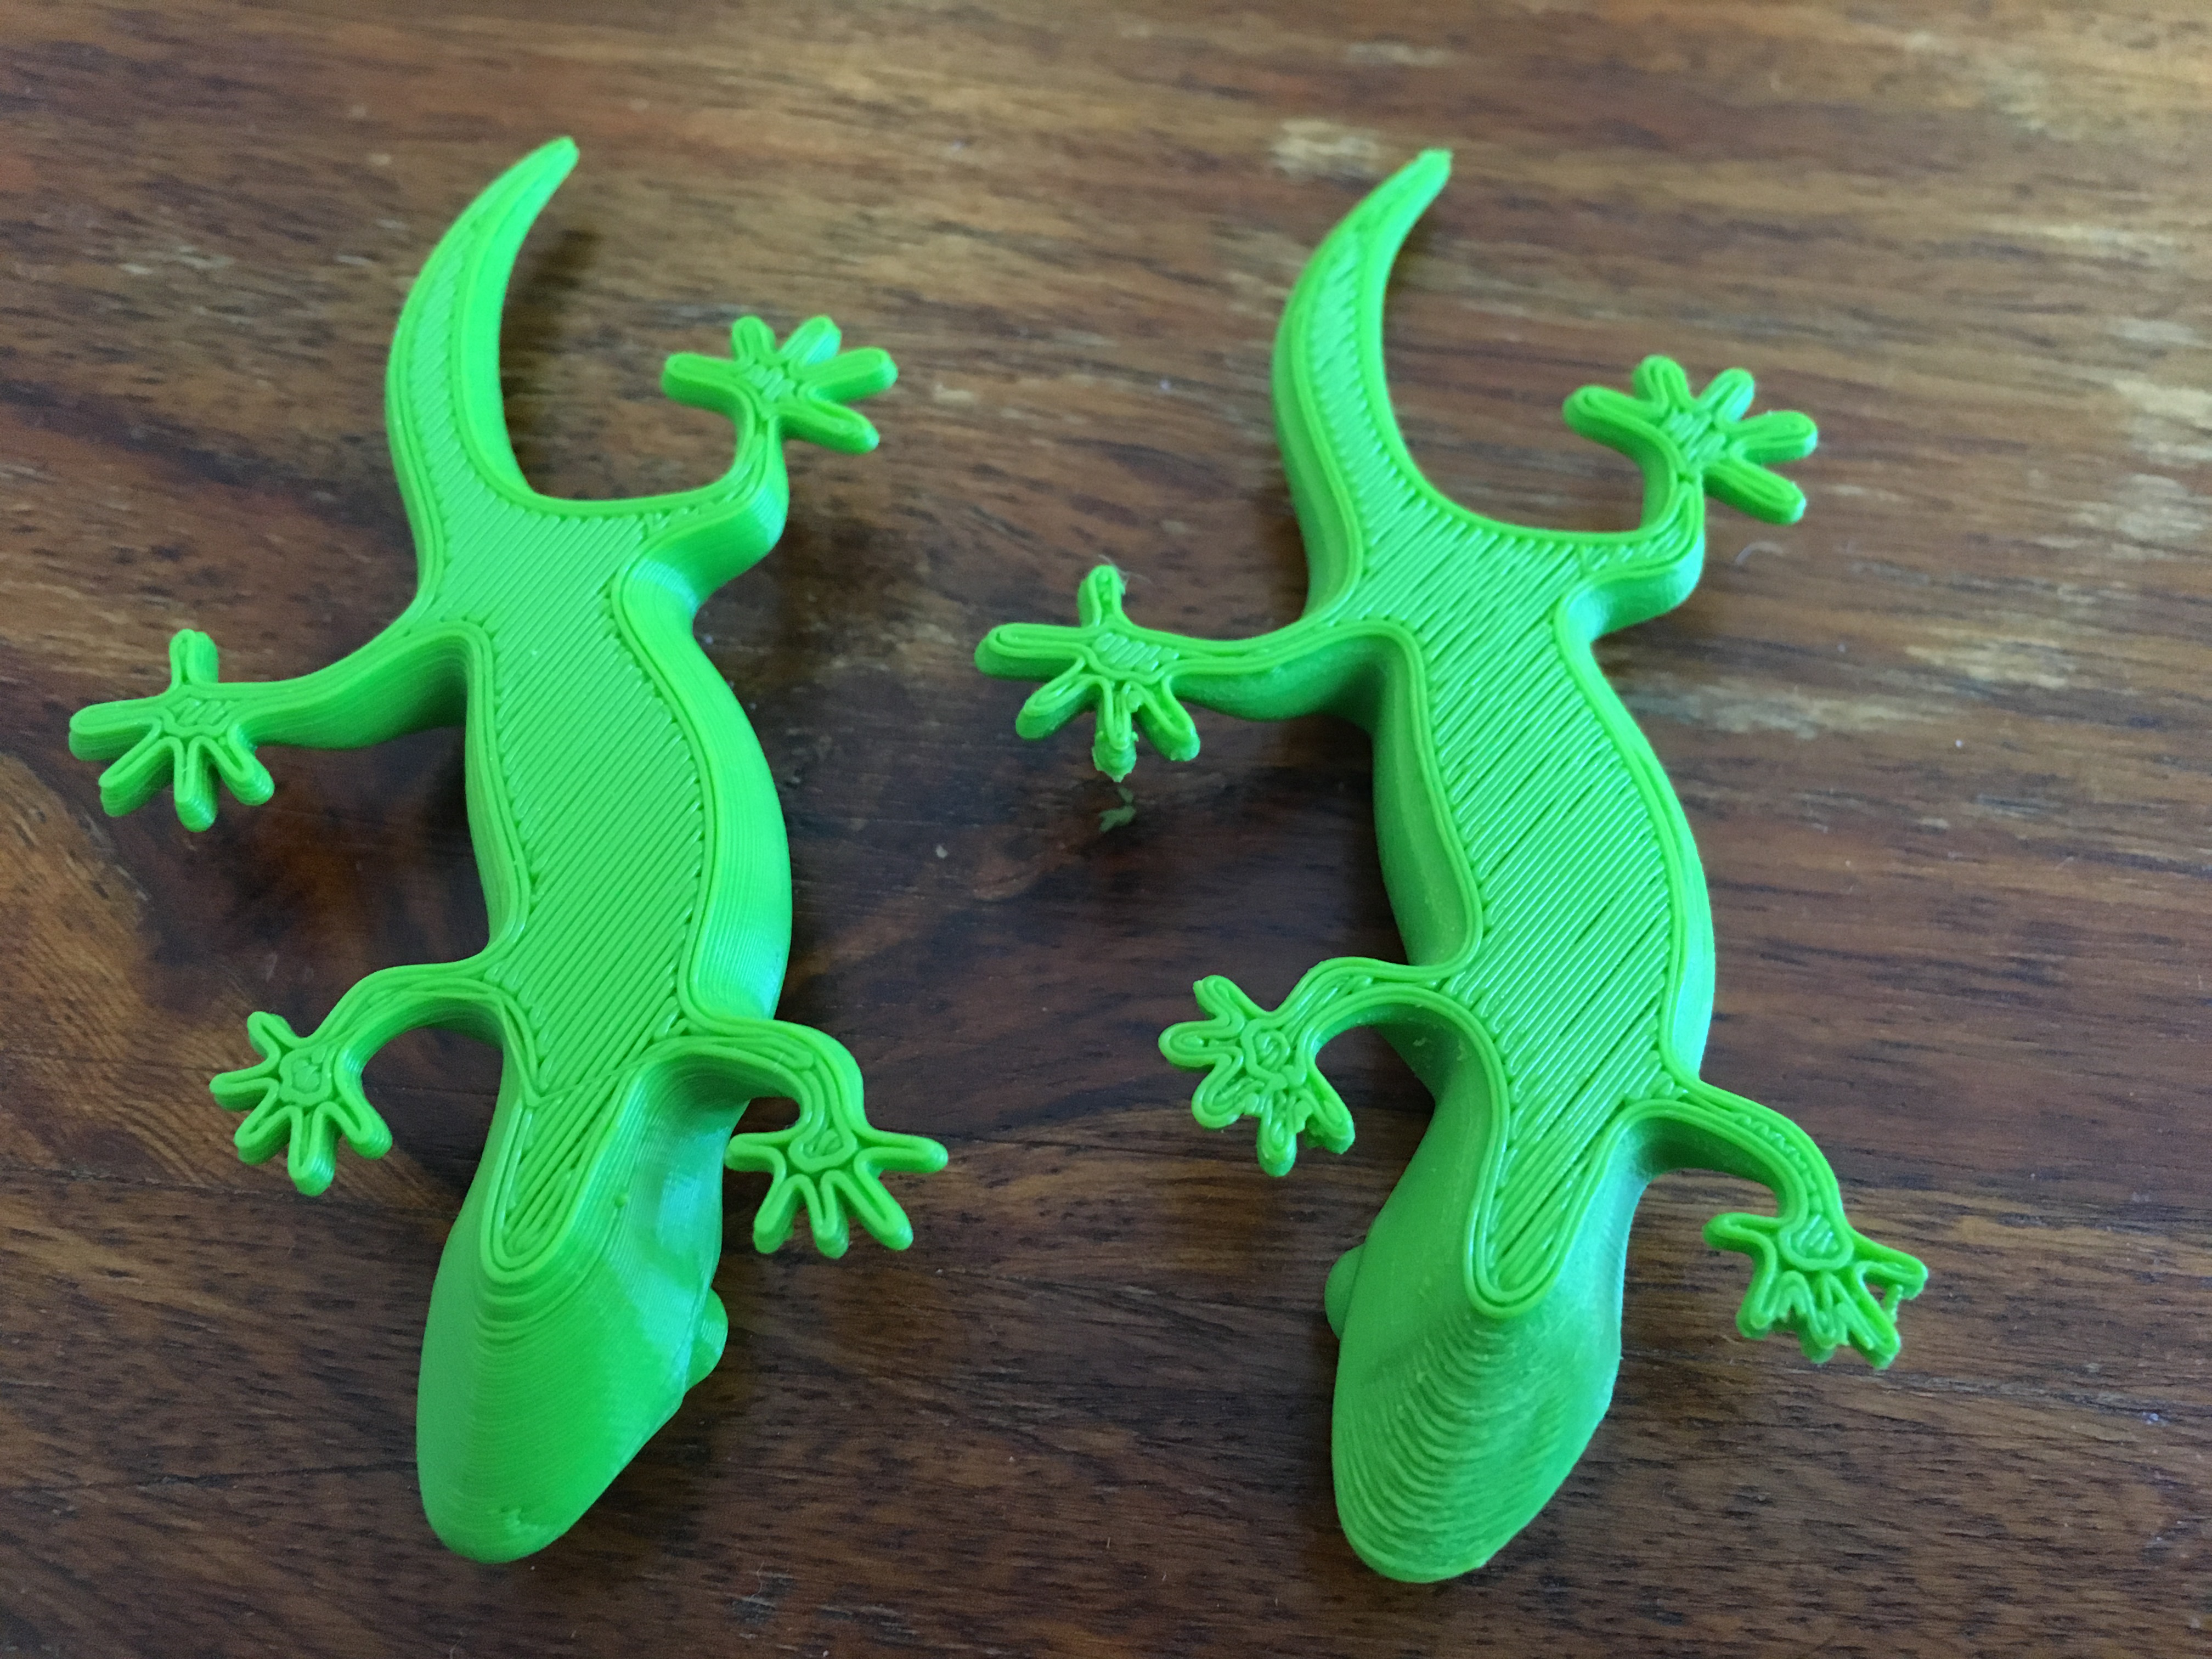
    You have an incredibly steep overhang there on the edges. The UM2 can handle it fine but it's "ugly". Typically perfect (visually) overhangs can only be up to about 45 degrees. Is this your design? Can you change the angle overhang on the sides? Certainly more fan helps - make sure the fan is at 100% before it gets to the overhang. But I think you may already have that.


  • Link to post
    Share on other sites

    Posted · Rough edges on overhangs

    Hi guys,

    Thanks for your reply. I had it printing at 215C as i have been having trouble with the PLA under extruding at any lower temp. I had the speed at 50mm/s and a layer height of 0.1. As you suggest, i will try slow it down and lower the temp as well, perhaps even print with a 0.06 layer thickness. The fans are at %100 after 2mm.

    I understand it is a very steep angle (around 30 degrees) - yes it is my design, i could change the angle but then the part wouldn't really be fit for purpose unfortunately.

    Im thinking i may have to split the part into 3 individual pieces and lay the sides over 90 degrees so the slots face upward.


  • Link to post
    Share on other sites

    Posted · Rough edges on overhangs

    Personally I would have approached that piece wanting to print vertically rather the horizontally. If the other side is the same as the facing side then I would just slice one side off and stick the two parts together, or maybe just slice it down the middle. Probably strength and visual looks requirements may determine if the approach is suitable. Actually I am starting to suspect that those sloping planes are also sloping inwards so a slice down the exact middle to get a flat printing base may be the better option


  • Link to post
    Share on other sites

    Posted · Rough edges on overhangs

    Im thinking i may have to split the part into 3 individual pieces and lay the sides over 90 degrees so the slots face upward.

    How will you attache the 3 sides? Glue? Melt?

    Try sticking some 3mm filament into some hot water (boil water in microwave first - then insert filament for 10 seconds) and then bend the filament as it cools.

    Now consider printing the entire phone case flat and then heating it in hot water and bending it around your phone. This is how Aaron made his glass frames - he printed them flat, then heated them and curved them to fit his face. I've seen this done with 3d printed clothing also. A jig might help also with the glueing/melting/bending phase. Perhaps made out of ABS, UPET, XT, or Nylon so it can withstand higher temps.


  • Link to post
    Share on other sites

    Posted · Rough edges on overhangs

    I'm also experiencing an issue where the upward sloping planes are rough.

    Does anyone know why this would occur when printing with "Low Quality" but does with "Ulti Quality"?

  • Link to post
    Share on other sites

    Posted · Rough edges on overhangs

    Photos of the 2 different prints please. Layer height, print speed, fan speed, nozzle temp and brand of PLA make a difference on overhang quality. In general you want to print slow, cool and with fans at 100%.

  • Link to post
    Share on other sites

    Posted · Rough edges on overhangs

    IMG_4301.JPG

    The one on the left was printed with:

    Layer height: .15

    Print speed: 60

    Fan speed: 100%

    Nozzle temp: 210

    The one on the right was printed with:

    Layer height: .06

    Print speed: 60

    Fan speed: 100%

    Nozzle temp: 210

    Both were with Ultimaker's green PLAN

  • Link to post
    Share on other sites

    Posted · Rough edges on overhangs

    Nice. I recommend you move your glass closer to your nozzle. Simply turn the 3 leveling screws about 1/3 turn counter clockwise from below. Stay away from the automated procedure. I say this because your bottom layer is a bit underextruded due to nozzle being too far from glass. The rest of your print of course is unaffected. If you don't do this your parts won't stick well either.

  • Link to post
    Share on other sites

    Posted · Rough edges on overhangs

    I really love this color by the way.

  • Link to post
    Share on other sites

    Posted (edited) · Rough edges on overhangs

    Thanks for the advice and compliment!

    As someone who is relatively new to the world of 3D printing, can under-extrusion cause the overhang roughness?

    I've been testing today, and found that if I print on a raft I can bring the temperature much further down (currently at 180), which helps dramatically. I've also slowed the print to 15.

    When I tried similar settings with a brim, the model would get proper adhesion to the bed, which is why I switched to the raft.

    Edited by Guest
    wrong details
  • Link to post
    Share on other sites

    Posted · Rough edges on overhangs

    Raft is old technology. You shouldn't need it anymore. The 3d community mostly stopped using rafts and have moved on to better. But for a few years it was the best we knew how to do ABS.

    I've never heard that underextrusion hurts or helps overhangs. Certainly these green lizards don't look underextruded. There is a huge discussion on why overhangs don't print well and do strange things while printing (they lift up) along with great slow motion video but it will take you a long time to find all the jewels of information among the bad guesses of whats going on:

    =========

    What causes raised edges and crappy quality on overhangs.

    http://umforum.ultimaker.com/index.php?/topic/4094-raised-edges/

    Skip right to "page 2" and look at foehnstrum's video and read all the posts after that possibly. It's not until around post #39 and later that we really begin to understand what causes the issue.

    The problem has to do with the fact that liquid PLA is stretchy like melted mozzarella cheese or like mucus. The liquid plastic is pulling like a rubber band as it goes down and creates a lip or raised edge where there is an overhang. The effect gets stronger on each succeeding layer. It is what causes the lower quality "look" of overhangs. Sometimes the part will actually rip free from the bed because of this (which is easily fixed by making parts stick like hell - another topic).

  • Link to post
    Share on other sites

    Posted · Rough edges on overhangs

    Reminds me alot of the problem I was having with the bow of my benchy with some PLA, incl. the Ultimaker Silver one that came with the printer or the bright green from Innofill - but not with other brands of PLA.

    I managed to make it go away by:


    a) printing hotter (220-240 instead of 200-210)

    b) or increasing layer heights (problem did not occur at 0,2mm, but does occur at 0,1mm) or

    c) using some other manufacturers PLA

  • Link to post
    Share on other sites

    Create an account or sign in to comment

    You need to be a member in order to leave a comment

    Create an account

    Sign up for a new account in our community. It's easy!

    Register a new account

    Sign in

    Already have an account? Sign in here.

    Sign In Now
    • Our picks

      • UltiMaker Cura 5.7 stable released
        Cura 5.7 is here and it brings a handy new workflow improvement when using Thingiverse and Cura together, as well as additional capabilities for Method series printers, and a powerful way of sharing print settings using new printer-agnostic project files! Read on to find out about all of these improvements and more. 
         
          • Like
        • 18 replies
      • S-Line Firmware 8.3.0 was released Nov. 20th on the "Latest" firmware branch.
        (Sorry, was out of office when this released)

        This update is for...
        All UltiMaker S series  
        New features
         
        Temperature status. During print preparation, the temperatures of the print cores and build plate will be shown on the display. This gives a better indication of the progress and remaining wait time. Save log files in paused state. It is now possible to save the printer's log files to USB if the currently active print job is paused. Previously, the Dump logs to USB option was only enabled if the printer was in idle state. Confirm print removal via Digital Factory. If the printer is connected to the Digital Factory, it is now possible to confirm the removal of a previous print job via the Digital Factory interface. This is useful in situations where the build plate is clear, but the operator forgot to select Confirm removal on the printer’s display. Visit this page for more information about this feature.
          • Like
        • 0 replies
    ×
    ×
    • Create New...