


onkelgeorg
-
Posts
260 -
Joined
-
Last visited
Content Type
Forums
Events
3D Prints
Everything posted by onkelgeorg
-
not only for metal printed parts... there is a technique called tumble coating also: http://www.whirlinglight.com/tumble-coating-3d-prints-part-1/
-
no it isn't rubberized. and yes, I know a supplier in Germany who is selling the original Lortone Tumblers and drums (which are insanely overpriced): http://www.uhrmacherwerkzeuge.com/epages/62662707.sf/de_DE/?ObjectPath=/Shops/62662707/Categories/Poliermaschinen hth
-
Here it is: http://www.instructables.com/id/Affordable-Rock-Tumbler/ Your vote is appreciated

-

Fan percentage on Ulticontroller satus screen...
onkelgeorg replied to amedee's topic in UltiMaker Cura
@amedee really nice thanks. Do you think it is possible to add one more thing to your Marlin Genarator: Switching the piezo buzzer off, or make it less noisy? -
da du ja sicher REseller in Deutschland werden möchtest werden die dich ziemlich sicher an igo3d verweisen - frag doch da direkt auch parallel an
-
look for "H3 Extruder", which is actually a feeder, on thingiverse (I don't know if it is on youmagine too). This one works really perfect. For the fan shroud there are many alternatives, but the original is really ok. There is a printable version on youmagine, which is more rigid.
-
Bräuchte dringend eine Rolle Colorfabb PLA/PHA Standard Schwarz
onkelgeorg replied to backinblack81's topic in Deutsch
N'abend, ich hätte noch eine Rolle, OVP, produziert 31.03.2015. Nur mit der Abholung wird es schwierig - ich wohne an der Nordsee. Versand wäre kein Ding, geht aber erst am Dienstag. Ggf. könnte Versand mit Hermes morgen klappen, müsste ich fragen. Melde dich bei Interesse. Gruß, Jörg -
which is total crap, as it requires to be logged in to the forum. An email makes much more sense as I don't want to 'check the bell' frequently. one more bad point regarding the new community... :( sorry for beeing OT.
-
sorry for the late answer, I didn't get a notification :( There is no significant wear yet. May be because I didn't print much more than theese 3 little guys. All in all I printed less than half a spool of it. But to be honest I don't care about the nozzle - when it is worn out it will be replaced, it's easy
-
sorry for the late answer, I didn't get a notification :( yes I will put them on youmagine - hopefully the coming weekend
-
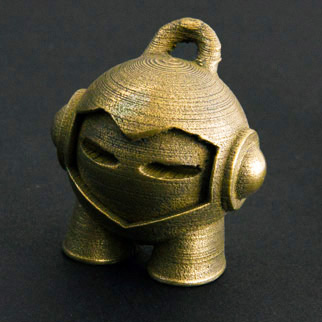
Here is one of my latest prints in Colorfabb Bronzefill, Brassfill and Copperfill: Before polishing: After polishing: Polished in self designed and printed rock tumbler with brass screws for approx. 12 hours. After that finished with simple buff wheel. The rock tumbler files will be available soon Closer look:


-
or this: https://www.tinkercad.com/ I tested it with several children aged 10-12 and it was real fun
-
ok, I stopped using cura for the bfb-3000 because it is too extensive to get it running with multiple extruders - it is not worth the effort I am afraid. good luck
-

Version 1.0
1,979 downloads
Hi all, last weekend I printed three Marvins: 1x Bronzefill, 1x Brassfill and 1x Copperfill. After printing they were pre-polished for approx. 8 hours in my self designed rocktumbler and finished with a buff wheel. Not perfect yet, but the result is ok for a first try The lesson I have learned is that I have to print finer layers to make polishing easier - will try it soon. -
today I ran into the same issue. Do you have any news about it?
-
ebay.de
-
Hi all, if someone has an hot end of the UMO lying around, please make me an offer. I am also interested in used parts if you have some Please feel free to email directly: joerg@torhoff.com Cheers, Joerg
-
Starting scratch built UMO, mod suggestions?
onkelgeorg replied to analog-kid's topic in Third party products & modifications
good point, but as I mentioned above, I already have an original UM board and Ulticontroler lying around. So I don't like the idea to spend extra money. On the other hand: If it gets too expensive to get the E3D running on 18V it may be cheaper to buy a RAMPS and run the entire thing on 12V. In this case I have a problem with the firmware I am afraid... -
Starting scratch built UMO, mod suggestions?
onkelgeorg replied to analog-kid's topic in Third party products & modifications
Hi, I will start building an UMO within the next couple of weeks. As I am not in a hurry it may take several months, but it will be fun, I am sure. Most parts I have bought already, but the most important problem isn't solved yet: The hotend. You are planning to use an E3D, but how you will solve the heater cardridge problem? Will you use the original heater block with the 18V cardridge, or will you go with the 12V version of the E3D and ass another power supply. (I am planning to go with the original electronics as I have it lying around already) Any help on this issue is highly appreciated. Cheers, Joerg PS: I cheated also regarding the wooden parts -
Heated bed upgrade kit - heatbed doesn't heat :(
onkelgeorg replied to onkelgeorg's topic in Coffee corner
Hi all, here is my update: First I checked the voltage on the mainboard as suggested by Phil - Result: 18.66 V Then I checked the voltage on the new PCB: 18.66 V - uuummm... strange... Both LEDs (on the output and the input) were lit, so I gave it a try and set the heated bed to 70°. It started to heat up immediately. Sorry that I don't have a final conclusion what the error was. Fact is that I didn't change anything, but now it works :shock: So what can I say? Thanks to all people that tried to help with their ideas. Cheers, Joerg -
Heated bed upgrade kit - heatbed doesn't heat :(
onkelgeorg replied to onkelgeorg's topic in Coffee corner
Good point, I will check it after work this evening. Thanks to all other posters, I will double check and take some pics. Cheers, Joerg -
Heated bed upgrade kit - heatbed doesn't heat :(
onkelgeorg replied to onkelgeorg's topic in Coffee corner
hehe, ok Yes I have the option to preheat the HPB, that's what I did when I measured the 0.3 V on the output, after I have chosen the "Preheat PLA1" option. The temperature is set to 70° but the HPB stucks at 20° and doesn't change. So I removed the large plug with the two thicker wires from the PCB and measured approx. 0.3 Volts. -
Heated bed upgrade kit - heatbed doesn't heat :(
onkelgeorg replied to onkelgeorg's topic in Coffee corner
ok, I understand. But why can it be the wrong firmware? I did everything exactly as recommended in the installation manual of the original kit. And again: If I really have the wrong firmware installed, why is it possible to set a temperature for the heated bed? If the firmware is wrong the printer shouldn't 'see' any heated bed, right? Is there any other way than installing it through Cura? May be I should give this a try? Thank you for getting into this issue. -
Heated bed upgrade kit - heatbed doesn't heat :(
onkelgeorg replied to onkelgeorg's topic in Coffee corner
no, you are wrong may be my writing is a little bit confusing I installed the new firmware using Cura and after the succesful installation Cura displayed the .hex number you mentioned. Otherwise the Ulticontroller wouldn't give the possibility to use the heated bed, right? On the Ulticontroller there is a possiblilty to check the Firmware version, it says: 15.02.1 I naturally setup a new machine in Cura also. btw: the wrong z-steps were already reported in November: http://umforum.ultimaker.com/index.php?/topic/8305-wrong-default-axis-steps-per-unit-in-branch-marlin-um-heatedbedupgrade/?p=78122 any other idea? -
Hi all, yesterday I managed to install my heated bed upgrade kit which I ordered in October 2014 already. Installing it was not a big deal, after approx. 3 hours everything was fine, except of one thing: The heated bed doesn't heat :( I followed the installation guide to 100% and installed the new firmware 15.02.1 with Cura. btw: in this firmware is a minor problem also: The z-steps are set to 533.3 but he correct value is 200. This issue had been posted here in November already. Is there still the wrong value in the firmware installed by Cura or did I made mistake? Nevertheless the heated bed seems to be recognized by the firmware and it the current temperature is displayed on the controller. When I set the heated bed to 70° nothing happens at all - it doesn't get warmer. I checked the output voltage on the heated bed PCBs output and there are only 0.3 volts. So I am afraid that the board ist faulty, or is there any other possibility for this behaviour? Any help is appreciated. Cheers, Joerg


