

burtoogle
-
Posts
1,529 -
Joined
-
Last visited
-
Days Won
19
Content Type
Forums
Events
3D Prints
Everything posted by burtoogle
-
I put water in it and it doesn't leak at all so all I need now are some daffs to go in it! BTW, my settings were: 0.6mm line width, 0.2mm layers, no fan, 50mm/S print speed and 6 bottom layers.
-

Introducing The Experimental Bridging Settings
burtoogle replied to burtoogle's topic in UltiMaker Cura
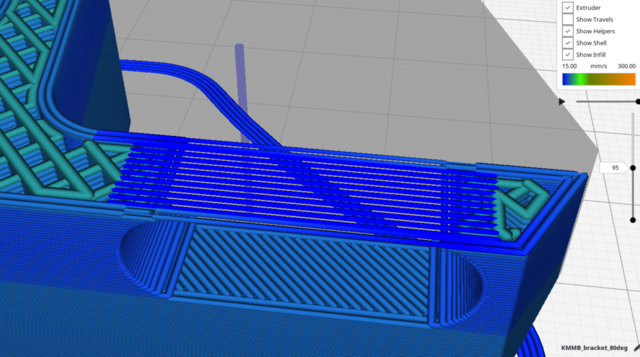
Hi @Verne64, you need to expand the skins to get them into the infill (Settings -> Infill -> Skin expand distance). The bridge in my image is surrounded by wall lines, they are being printed with the same flow and speed as the skin lines which is why they look very similar in the image. If you look closely at my image you can see that the wall lines are coasted just before the bridge starts whereas the skin lines don't need the coasting. Hope this helps. -
It came out with no visible z-seam - rather nice in transparent PETG

-
I am currently printing one, will let you know how it turns out (looking good so far).
-
I cannot see a problem with the gcode that has the smoothing enabled. The gcode that does not have the smoothing enabled has an obvious z-seam which is what I would expect. Did you print the version with smoothing enabled and see flaws? I find that hard to believe as the smoothing works well. I have sliced the stl and it looks good. I will print one tomorrow and see if there are any flaws.
-
Hi @Frank5300, have you actually tried printing this and seen flaws in the printed part? I ask because when using spiralization, the layer view does show some artifacts that normally do not appear on the printed object. If there really are those artifacts on the printed part, please make the gcode available so I can check it. Thanks.
-
It's controlled by Extra Skin Wall Count in section Shell. I mean, what else could it be called?
-
Yes, it's in section Special Modes.
-
Hi, look in Material section of the custom settings. There you can specify various values related to retraction (speed, distance, etc.)
-
It looks to me that you have the z-seam location to either random or possibly nearest with the corner preference set to something other than none. BTW, that model is not going to be printable when orientated vertically because the fins have no support. It would be printable orientated like this:

-
Sounds like it's an issue with the extrusion mode being absolute but then it's getting reset back to 0 when resuming after the pause and so the printer is rewinding the filament? Can your printer use relative extrusion? If so, try enabling that (special modes) and see if it helps.
-
Introducing The Experimental Bridging Settings
burtoogle replied to burtoogle's topic in UltiMaker Cura
Hi @geert_2, that's all very interesting. I definitely think there will be situations where these techniques would be valuable. I am happy to keep working on the bridging support in Cura so if we need some changes to make a better result, please don't hesitate to make suggestions. Great work, thanks. -
Introducing The Experimental Bridging Settings
burtoogle replied to burtoogle's topic in UltiMaker Cura
Hi @mastory, in my testing with PLA, I have found that with suitable speed/flow/fan settings, the first layer strands do not sag on small to medium length bridges (say up to 50mm). Maybe for longer bridges or difficult materials the parabola would be worth trying. It would be straightforward to implement in Cura. -
It's not possible to spiralize multiple models simultaneously, the whole point of spiralize is that it goes round the periphery of a single model without using any travel moves.
-
Introducing The Experimental Bridging Settings
burtoogle replied to burtoogle's topic in UltiMaker Cura
Oh yes, @ahoeben, I used the support blocker to remove the support between the build plate and the bridge in my example above. Thanks! -
Introducing The Experimental Bridging Settings
burtoogle replied to burtoogle's topic in UltiMaker Cura
Hi @geert_2, I made a test model to try out the idea of "flying support", i.e. printing support on top of a bridge. It worked very well and I think could be a useful technique in those situations where you need support but it's either a long way down to the bed or you really don't want to print support on top of the model that is below. Here's a picture of my test piece. You can see the bridge (which is cut off and thrown away along with the flying support) is only one layer thick at its first layer. Sure, it does leave a visible mark on the vertical pillars when it is cut away but it's not horrendous. BTW - the 3.3 beta bridge code doesn't have a few changes that stop bridges being printed over support so if you try to recreate this using 3.3 beta you will find that it will print the skin layers above the support as bridge layers which isn't what one would want. I have made the required changes but they haven't been merged into the Cura release branches yet. Update: You don't even need to make the first bridge layer the whole width, so in my test model I reduced the first layer to two 3mm wide "spars" that span the gap between the pillars. Certainly with PLA, the sheer strength is such that you don't need very much width to support the bridge.

-
Introducing The Experimental Bridging Settings
burtoogle replied to burtoogle's topic in UltiMaker Cura
Yes, @geert_2, I agree with all that you say. One other thing that I was discussing with a friend recently was the idea of using a bridge as support below the real bridge which is printed just like it would be done above normal support. Once the print is finished the bridge-support is removed to leave a very good quality bridge on the model. That could save a lot of time and support material. -
Introducing The Experimental Bridging Settings
burtoogle replied to burtoogle's topic in UltiMaker Cura
Hi @geert_2, thanks for the torture model. However, I cannot see how any FDM printer would be able to print that satisfactorily without the use of support. Bridging is only appropriate when there are multiple pillars that the bridge can be spanned across. Bridging cannot help when only one side of the area has support under it. -
Introducing The Experimental Bridging Settings
burtoogle replied to burtoogle's topic in UltiMaker Cura
Hi @catohagen, thanks for the feedback. Well, all I can say with regard to the default settings is YMMV. They work for me just fine but I don't for one moment expect them to be optimal for other people. So, you have to experiment and find what works best for you. You can then share that info with others and when enough people have tried it out and got good results we will have an idea what are the default values that are most likely to be successful. -
Sorry, I can't help with your request for "mouse ears" but have you tried using a wide skirt that extends to within 0.25mm (or thereabouts) from the print. It gives you the benefit of keeping the corners of the part warm without actually requiring to be cleaned off the object when the print is done. Here's an example of what I mean:

-
Introducing The Experimental Bridging Settings
burtoogle replied to burtoogle's topic in UltiMaker Cura
I cheated and made it very small! -
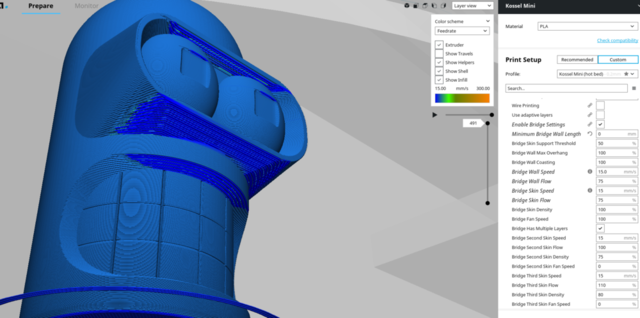
Introduction The 3.3 beta introduces new functionality that is intended to improve Cura's ability to print bridges and overhung areas. The current Cura code base has long had the ability to detect when a skin region spans across islands of support and those skins that Cura thinks are bridges will have the direction of the lines aligned with the detected bridge detection. But nothing was done to detect walls that spanned unsupported areas and no changes were made to the wall or skin print speeds, flows or fan speed. The new bridging functionality does now detect when walls cross unsupported regions and it does now modify the print settings for those walls and skin that are determined to be unsupported. This topic introduces the new settings that are grouped together in the experimental section and are enabled using the Enable Bridge Settings checkbox. The settings Explained You will immediately notice that there are quite a few settings. Why so many? Well, I realised pretty early on in my experimentation that modifying the skin settings for the first bridge skin and then using the normal skin settings for the skins above the first does not always lead to a good result. So there are settings to not only modify the print speed, percentage flow, density and fan for the first bridge layer (bottommost layer) but also for the two layers above. If you want to keep things simple you can un-check the Bridge Has Multiple Layers checkbox and then only the first bridge skin layer settings will be modified. The settings used for the bridge walls are Bridge Wall Speed, Bridge Wall Flow (aka line diameter) and Bridge Fan Speed. Also relevant for walls are Minimum Bridge Wall Length which only considers wall line segments that are longer than this length as bridges. Shorter wall line segments are just printed using the normal settings. Bridge Wall Coasting controls a feature that reduces the pressure in the nozzle as it approaches the start of the bridge. This is necessary because the extrusion rate will need to be very much reduced from the normal rate as the speed and flow used on the bridge is likely to be less. If this is not done, the wall line tends to droop very badly at the start of the bridge. Finally, there is Bridge Wall Max Overhang which controls how much a wall line can overhang the layer below before it is considered to be a bridge wall line. By default it is 100% of the wall line width so the line has to be completely over air with no overlap whatsoever with the layer below. Reducing the value of Bridge Wall Max Overhang means that the line doesn't have to overhang the layer below so much for it to be printed using the bridge wall settings. See below for an example of its use. For a given material and print temperature, there will be some combination of the bridge wall settings mentioned above along with Bridge Skin Speed, Bridge Skin Flow (aka line diameter), Bridge Skin Density (line spacing) and Bridge Fan Speed (and the similar settings for the 2 other skin layers) that produces the best results. This is where the fun starts because it's going to require a lot of experimentation to come up with suitable settings. The default values are tested with PLA at 200deg, 0.4mm nozzle and 0.2mm layers and may work OK, or not (YMMV). One other setting is Bridge Skin Support Threshold which is the percentage of a skin area that is supported for it not to be considered a bridge. i.e. skin areas that are supported for less than this percentage (default 50%) are considered to be bridges and will be printed using the bridge settings. Skins that are supported for more than the threshold value will be printed just as normal. Here's some picture that, hopefully, will make things clearer! First, here's the settings showing some typical values: Here is the first bridge layer, I am showing the layerview as feedrate so you can see the speed changes on the bridge. Notice also the coasting just before the bridge walls start (the walls are printed anti-clockwise): Here's the second and third skin layers: Finally, here are a couple of images of a model (thanks to the community member that sent it to me) that has some overhung regions. The first image is using Bridge Wall Max Overhang set to 100% and the second is using 50% and you can see that more of the lines are going to be printed using the bridge settings. For overhangs, I recommend setting Minimum Bridge Wall Length to zero as the wall line segments are likely to be very small. Feedback Required From You Please give it a go and share your experiences, all feedback is welcome (good and bad). You can either reply to this topic or for really bad news, please submit a github issue.


-
Thanks for the mention @SandervG, I will put together a topic that describes the new bridging features and the associated settings.
-
Not unless you can rebuild the C++ part of Cura. The change is trivial, I just moved a little bit of code to change the sequencing so it now does the move before the heating of the bed. BTW, I notice that the code doesn't do the right thing when the nozzle temp is different for the first layer and you are using one at a time printing. It fails to change the nozzle temp before outputting the first layer of the second (and other) prints which could have an effect on adhesion? I am not going to attempt to fix that, just pointing it out.
-
Just submitted a fix (https://github.com/Ultimaker/CuraEngine/pull/732) but don't hold your breath, fixes and other improvements are currently taking several months to be incorporated into Cura, there's a bit of a log jam...


