

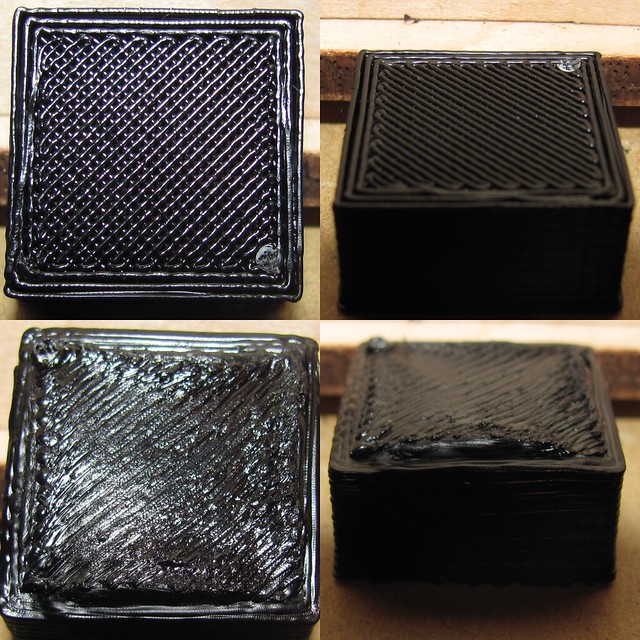
http://daid.eu/~daid/IMG_20111027_195618.jpeg
Good example of under-extrusion and the top one had an filament jam.

http://daid.eu/~daid/IMG_20111027_195618.jpeg
Good example of under-extrusion and the top one had an filament jam.
These are the only ones I can remember off the top of my head:
http://richrap.blogspot.se/2011/10/art- ... wrong.html
http://techwall.net/analyzing-your-first-print
It's been a long time since I read them so I'm not sure how much is applicable today.
I'm curious about the under extrusion one Daid - out of interest what did you do to fix it? was it the thumbwheel on the back or wrong filament diameter or what?
for reference for other folks, I'll include
http://s177.photobucket.com/albums/w228 ... ultimaker/
some close up prints of what happens when the filament diameter varies by 0.3mm (good PLA appears to vary by <0.05mm) (the silver one is the bad PLA, white is good)
also an image marked #1 of what happens if you don't have the extruder thumbwheel tight enough and/or temperature high enough
the birds nest sitting on top of #2 happens when the temperature is too high and your print just got kicked off the bed..
I changed from RepG25/RepG26 to stand alone Skeinforge with Marlin. And later to Cura. That print was before volumetric printing, which was a lot harder to calibrate and those prints where done with just guessed numbers.I'm curious about the under extrusion one Daid - out of interest what did you do to fix it? was it the thumbwheel on the back or wrong filament diameter or what?
If you get this now, then you could have slipping filament, wrong filament size, or a wrong steps_per_e.
Hi Guys,
I've tweaked and tweaked, but I can't seem to get quality past this...


EDIT: My web server is not allowing hot linking of pictures, so here's a html page with the 2 jpegs:
http://radiusdev.com/tachyio/um/ultimaker.html
When you look at the profile of the printed model, the surface looks really smooth. Yet when you look at the model directly under bright lights, you can see this undulating pattern. My guess is that the printer wobbles as it prints, or that the x-y accuracy is rather poor. Also I still have problems with printing overhangs...
I currently used netfabb to print this model, using standard quality PLA material settings, at 0.15mm layer height and 300mm/sec jump speed to reduce stringing. But I don't understand, despite this teeny teeny layer height, I can still see the layers! :(
Additional info: Marlin firmware flashed from replicatorg 26, temperature was 185C to 200C...My extruder head jams often as well, every 2 prints...balanced the peek and bowen many many times. I am just thinking to myself that Ultimaker should have designed a snap-in-place extruder head...so every time it jams, we snap the old one out for cleaning and snap a new one in for the next print - kinda like the old days where standard 2d printers kept getting their heads clogged.
Sigh, any help would be much appreciated...If this is the best the Ultimaker can do, it leaves me wondering how the promotional pictures look so good...
At 0.1mm layers I can also still see the layers. Reducing your eye sight might help 
There are people printing at 0.02mm layers, those might be the high quality photos you are thinking off.
I also recommend you upgrade to RepG34 or Cura (depending on your taste), which has a newer version of Marlin giving a stabler temperature. This could help against the clogs.
Overhangs at low layer thickness are quite tricky. Proper cooling and stable temperature are important.
I also see a few blobs, which could be buffer-underruns. Printing with the UltiPanel helps in this case.
(Hint, include something like a coin in your photos, then we can judge the scale of your print. See:
http://daid.eu/~daid/IMG_20120418 ... .small.jpg
)
do we expect buffer underruns if the PC isn't doing anything other than sending gcode? I hadn't realized this would result in blobs..
If it's sending a lot of small moves, then the printer can execute those moves faster then you can send those over USB. Which results in small halts, and blobs.
Thanks Daid - you're a mine of information.
I found this this morning -
http://www.flickr.com/groups/3d-print-failures/
unfortunately gives few indications as to why the prints failed - some of the pictures do have comments however.
Thanks for the replies guys  yeah the blobs are definitely buffer related - I notice the printer "shutdown" for a second before continuing on...
Hmm so printing overhangs is easier at thicker layer heights? Is it possible to use netfabb to print thicker layers for overhangs and then thinner layers for up skins and straights?
Thanks for the replies guysyeah the blobs are definitely buffer related - I notice the printer "shutdown" for a second before continuing on...
Hmm so printing overhangs is easier at thicker layer heights? Is it possible to use netfabb to print thicker layers for overhangs and then thinner layers for up skins and straights?
Don't think so. I've found overhangs OK at thin layers. You want good cooling from your fan and probably printing at a cool a temp as possible will help.
Thanks for the replies guysHmm so printing overhangs is easier at thicker layer heights? Is it possible to use netfabb to print thicker layers for overhangs and then thinner layers for up skins and straights?
I'm with Owen, thinner layers are easier overhangs, because less heat needs to be removed from less volume of hot plastic. If you overhang is on the other side of your fan, additional fans help a lot.
Hmm my fan blows from the top only, that must be the reason. Anyone tried operating their ultimaker in a freezer? If the filament froze fast enough maybe even delicate structures are possible.
Anyone tried operating their ultimaker in a freezer?
Not sure but I don't think so 
Hmm my fan blows from the top only, that must be the reason. Anyone tried operating their ultimaker in a freezer? If the filament froze fast enough maybe even delicate structures are possible.
It is not so much about the ambient temperature, but the targeted heat removal near the freshly laid plastic... the best cooling method would be a stream of water, due to the heat capacity of H2O, but that is insanely impractical for the UM (which is not a nuclear power plant)... moving air is another more practical choice, since fans are ridiculously simple devices.
putting it into a fridge seems like a grotesquely inefficient method for cooling, especially if you use a heated bed. if you need more additional cooling, use a bigger fan, or put it in front of the outlet of a window air conditioner.
Oh boy I just tried replicating 0034, and somehow the new marlin firmware really messed up the extruder motor - the thing was moving at lightning speed. And basically the print jammed when a load of plastic got deposited onto the stage - haha!
Anyone else have the same weird problem? I'm going back to 0026 for now, at least that works. 
Oh boy I just tried replicating 0034, and somehow the new marlin firmware really messed up the extruder motor - the thing was moving at lightning speed. And basically the print jammed when a load of plastic got deposited onto the stage - haha!Anyone else have the same weird problem? I'm going back to 0026 for now, at least that works.
Try inserting a G92 M14 in the beginning of you gcode, since you are probably slicing with an old (pre skeinforge40) slicer or netfabb
Alright thanks I'll try that once I get it rebalanced and unjammed.
I've been thinking a lot about SLA though, has anyone seen this?
http://www.instructables.com/id/Build-a ... phy-at-Ho/
It seems like the logical next-step, less moving parts and no filament to jam in a tiny nozzle.
Also with lasers we can actually get much higher resolution - nanometer wavelength.
And I'm thinking to myself how to eliminate the need to calibrate the gap between the nozzle and the stage. It's really tough to get it just right for high-detailed prints. My friend and I designed a little mechanical piece that would allow us to adjust the z-axis end-stop, but even then its hard as our stage isn't perfectly level.
Could a laser be used to measure the gap-distance, then we can tune it accurately?
Your laser is only as good as your optics, so to get really high resolution you need very good optics. But that's solvable.
Anyhow, there is a ZBed adjuster on thingiverse already, you might want to take a look at it. There is also the tip to remove your metal lip from the end switch to improve accuracy.
In Cura I solved the uneven bed and hard to get right start height, by having a different layer thickness for the first layer. A 0.3mm first layer is easy to lay down, and you can lay 0.1mm layers or thinner on top of that without much problems. Simple and effective.
Objects printed with a first layer of 0.1mm are also hard to remove from the printer bed, while 0.3mm first layer pops off quite simple. So replaced a lot of tape after every print with 0.1mm first layers, and now that I've switched to 0.3mm first layers I only had to replace a few strips so far because the printer head had dug into it, which was my own fault.
I can second Daid's comments through experience. adjusting the bed to be perfectly level is a thankless task and it seems no matter how hard you try it's never quite perfect. the 0.3mm first layer seems to solve it as long as the temperature is high enough and the flow rate is sufficient.
(if they're not, the part will either not stick and make a terrible mess on the hotend as it drags it around, or curl slowly off the bed and give an 'old cheese sandwich' effect to your object).
I've replaced tape 3 times in the last 20 or so prints. mostly my own fault due to experimentation.
http://daid.eu/~daid/IMG_20111027_195618.jpegGood example of under-extrusion and the top one had an filament jam.
Another of the under-extrusion but with over-extrusion in there, too..
too little & too much by ddurant123, on Flickr
I didn't see Daid's post about the 0.3mm first layer height, but I'm using Cura RC2 and everything's working like a breeze now! Thanks Daid =)
Anyway I think Ultimaker should just recommend beginners use Cura...I personally spent weeks messing with ReplicatorG and Netfabb with no results, but with Cura, *bam* my prints now look like the photographs you see online!
(Also I tightened my stepper belts, I think that was affecting x-y accuracy, but generally I attribute my results to Daid's software lol)
I'll post some up later =)
Photo link:
https://plus.google.com/photos/10422046 ... 8660985857
I'm working to reduce hairs and improve bridging, also the dimensional accuracy of the x-axis is slightly off - trying to work these 3 most important issues out.

ArunC posted a topic in UltiMaker Cura,


ArunC posted a topic in UltiMaker 3D printers,


Recommended Posts
thomix 0
Yup, I have a couple (mostly extruder problems); I'm working on getting a blog up, still have to sort the photos.
Link to post
Share on other sites