


neotko
-
Posts
4,788 -
Joined
-
Last visited
-
Days Won
94
Content Type
Forums
Events
3D Prints
Posts posted by neotko
-
-
Curiously enough @Lepaul had suddenly much hairy prints, but changing the nozzle as @Izzy suggested fixed the issue.
http://www.3dprintingforum.us/viewtopic.php?f=9&t=773
But indeed a photos of the issue it's a must to help
-
Small update
The TL-Smooth do raise the temperature of the chips. Clearly it’s a must to use heatsinks for the stepper chips (they are incredible cheap and easy to stick).
Also. Very important to triple check the cables. Two weeks ago had a very intense 18h print turns on 2 printers with it and had 2 tl-smooth giving troubles in the shape of suddenly the motors went crazy on the Z and extruder, exactly the 2 that get hotter.
After removing one and fixing the cable of the other all went back to normal.
Further inspection shows that the extender cables ain’t perfect and I had to recrimp the connector since the heat was allowing the cable to slipout (due heat and vibrations). So if your motor ever goes crazy, you know where to check.
On this twitter I posted the crazy stuff the motors did
-
Yea Cura can't do that, it doesn't have a easy script system inside like S3D. But afaik it should be possible to set standy / heat temps.
The problem it's that Cura atm, like Thinkprint Tony said on Duet3D forum
"This would be helpful but it does require the firmware to look ahead, potential rather far in the gcode to anticipate a tool change and then act appropriately. I think the right answer is actually for the Slicer to do it as Lars says. The issue is that Cura should be using G10 properly rather than just using M106."
https://www.duet3d.com/forum/thread.php?id=1955
To do the same on Cura it would need a few changes. Maybe someone can do a pull request, and if a Cura developer can do the job for it, it could be done.
That's also, one of the advantages and disadvantages of S3D. It can do easy scripts, but Cura has a intelligent heat/cold timing to plan the heat/cold based on how fast C your hotend heats per second.
Short answer, you might want to do a Script Batch outside Cura to change the heat/cold/wait system so it works better with Duet3D and parse the gcodes before sending them, at least for now...
-
Lo que puede pasar, y esto es tirar al aire sin mirar, es que tengas stuttering. En número de movimientos que ouede hacer el planner del viejo procesador atmega es 16 por segundo, si supera ese número de movimientos el planner se satura y se atasca al leer más movimientos. Si solo te pasa al ir rápido, entonces es eso y no tiene cura, salvo exportar los círculos con menos polygonos.
Otra solución es moverse a una placa más moderna y rápida. Yo he pasado una de las máquinas a duet3d y estoy esperando a un finde semana tranquilo para pasar la última y escribir un tutorial para otros.
Por ahora solo he hecho un video en de la parte hardware básica en youtube.com/neotko
Prueba bajar los polygonos del fichero stl que exportes desde tu software 3d o bajar velocidad, el número de movimientos del planner es un cuello de botella difícil de evitar. Aunque claro, cualquiera te dirá lo típico de ‘si no se nota’. Bueno, depende

-
Te respondo rápido q estoy de aquí pra alla.
Mira la tensión de los cinturones cortos y verifica que estan bien tensados.
-
Ok 2.1.1 Schematics are on:
This old post explains a bit where you can get 5V
Btw, you already had one before, maybe you made a photo before unpluging stuff? Because that could be the easy way to replug it.
The EXP3 pins seems to give 5V and ground. Maybe someone more experienced can confirm this

Check against the PDF of the board to confirm the +/neg it's right.
-
You can also print another version, for all I know this is less noisy
https://www.thingiverse.com/thing:40334
Ofc you you just want the file so check the github
https://github.com/Ultimaker/UltimakerOriginal/tree/master/1041_Feeder_Small_Gear
-
The advantage it's on the parking, you can avoid dripping from the other head while parks, and when it's engaged there's a few mm height difference so the main resting head doesn't hit/touch the printed part.
But probably someone can give you the long explanation
If you fell bored you can read this 51 pages of the first prototype @foehnsturm made to what it's today
-
 1
1
-
-
Thanks.
But for calibrating, zeroing print bed, the end stop is in the wrong spot is in the place for the preset UMO profile and there is no option to add a second hot-end to the preset UMO+ profile. Have to create a custom profile? Or zero with the UMO+ profile then skip all that when I set it up with the UMO profile?
Cheers
Indeed skip all that auto test stuff.
Why would you need to zero with one profile? The start sequence is what will run the home sequence etc.
Indeed you could add a second extruder editing the json file of the umo+ but that’s something I never done, I use s3d.
-
The problem with Drylin igus for round shafts it's that you would need to also use Igus shafts to make them work, because they are made for X tolerances, and if to that you add that you got them on ebay well... probably they are made for a clamp system that fits them so they won't work nice on your printer. IMO Igus it's nice but doesn't work with round shafts, on prusa the bearings are on a different situation where they are inside a bearing holder that press them etcetc. It's different.
Misumi flanged bearings work great, dunno where to get them on UK. But https://www.technobotsonline.com for me has deliver really good stuff, specially nice hotend LMU bearings, dunno if they have flanged bearings for the Z.
Edit. Yea they don't have the LMK12LUU but the LMK12UU (short version). Maybe you can get a friend with a company to order them for you to misumi, the C- (Cost effective) ones are decently priced (but not cheap) and they work great for me.
-
1
-
-
Ok thanks for the good info, But still no one said if i can over tighten the nozzle screw that keeps the heater and heatsensor in place?
If i overtighten it will it damage anything?
...I assume I run the pid35.gcode as if i was printing an object from the print menu, or do i go somewhere else? Thanks again. Thats all my questions!!!
Indeed you launch it like a print, you will now it works because you will see that X goes do a Home check. After that the info will be stored on the machine memory and you won't need to run/print it anymore.
About overtighten the screw, well, if you force it, ofc you can damage stuff, after all it's holding a heater and a sensor, no screw should be overtighten. It's like everything, it can damage the screw or the sensor, and it won't make it have better heat control.
IF you really want to make the heat more precise, buy a E3D sock, cut it with an exacto so it fits nicely and the heat will stay inside the block with much more precision.
This is an E3D Sock for E3D hotends
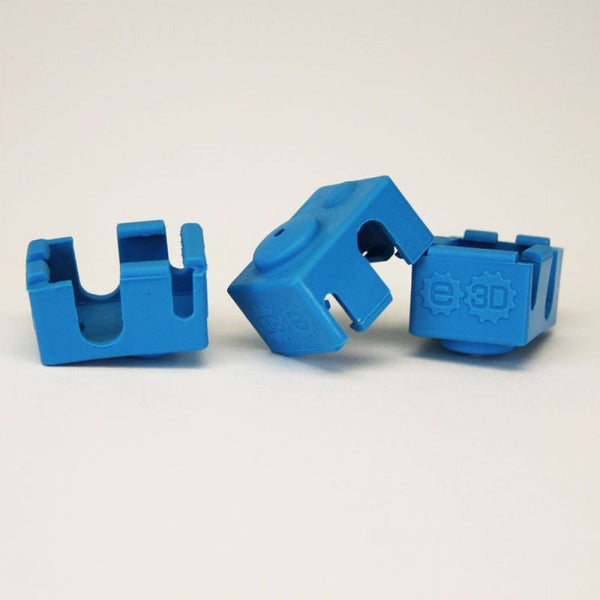
And like you can see on this image, it can be used on Olsson (OFC you might need to cut some silicon of the sock so it stays fit. The important part it's that it surrounds the block, so the heat stays better inside the block and there's less heat loss.
Sample of E3D sock use

-
Circuit maker can open altium files, but I use mac and it’s only for windows
Could anyone take a look to help?
Software free to open the files
http://documentation.circuitmaker.com/display/CMAK/CircuitMaker+-+((FAQs))
The altium files are on
https://github.com/Ultimaker/Ultimaker2/tree/master/1249_Ulticontroller_Board_(x1)
-
Thanks all for the help.
I've made sure the screw is tight and the nozzle is not touching. But because i got slightly less temperature variance swings after, i thought that maybe i need to tighten it even more. I am now worried that ive tightened it too much!
Also about the text file....dont worry i will do it on windows in plain text like normal but was curious if the 'done ;)' was needed or simply didnt matter?
Im just asking too many questions to be sure because no one got back regarding the screw too tight.
Anyways thanks again and hopefully ill be back printing lolcats!
I still have to finish my ultimate acetone tutorial but I need to order way more nitrate gloves.....
Like @Amedee said

I hope it works
BTW! DONT WORRY about the initial overshoot, it happens with 35W, it calms down and go stable really fast, just dont panic if it hits +10C and then goes stable after a minute or much less. It should remain very stable after that.
-
Hello,
I still waiting support from my reseller.
Unfortunately I did not activate developer mode on this printer. Is there any way to activate developer mode without using the printer menus?
Gabriel
Yea but not easy. I only know 2 ways and both could damage your warranty.
- Olimex sells a 3 pins wire cable to usb that allows to enter on debug mode into the system, that allows you to do anything inside the boot system. Ofc this method ofc will be against the warranty and it needs to be done with ESF protection to avoid damaging hardware.
- Other way it’s to plug a HDMI into the hdmi port of the olimex and see how thr system bootup and read where does it fail, but you can’t do anything but watch.
Both methods I found out by myself and ain’t part of the proper way to check nor fix and can/will affect your warranty and must be done with ESD equipment. So don’t do them... The serial cable cost like 10€ or something like that... That’s the beauty of having a system so focused on opensource and leaving the doors open to the users.
For reference only this is the cable that you shouldn’t have/use https://www.olimex.com/Products/Components/Cables/USB-Serial-Cable/USB-Serial-Cable-F/
-
I asked you this simply because I would not have any surprises once I've replaced XY shafts and bearings. Thanks for the help Neotko

Debugging something like that can be a pain in the ass indeed. I hope that fixes it
-
Mac, ok that I know. Change the edit mode to simple text
Go on the menus of "Format" and then click "Make Plain Text" and save.
-
I suppose you can only use 3. Z max/min look like endstop related? Not sure (thinking out loud)
Also, the only difference afaik from z to e1 is that Z has a physical switch to set it to 1/8 ot 1/16 and by default it’s on1.8 microstepping but e1 can be set by firmware.
Maybe that other 2 of Z are related to that? I would just change the 3 that are the same and try to see what happens.
-
Many thanks.
I have tried it and yep spot on. it now does what I want it to do but found that it didn't wait for the temperature to stabilise before it printed.
so I added a M109 command with a {if new tool} entry infront of it and now it does what I want it to do. change tool using idle temps and wait for it to heat up. winner.
would I need to add retraction settings in there or will it go by the start script of the GCode file?
Not sure. I mean, I did msg Simplify3d almost a year ago about their um3 profile and they didn’t care/lissen and they answered with a ‘yeah ueah we know’. They use a weird way of solving the tool changing that isn’t effective because the tool retraction distances are applied when s3d goes from one process to the other (adding horrible long retractions). On my unfinished (the public one at least) profile I fixed that using the tool distance to 0 and making a fixed distance length inside the tool change scripts. This way you can define on your profile how much it will retract on tool change and you don’t have a double tool change retraction. Ofc not sure if they fixed this issue on 4.0 but afaik they didn’t because it’s part of the nature of the process system.
So, short answer. Settool change settings to zero and defined inside the tool change script by a fixed amount. This way it will work better and cleaner.
About the wait, yeah they also didn’t add that. They really needto step up the game and make a heat/cold like Cura does, and I thought (heard) that was gonna be 4.0, so hopefully they will add that on next releases (but who knows...).
-
To be sure, there could be other causes according you?
I can’t think of anything else except excessive bed wooble or heat temperature fluctuations while printing.
-
You need to remove the ;
That’s the ‘uncomment’
The one after the IF{}
Also um3 doesn’t know or thinks. S3D just do a poor heat/cold control, that’s one of the Cura features that make dual easier/faster. But um3 doesn’t actually think much about what’s happening on the print, but the slicer.
For example the material, um3 only checks the tag # compares to his internal list and send the info by wifi to cura so cura knows what material is there. But that’s all. UM3 doesn’t parse the gcode, set the heat/cold times or knows where the head shouldn’t go (like bed clips). All that job is done on the slicer.
-
Just throwing spaghetti to see if something sticks
Can you check the 4 8mm smooth rods if they wooble up/down?
I had this looong ago on 2 umo+ and in the end I just replaced all shafts with misumi/igus ones for precision
This was 2 years ago when I was even bigger a noob
https://ultimaker.com/en/community/16964-umo-woobling-x-block-sometimes-y?page=last
-
Thanks neo,
Where do I enter these PID values?
If I have too many problems I'll just buy a 25W heater, That worked fine even with an OB.
How about the question about screwing it in tight. If i screw it tighter, can i break the sensor and nozzle?
I'll look into the sock too, but I am just after retiring the printer to the original setup as I did have any problems with quality in the beginning.
Without the screw in the block tightened i had +/- 11-12 degrees flotation, after tightening it is 6-8 degrees fluctuation.
either way i'll keep trying!!! thanks again!
Easy way to change it since UM firmware doesn’t allow to do it with the menus (but the fantastic tinkegnome does)
Make .gcode text file for example called PID35.gcode
On the text file insert this 4 lines
M301 P10.03 I1.50 D70
M500
G28 X0
; done
this will set and save the new PID and will do Home on the X axis
Note to the guys that know more: I added the G28 because most of the time it’s easy to forget to add a return after the m500 and without it, it doesn’t execute the line
If you don’t know how to make a .gcode file just get any cura file, open on a editor txt file, remove all whats inside and place the 4 lines
After doing this you won’t need to do it again unless you change the heater to 25W, in that case you need to do a Restore Factory settings using the um2 menus to restore the 25W pid values.
-
1
-
-
The PID bed indeed could be the issue.
You did set bed pid, but did you change the firmware? For example on UM (umo+, um2, um2+) the official firmwares are on bangbang mode, to use PID on the bed you need to build your custom firmware OR just install tinkergnome firmware.
Oh I see with bed off you get that too.
You use zge but with bowden that also happens? I mean, with zge the z noise can be almost removed with the z dampening change. But if that shows on bowden then I’m not sure except there’s some kind of play on the head bearings or the axes ain’t fully squared.
Other crazy idea. Try the same test without fan, even if gives bad quality because lack of cooling. Just to check the fans don’t affect the hotend temperature.
-
No idea. Maybe is a glitch but maybe you can close and reopen cura, ofc you could save settings changed and all that before doing so.


Manual - How to install TL-Smooth - Zebra Strippes Fix UMO - UM2 - UM3?
in Third party products & modifications
Posted
I think it’s a bit overkill. With the heat sink on mines work great. Ofc umo+ has the board reverse vs um2, so it can get out more heat than um2. I think with cheap heat sinks (adhesive) and removing the white plastic should be more than enough to keep the heat away.
If you install a fan try to use one as noiseless as possible, since it’s quite disturbing to hear a fan while printing
But indeed one fan should be enough, as long the heat has a way out.