

How many print hours do you have on it and have you changed out your PTFE part lately? (the white piece between the spring and nozzle)
I wish there was an easier way to inspect and change out the PTFE coupler.

How many print hours do you have on it and have you changed out your PTFE part lately? (the white piece between the spring and nozzle)
I wish there was an easier way to inspect and change out the PTFE coupler.
I don't know how many hours it has but it will be a lot, and I haven't changed the PTFE part, probably ever.
I have done an atomic pull. Yes, it was successful and I was able to easily push filament through manually.
If you've never changed out the PTFE and your machine is nearing or over 1000 print hours, my best guess would be that.
You will usually be able to push filament through no problem, but you will have trouble pulling filament out at 90C without breaking the filament strand.
In terms of inspecting the PTFE, you can post a picture of your atomic pull and we can usually tell the state that it's in if everything else is working.
Depending on when you purchased your machine you might have an extra PTFE in the bag of stuff.. I would rummage through your box of parts to see if you have an extra and swap it out. If you don't, source a TFM coupler (the ones used in the 2+) and they will last you a very long time compared to the PTFEs.
In addition to swapping to a TFM like valcrow suggests, I would also advice you to combine it with a fixed spacer from the UM2+ instead of the spring.
I also have a very similar issue, and this is with a Bondtech extruder.
Pulled the coupler and it was fine - a 1/8" drill bit passed through without obstruction. Atomic pull gives a nice clean inside-of-nozzle shape.
Other thoughts, anyone?
If you get a nice impression of your nozzle it's usually not the TFM, check the nozzle next. I've had some nozzles that just don't print well because there is buildup at the tip, it cleans well and everything so I would try with another nozzle if you have an olsson block. If problem persists then it's not the nozzle.
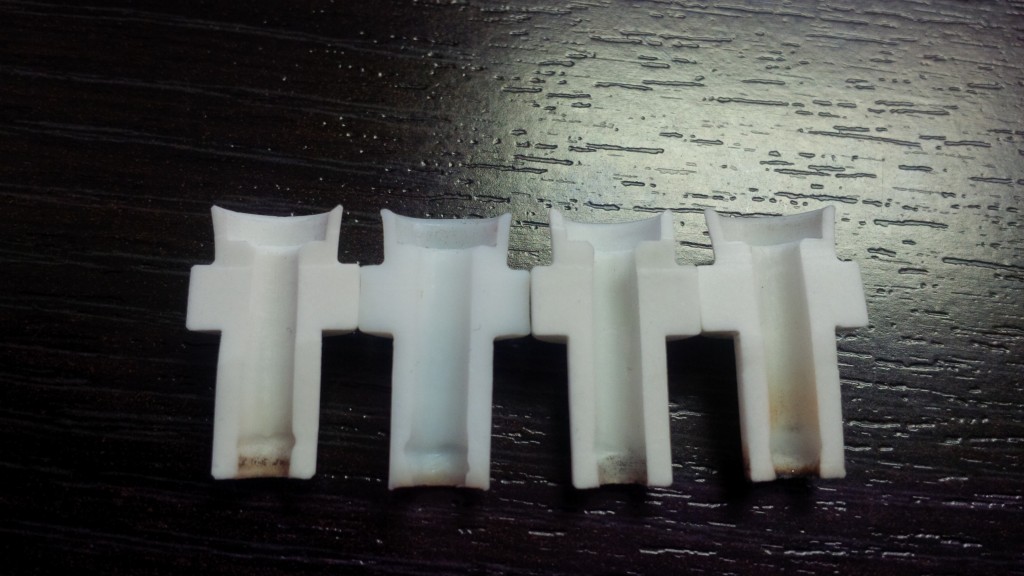
Also a drill bit passed through the TFM doesn't really reveal the problem because it's usually the cavity that causes the issue. The cavity 'catches' molten plastic, and it cools which ceases the whole system. So usually it'll break down when there's any sort of retraction.
Here are a few spent TFM's cut in half. A drillbit or filament will pass through that just fine.
http://www.redicubricks.com/wp-content/uploads/2016/09/IMG_20160303_162640-1024x576.jpg
 1
1
Anyone else hear the clicking in the video?
Hi,
Yes, I was listening and saw this video yesterday. There is something wrong in the X/Y linkage train as you can hear from this "alarming" sound. -Or is this from the feeder stepper motor???
An Ultimaker normally is humming without the "loud" rattling sound and the single click on the return from aft right corner in the middle of this track.
Also note that the extruded material is completely loose as it moves when the extruder head “hit” and is returning from "front left" position along the diagonal path. To me it looks like the nozzle is to high above the bed... ? (Yes I've read all the post in this tread.)
However, it might be caused by some mechanical problem. If this sharp rattling noise is from the printer, you have to fix this asap..
Are you using glue or heath bed or both for this print?
Thanks
Torgeir
I was wondering if the click was the feeder too. Is the filament being ground up in there? Slipping?
Have you been experiencing under-extrusion in prints?
Yes, you could be right, this click or.. could be just when the feeder release and the feeder is moving back again. I thought this occured at the same point, but the two first click is approx at the same point but the last one in more toward the front side.. So this thing occure at different places on the track line. If this video last some longer, we'll prob hear this sound on the return track as well, may absolutely be caused by the feeder is pushed back due to the high pressure. Good suggestion.
As the manual test is "proving fine", it does not confirm that the PTFE insulator is good! This might be measured carefully as we need to know how much filament is extruded pr a fixed number of E step. This is the only way to "properly" check the calibration or that the PTFE insulator is in good condition.
You can find out how many hour you Ultimaker been running by checking the maintenance advance menu.
As sugessted previously, check the PTFE insulator. This is one item we'll need to have as a spare parts "in our store box".

ArunC posted a topic in UltiMaker Cura,


ArunC posted a topic in UltiMaker 3D printers,


Recommended Posts
valcrow 145
How many print hours do you have on it and have you changed out your PTFE part lately? (the white piece between the spring and nozzle)
Have you done an atomic pull? Were you successful? As in you got an impression of your interior nozzle shape?
Link to post
Share on other sites
matthewinglis 0
I don't know how many hours it has but it will be a lot, and I haven't changed the PTFE part, probably ever.
I have done an atomic pull. Yes, it was successful and I was able to easily push filament through manually.
Link to post
Share on other sites