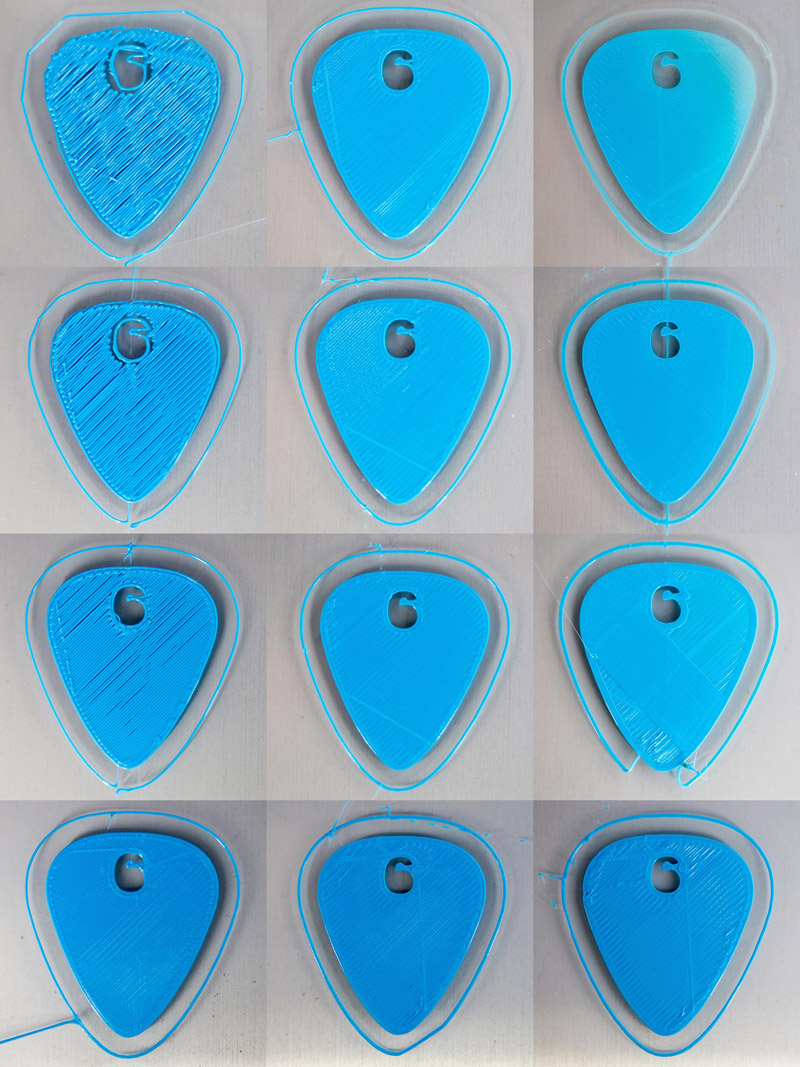
Jump to content

UM2 Bed Levelling - Mission Impossible?


uit

Recommended Posts

Posted · UM2 Bed Levelling - Mission Impossible?

I am trying to level my bed. and I'm constantly failing to the point where I lose interest...


I ran about 20 levelling cycles with varying every variable which i think has influence the correct levelling (glass plate orientation, heated/cool bed, heated/cool nozzle).


the 3 points of the levelling wizard are levelled near to perfection by using 80g/mm²-paper.

But no the rest, i have 2 troubling regions, where on one the nozzle is touching the glass and on the other the distance nozzle-glass is too far for the filament to stick


I hope you can understand what I mean by looking at this print.

model: Bed leveling test by imitation


_MG_4440_small.jpg


you can view this photo in higher resolution here

as well as detailled photos of the corners

left upper

right upper

left lower

right lower

center

of course this issue leads to unprintable regions and limits the maximum printable size and amount of objects.

problem region left upper - filament is not sticking to bed

problem region right upper - feeder clicks - too much resistance pushing the filament out (good chances of clogging)

any idea?

is there a way to fix this Issue myself?


  • Like 1
Link to post
Share on other sites

Posted · UM2 Bed Levelling - Mission Impossible?

I don't use paper. I never did. I've always leveled the bed by sight alone or by printing such a calibration pattern and adjust the screws on the go (adjusting them on the fly).


  • Link to post
    Share on other sites

    Posted · UM2 Bed Levelling - Mission Impossible?

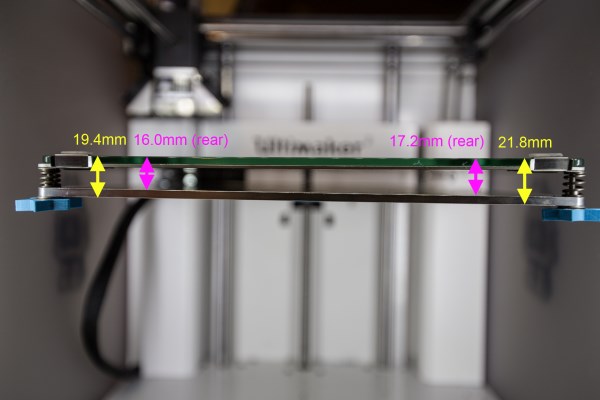
    Not sure about this but maybe there is something that makes the plate higher on the upper right and a bit lower on the upper left.

    Maybe check the screws (not sure what screws).

    And take a look at the manual you can download here to help:

    https://github.com/Ultimaker/Ultimaker2/blob/master/um2%20assembly%20manual%20V1.1%20_english.pdf

    And also make sure you're on the latest firmware there was a bug in leveling with previous firmware (14.07 solves it)


  • Link to post
    Share on other sites

    Posted · UM2 Bed Levelling - Mission Impossible?

    thanks for your replies,


    @nallath

    adjusting on the fly would be kinda hectic because you have to adjust the level back an forth everytime the head moves to one of the "trouble regions" ;)

    and furthermore there are no relevant levelling screws for the level of these 2 corners


    @Didier Klein

    yes, something is way out of plane

    the glass-plate is flat (definitely)

    could be the L-shaped part which attaches the buildplate to the Z-rods

    could be a bent x-axis

    could be a bent chassis


    i can only see 3 relevant screws which are accessable without taking the frame apart...


    I#m aware of the levelling bugs, I tried the whole procedure in Cura 14.03 and 14.07, this issue is definitely Hardware-related.


    maybe I should try Chapter C3 (stabilize z-stage) from the assembly manual, but I#m not very motivated and talented doing that :(


    @Cez_etc

    thanks for the link, I will try this method in the evening, but I'm sceptic if it helps me in any way

    In fact i can print a perfect concentric circle

    but only in the middle of the bed and with a max diameter of ca. 6-7 cm, then I'm hitting my problem corners...


  • Link to post
    Share on other sites

    Posted · UM2 Bed Levelling - Mission Impossible?

    Its a bit hectic, but its perfectly doable if you tune the speed down for the first layer a bit. You only need the 3 screws. With a bit of practice it gets quite easy.


  • Link to post
    Share on other sites

    Posted · UM2 Bed Levelling - Mission Impossible?

    Have you checked to see if the bed or glass is warped?


  • Link to post
    Share on other sites

    Posted · UM2 Bed Levelling - Mission Impossible?

    Have you checked to see if the bed or glass is warped?


    i don't know how I should measure it exactly, the thickness of the glassplate is constant as I my calipers tell me, i also orientated the glass plate 90 degrees and flipped it with the same results.


  • Link to post
    Share on other sites

    Posted · UM2 Bed Levelling - Mission Impossible?

    I suspect your gantry rods are out a bit. The rear X rod is probably not level with the front X rod. Is the box of your machine warped? Do the 4 "feet" sit level on a flat surface or does it rock? More important are the top 4 corners level. Shipping companies like DHL seem to employ elephants who sit on the boxes during shipment.

    What do to about it...

    Well first of all: Ignore all the criticism or suggestions of another leveling technique. Your technique is fine. There are many good ways and no matter how hard you try you will always have a problem because something is slightly off on your hardware.

    How thick is the layer you printed? What is your bottom layer thickness? If you are seeing this kind of error with a .1mm layer then you can fix this a bit and it's as good as most ultimakers. But if this bottom layer is .3mm thick and you see this kind of error you need to get it fixed.

    My only quick solution to your problem:

    First realize that if you want to lower the back right corner (which you need to do) you need to raise the front left corner a bit. So what I'm saying is you can distribute the error more evenly. So I would raise the front left corner 1/4 turn and lower the front right corner 1/4 turn and don't touch the rear screw. Then repeat the test until the overly thin section currently in the rear right corner matches the front left corner - you want equal thinness there. Also you want the rear left corner to be overly thick by the same amount as the front right corner.

    If this compromise "best fit" leveling is not good enough you need to twist the UM2 frame or the glass. Probably the glass is easier. You could try inserting a .1mm shim (a small piece of paper) under the rear left and front right corners of the glass. That will warp the glass to match the gantry above. You might need 2 pieces of paper.

    I'm really curious to know if this paper warping solution works! Let us know because if it does there is a second person on the forums who has the same problem as you.


  • Link to post
    Share on other sites

    Posted · UM2 Bed Levelling - Mission Impossible?

    Did you always have this problem or did it occur suddenly?


  • Link to post
    Share on other sites

    Posted · UM2 Bed Levelling - Mission Impossible?

    @gr5


    thank you for your time to reply


    the box seemed to be okay, maybe a subtile smell of elephants, but next to no surface scratches.

    inside the box, everything was in place.

    first thing i noticed when assembling was that the included filament guide wasn't fitting into its suposed hole, cause the backplate seems too thick. (but that would be very suspicious)


    my the chassis of my machine is definitely warped, it's sitting on 3 feet as you can see here: http://umforum.ultimaker.com/index.php?/topic/6050-um2-housing/&do=findComment&comment=60758


    the initial layer thickness was 0.3mm at this print (layer height 0.1mm)

    I made another print with an initial layer thickness of 0.1mm. which you can see in this photo (collage for more detail - highres )

    0_Collage_PLActron_800.jpg

    I used the distribution of error method on this print - it is the best I can get


    so my next option is twisting the frame or glass which i will skip for the moment.


    finally I tried a similar method to your paper warping idea, which is a nut right under the heated bed, to raise it a small amount. I hope you can imagine it with this photo (the smaller screws are from the left backside clamp)

    _MG_4456hotfix.jpg


    I did several loops of the bed-levelling-wizard, and I noticed a very slight change to the better (at least for the back left corner). Further trials tomorrow.


  • Link to post
    Share on other sites

    Posted · UM2 Bed Levelling - Mission Impossible?

    The warp on your foot of your UM completely agrees with expected leveling errors you are experiencing. One way to think about it - your right front foot and left rear foot are "high" so you the gantry will be warped the same way (right front, left rear high) so you can warp the glass by a similar amount - raise right front and left rear corners of the glass.

    Ideally you should be able to put the whole thing in some kind of vise that pushes down on those 2 corners until it sits flat on the table again. But in practice I'm not sure it's possible. I guess you would want to loosen and retighten all the chassis screws while doing that. :( I think you are better off with the glass-warping technique.


  • Link to post
    Share on other sites

    Posted · UM2 Bed Levelling - Mission Impossible?

    I actually had a very similar problem with my UM2. If any of my prints were close to the back right corner, they would come out bad. What I found was that there was a black wiring box that is on the left side of the top aluminum plate (it connects the wires to the heating pad for the build plate). If the rear adjustment screw is too tight, then this wiring box will contact the lower aluminum plate, and once it contacts if you continue to tighten the rear leveling screw it will actually pull down the rear right corner. I found that you have to leave about 1mm of space between the plastic box and the lower aluminum plate to account for thermal expansion as well.

    Hope this helps!


    • Like 1
    Link to post
    Share on other sites

    Posted · UM2 Bed Levelling - Mission Impossible?

    I'm experiencing this same exact issue with my new Ultimaker 2. I have leveled it countless times and also tweaked it on the fly, but it's never perfect. My unit did arrive with shipping damage to the frame--- the right rear leg isn't level and requires a shim to prevent the unit from moving around on my desk while printing. I'm getting great prints in the center of the build plate, but just like UIT I experience issues in the right rear corner of the build plate when doing larger prints.

    What was the final solution here, UIT?

    I like the idea suggested by GR5, but I would like to avoid taking the printer apart since it's so new. If that is the best solution, I'll do whatever it takes to get it printing correctly across the entire build plate.

    Thanks


  • Link to post
    Share on other sites

    Posted · UM2 Bed Levelling - Mission Impossible?

    how about just put dime underneath the "low" corner(s)? Between the glass and the aluminum to bend it to match the tilt of the gantry overhead.


  • Link to post
    Share on other sites

    Posted · UM2 Bed Levelling - Mission Impossible?

    a short status update on my side:


    I made a "workaround" by putting a nut under the heated bed, pressing the heated bed with the glass-plate a little bit up on my lowest corner.

    you can see this on the second photo of my last post ()

    so i can increase my printable area a little bit. problem is that there is a thermal coupling now via the nuts, so the bed takes a little bit longer to warm up and energy is wasted, and it's no final solution at all.


    sadly I'm still not able to use the whole building plate. so no large prints for me.


    I have an open support ticket (#UHK-927-78261) regarding this issue, but I have not heard from support since July 17th


  • Link to post
    Share on other sites

    Posted · UM2 Bed Levelling - Mission Impossible?

    I would just send another mail after it. These kind of waiting times are unacceptable.


  • Link to post
    Share on other sites

    Posted · UM2 Bed Levelling - Mission Impossible?

    I'm currently working through this with support. Simon aka illuminarti is being very responsive, although I have yet to correct the problem after several hours of adjustments and test prints.

    I might try a little shim in the corner as suggested by gr5 as a temporary fix.

    Has anyone else had any luck correcting the warped foot? Most posts on here suggest that it's cosmetic and doesn't affect the print, but it seems clear (based on our experiences in this thread) that it has a larger effect when trying to print across the entire print bed surface. As gr5 posted, slightly loosening all the frame bolts and placing a large weight on the top of the frame to level it out, followed by tightening all the frame bolts again might work. Of course, I'm sure it's more complicated than just that... ?


  • Link to post
    Share on other sites

    Posted · UM2 Bed Levelling - Mission Impossible?

    I noticed that the spring compression bolts are not flush in the rear center or the front left of my unit. Everywhere else they are flawless. Perhaps this is part of the leveling issue.

    I have removed them and re-installed without any difference. It appears to be a tolerance issue with either the bolt production or the CNC on the aluminum bed below the glass.

    Here's a set of photos of the front left (not flush) and front right (flush):

    https://www.dropbox.com/l/AGLzA3XEd8CZcntqOE1gau


  • Link to post
    Share on other sites

    Posted · UM2 Bed Levelling - Mission Impossible?

    Upon closer examination the unit came pre-built with different hardware! The bolts that do not sit flush are a hair different than the bolts that do sit flush!

    They appear to be M3, so I'll see if I can find a new set at the local hardware store.

    Has anyone else had this issue?


  • Link to post
    Share on other sites

    Posted · UM2 Bed Levelling - Mission Impossible?

    I think UIT's problem is different. I think his two X rods (the one in the front and the back) are not parallel and in fact one is tilted versus the other. This means as the head approaches a corner the head is higher or lower than a flat plane. No amount of leveling can fix a saddle shaped surface.

    I think if I had UIT's machine and it was out of warranty I would put the whole box in a vice and twist it until the front and rear rods were parallel.


  • Link to post
    Share on other sites

    Posted · UM2 Bed Levelling - Mission Impossible?

    hello everyone,

    maybe this picture is worth a thousand words (buildplate is levelled as best i could)

    UM2_buildplate_MG_4850_small.jpg

    @timelapse: my bolts are exactly the same and not lifting the glass plate


  • Link to post
    Share on other sites

    Posted · UM2 Bed Levelling - Mission Impossible?

    Thanks for sharing, UIT!

    I have spent the entire day attempting to get my bed leveled for large prints. Failure after failure.


    After replacing the bolts to a matching set and seeing the problem still lingering, I measured the leg that is not level on my UM2. It’s the front left and it’s 2.54mm taller than all the other legs that sit level. It’s very interesting the the build plate problem seems to be tied to the front left adjustment corner (which affects the rear left where my problem mainly exists) and this is also the same corner that the UM2 frame isn’t level.


    After trying all sorts of small shims (sheets of paper... stack of 2, 4, 8, etc) without much success, I used a wood shim that is 2.54mm (same as the out of alignment leg on the front left). Photos attached. After re-leveling, the test print still had the same problem. In my case, this is the rear quadrant being substantially higher than all other corners.


    I also already tried to find a balance between the front tensioning / leveling bolts, but it's never perfect. If I start to get better results in the rear, the front right is then too high or too low causing other unwanted issues.


    I'm now back to where I started yesterday... with the only permanent improvement being the new set of matching M3 machine screws on all 3 spring loaded leveling areas.


    This is starting to become very frustrating. 90% of my projects require the ability to accurately print larger parts. Hmmmmmm.... what next?


    Any other suggestions?


    photo 2

    photo 1


  • Link to post
    Share on other sites

    Posted · UM2 Bed Levelling - Mission Impossible?

    Here are some other photos showing the same problem before I started shimming the corner(s) and changing the mismatched bolts.

    photo 2

    photo 4

    photo 1


    I can print in the center of the bed with great accuracy. Here's the project I'm currently working on with T-glase. Everything turned out perfectly. Now, I have one part left to complete the project and I'm stuck due to this rear left corner problem.

    photo 4 1

    photo 3 1

    photo 2 1

    photo 1 1


  • Link to post
    Share on other sites

    Posted · UM2 Bed Levelling - Mission Impossible?

    I've actually had the same issues described in this thread when I first started using the UM2, but I've implemented a different fix using two parts.

    The printer that I have has the issue where one corner (front right in my case) was ~4mm higher than the other three corners and so the printer wobbled when printing. I didn't want to completely take apart the printer to fix the issue, so I came up with an alternative fix instead. The first part consists of length adjustable legs that attached to each corner to stabilize the printer:

    IMG 4790

    IMG 4786


    The second part was the actual fix for the heated bed and involved a printed spacer wrapped in kapton tape to prevent the spacer from melting/warping. By wedging the spacer into the back left corner between the PCB and aluminum plate, I've turned the three point leveling system into a four point one with one corner being set at a fixed height. By tightening the rear screw, the height of the back right corner can be adjusted without affecting the back left corner. This adjustment is also independent from the front corners. It takes a bit of time to get it levelled this way, but once the bed is calibrated it stays pretty consistent from my experience (I print at 0.05 - 0.1mm layer heights).


    IMG 4784

    Wish there was a more permanent fix, but it doesn't seem like there is one without taking apart and reassembling the printer.


  • Link to post
    Share on other sites

    Create an account or sign in to comment

    You need to be a member in order to leave a comment

    Create an account

    Sign up for a new account in our community. It's easy!

    Register a new account

    Sign in

    Already have an account? Sign in here.

    Sign In Now
    • Our picks

      • Introducing Universal Cura Projects in the UltiMaker Cura 5.7 beta
        Strap in for the first Cura release of 2024! This 5.7 beta release brings new material profiles as well as cloud printing for Method series printers, and introduces a powerful new way of sharing print settings using printer-agnostic project files! Also, if you want to download the cute dinosaur card holder featured below, it was specially designed for this release and can be found on Thingiverse! 
        • 0 replies
      • S-Line Firmware 8.3.0 was released Nov. 20th on the "Latest" firmware branch.
        (Sorry, was out of office when this released)

        This update is for...
        All UltiMaker S series  
        New features
         
        Temperature status. During print preparation, the temperatures of the print cores and build plate will be shown on the display. This gives a better indication of the progress and remaining wait time. Save log files in paused state. It is now possible to save the printer's log files to USB if the currently active print job is paused. Previously, the Dump logs to USB option was only enabled if the printer was in idle state. Confirm print removal via Digital Factory. If the printer is connected to the Digital Factory, it is now possible to confirm the removal of a previous print job via the Digital Factory interface. This is useful in situations where the build plate is clear, but the operator forgot to select Confirm removal on the printer’s display. Visit this page for more information about this feature.
          • Like
        • 0 replies
    ×
    ×
    • Create New...