


vincentbaas
-
Posts
42 -
Joined
-
Last visited
vincentbaas's Achievements
19
Reputation
-
Yeah, I already guessed I had to fix this in the firmware. What I can't figure out yet is how to do this, as firmware builds are not really my cup of tea. My approach would be to grab a Marlin configuration file for the UMO+ and somehow adjust that for the printer to ignore the heated bed completely. But I can't figure out which parameters influence this and how to do this. Or is there a firmware version out there that works and has the bed turned off by default?
-
I haven't used my UMO+ for a while, since I messed up my heated bed. I haven't been able to figure out what messed up my bed, even with replacement parts. But for the time being I want to run it without the heated bed, so I can at least get back to basic prints. I know printing without a heated bed isn't optimal, but at least it should work. I've reinstalled everything, but disconnected the bed. However, I get the MAXTEMP error when I turn on my printer. How do I get my printer to ignore the error and run without the bed? I read something about firmware changes, but I can't figure out what to change?
-
When doing some other repairs on my UMO+ I managed to damage the connector on my heated bed, resulting in detaching all soldering connections (yeah, stupid, I know). Obviously I want to fix this, so I can bring my printer back to life. Only I'm not much of a hero in soldering electronics (and missing the right tools), and I'm not sure if it can actually reverse the damage done. So I think my best option is to replace the entire bed with a new one. But every UM upgrade kit out there is either sold out or sold for ridiculously high prices, so that's not an option. My only source so far seems to be Chinese webshops (link) or eBay (link). So I have two questions for you: Is this a reliable replacement part? And will it work on my UMO+ without any major changes (voltage, connectors, UMO+ vs UM2, etc)? Do you have any experience ordering from these kinds of sources? Or do you know of any good alternatives for sourcing a new heated bed (for a reasonable price)?
-
I don't have a direct solution (facing issues with my printer as well at the moment ;-) ), but maybe a step in the right direction: have you checked / cleaned the knurled bolt (the spiky thing grabbing the filament) and the feeder gear itself?
-

ColorFabb_HT instead of Carbonfill
vincentbaas replied to vincentbaas's topic in Materials & profiles
Thanks, I'll give it a try in that case (after I've fixed a few issues with my printer though)! I'll post the results here once I know more! -
I'm having a strange issue with my UMO+, that I haven't been able to figure out myself. My last succesful print was a pretty large 5h print, but after that the problems started. It prints a very uneven first layer, it almost looks like too much material is deposited. This causes the nozzle to start 'plowing' through the material, and causes it to push down the print bed. At first I thought it was a feeder issue, as the knurled bolt was grinding into the filament. But now I think the issue must be somewhere else, as the feeder seems to be working fine. I feel I've tried all the options I could think of myself, so I need your help here. Am I having a first layer or a feeder issue? Or is it something else? Things I've tried already: Cleaning the nozzle (atomic), knurled wheel, and bowden tube multiple times Replacing the little black feeder wheel with a steel bearing Changing material (both ColorFabb PLA/PHA and Ultimaker PLA) Checked if belts, pulleys and other screws were still tightened Leveled the print bed multiple times, both closer and further away from the nozzle Checked the PTFE coupler, it still looks fine Checked and tightened the screws in my pulleys, short belts, print head. None of theme were loose. Pictures: Test cubes: 0.3 mm first layer at 205C, bed at 50C. Left 100% flow, right 80% flow. Bed leveling test: 205C, bed at 60C. The print itself is even, only the material 'plowing' remains.


-
Recently I've been playing with the thought of upgrading my UMO+ with a dual fan setup. However, I don't have a stainless steel nozzle and a roll of Carbonfill laying around to print the fan cap, as recommended in the Ultimaker upgrade guide. What I do have is a few small samples of ColorFabb_HT, which I bought for experimentation purposes. Looking at the glass transition temperatures HT should be able to handle the heat even better than ColorFabb's carbon filament (HT: 100C vs XT-CF20 75C). So would it make sense to use HT for this purpose?
-
Heb je iets meer info over materiaal, instellingen, temperatuur, etc? En foto's plaatsen doet het ook altijd goed bij problemen!
-
maatvoering 123Design / Cura en UM2 print verschillen
vincentbaas replied to ron's topic in Nederlands
Ik heb het zelf tot nu toe bij printen met PLA gehouden, maar op basis van wat ik overal lees heeft ABS sowieso de neiging om te krimpen, wat de oorzaak zou kunnen zijn voor zowel het maatverschil als het kromtrekken. De temperatuur verhogen zou kunnen helpen voor het beter laten hechten van de lagen. Voor een beter beeld van het probleem: welk materiaal (kleur / fabrikant) gebruik je en wat voor andere printinstellingen (o.a. snelheid, ventilator) heb je gekozen? -
Sounds like there's still some red filament stuck in your nozzle. You could try the so called Atomic method, which is very useful for cleaning your nozzle from time to time. Instructions can be found on https://ultimaker.com/en/resources/19510-how-to-apply-atomic-method
-
Cura has some settings for the Z-seam, either changing its coordinates to hide it somewhere in your model or to randomize it. The first option probably won't work for your model, as there are not a lot of corners to hide the Z-seam in. Randomizing might help in your case. Not sure if there are any other settings to consider here.

-
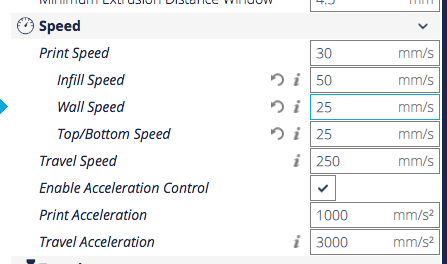
Er is in Cura inderdaad een instelling voor de snelheid van de fill. Zie onderstaande afbeelding, Infill speed is denk ik wat je zoekt. Mocht je de instelling niet zien dan is deze verborgen en kun je deze via de instellingen van Cura aanzetten.
-

Version 1.0
900 downloads
This was my biggest model so far and I'm quite satisfied with the result after lots of sanding, priming, and painting. As the model is made for the UM2 Extened, I had to split the wings and fuselage using Mesmixer. I printed the parts with 0.15mm layers in various PLA types (ran out of UM PLA after the body ) One of the body parts came out weird, and next time I would look into making alignment pins of some sort. Gluing with CA superglue worked fine, only aligning some parts was tricky. I underestimated the finesse that goes into neatly painting a model of this size, but in the end I got the paint to both fill some tricky parts as well as nicely cover the entire model. The model itself is great, only assembly took some filing, especially for the engines and wing pin. Filament: Body: Ultimaker PLA Silver Metallic Wings + engines: ColorFabb PLA/PHA White Stand + turbine: ColorFabb PLA/PHA Black Materials 'Regular' CA superglue Tamya Grey Model primer White acryllic paint Clear acryllic coat Sanding paper 120/180/200/400 grit -
https://ultimaker.com/en/resources/20411-adjusting-the-model Per model settings is what you're looking for.
-
Welkom! Je printbed staat inderdaad waarschijnlijk te ver van je nozzle af waardoor je eerste laag niet voldoende in elkaar wordt gedrukt. Een kwestie van met de stelschroeven van het bed het geheel iets dichter bij de nozzle zetten.


