

@fabskill: Awesome

@IRobertI, I especially like the case idea and how it's been designed and executed. I am really impressed.
@Didier Klein, I LOVE the octo-zorro.
@fabskill, really cool!
@LeoDDC, fantastic organic design, they also look rather and surprisingly friendly, no? great!
I am just today back to printing as I had a reall messy teflon coupler, that caused some real bad extrusion issues. It seems to be ok now... testing, testing, printing, printing :-P.
The fishbone hanger from thingiverse (http://www.thingiverse.com/thing:232464), which I installed in my boys bathroom, next to the nemo pictures. Also was my first print with inside support. printed with white PLA from SwissRepRap at 0.1 mm layer height. Speed was 50.


Have a great day!
@Martin: Thanks man. That hanger is really cool and it looks like it printed really well. Think I may have to get one my self 
just done one more test with the cheep white PLA and I'm really pleased with the results. This guy is tiny.
So far nothing beats this material 
nice, what brand is that white stuff?
just done one more test with the cheep white PLA and I'm really pleased with the results. This guy is tiny.
So far nothing beats this material
@braddock: I got it when I bought my printer from the imakr store. http://www.imakr.com/product/view/pla-3mm-filament
It did't have a brand or lable on other than heat setting and diameter.
@Osgar: Settings were 0.1 layer height, 35mm/sec, 0% infill, 197C. I actually didn't mean to print it at 0.1 layer height but it seems to have turned out ok. I also had one support for the nose as the tip is at a negative angle from the rest of the body.
I cant wait for the dual extruder to be released, so excited about soluble support structures.
Leo.. +1
soluble support structure... mmmm cant wait too!!
So here's the next character I'm going to do. I originally made this guy to try some realistic skin rendering in vray but I figured he'd make a cool bust as well. I just wanted to do a small test to see what areas would require supports, where would I need to enhance detail etc. Obviously the chin will need support. I'm wondering if I should slice his face off and print separately to avoid using supports. Mr braddock you seem to be experienced in these matters. How would you proceed?
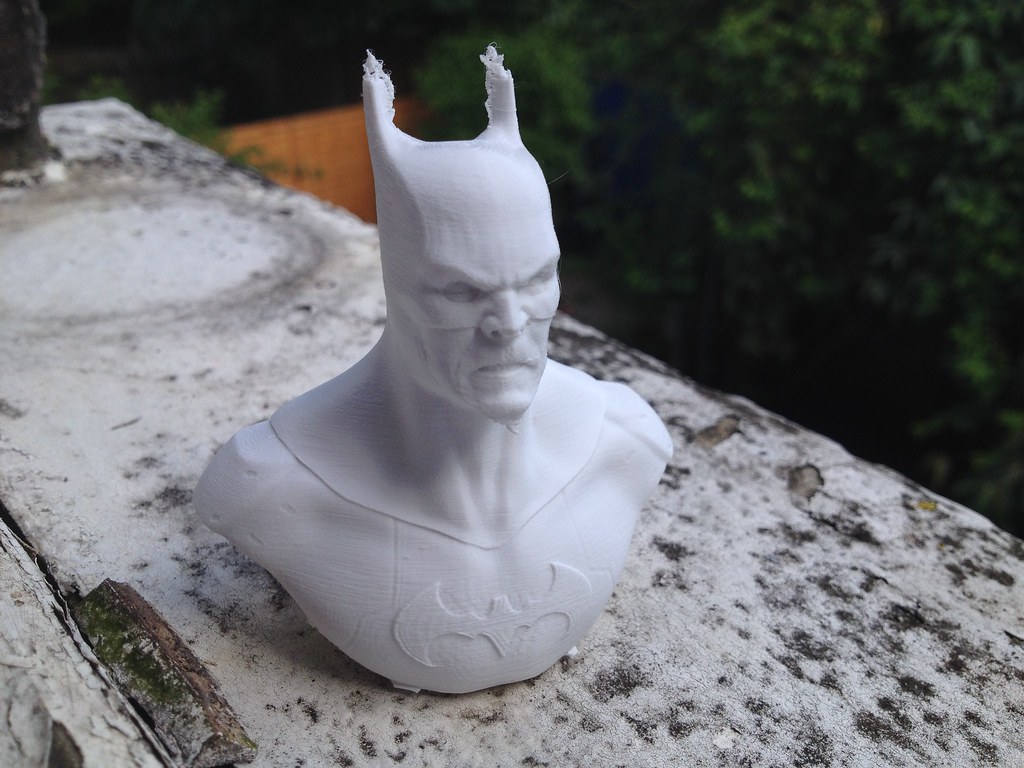
That`s a really cool mean looking batman tho
Hey Leo, nice sculpt!
Yep, I'm a fan of cutting models up, but sometimes you just want to print in one piece and not turn every print into a major project!
Hi shoulders almost don't need support, I'd be tempted to print them as is, and the overhang on his chin isn't too extreme either, a bridging support from his chest to his chin would be plenty.
However, if you did want to make a nice piece out of this, definitely cut it up, and make the final model and 200mm tall.
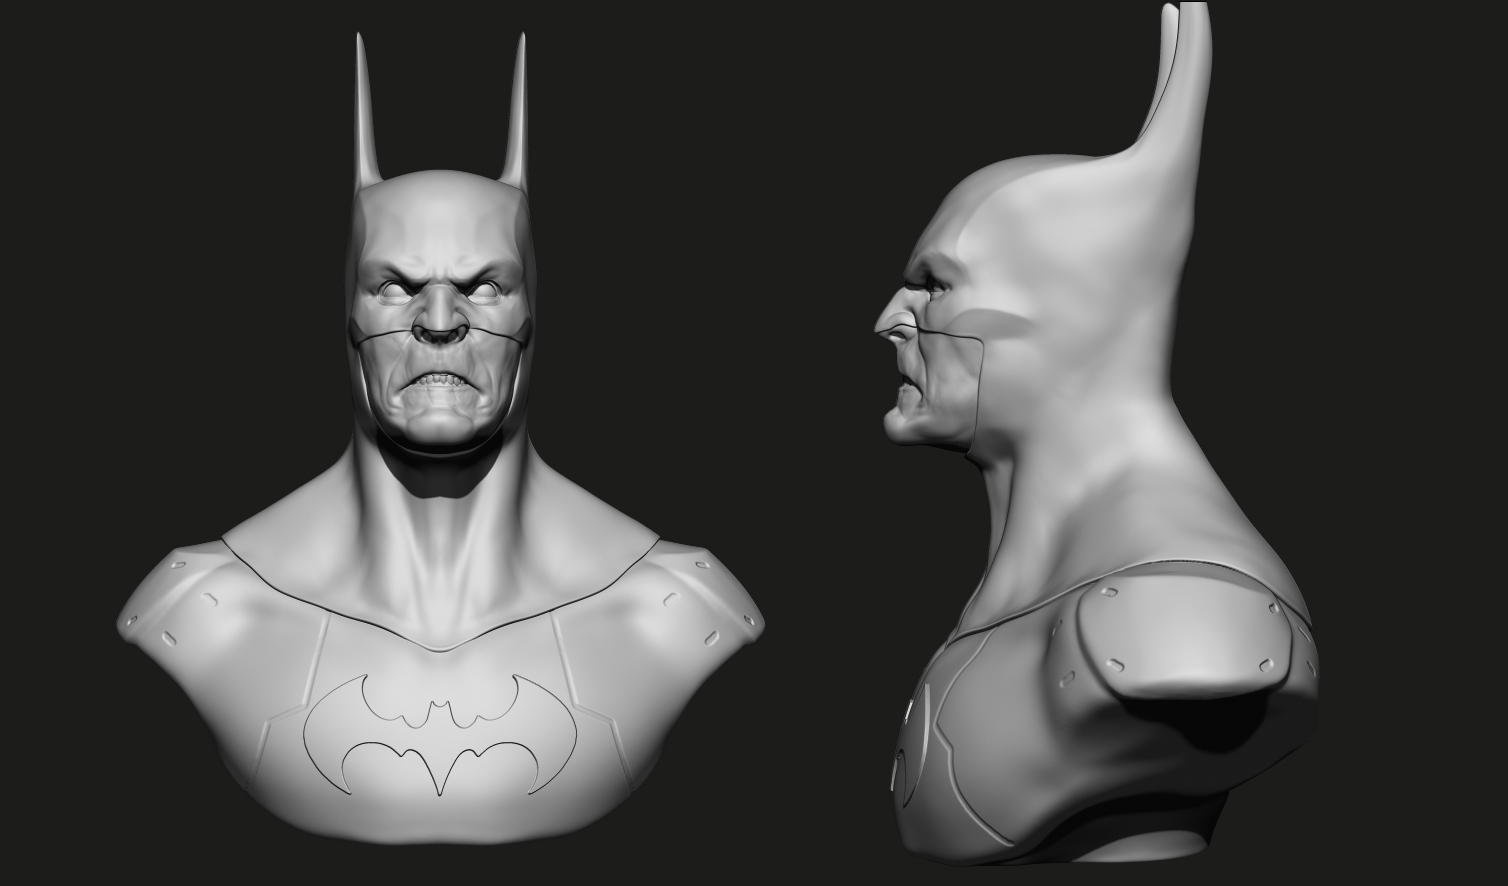
Like you say, cut off the face, and possibly the shoulder too, see my pic.
![Leo bat]](https://umgallery.ultimaker.com/uploads/gallery/album_615/gallery_20412_615_55178.jpg)
Surprised the ears didn't work?
There's a good video here on cutting and keying.
So here's the next character I'm going to do. I originally made this guy to try some realistic skin rendering in vray but I figured he'd make a cool bust as well. I just wanted to do a small test to see what areas would require supports, where would I need to enhance detail etc. Obviously the chin will need support. I'm wondering if I should slice his face off and print separately to avoid using supports. Mr braddock you seem to be experienced in these matters. How would you proceed?
@Skint: thanks man. PS now working on the hulk too.
@braddock: Thanks mate, now going to watch the video. I think I'll definitely cut the model up. The only thing that worrys me is that I'll get that layered/wood grain effect on his face.
The ears should be ok, the only reason they didn't print was due to a blockage in the nozzle. When I saw the printer head moving and nothing coming out I panicked but after a quick brows on the forums I realized what the problem was and fixed it. Gotta love this community man
I printed the head of my blue beast in that orientation at 0.06 and it's pretty good, not woodgrain at all.
Go big, you'll get better results.
Wow, thank you braddock! There are two things I realized after watching your video post:
1. I love what people are able to do with this kind of software. Without them we could not print such beautiful models which are always fascinating the people! Keep doing that awesome stuff!
2. I totally love the parametric stuff! I could not go without it. When I listened to the guy I started laughing when he just switched between different key forms like he wanted till he thought: ok, that looks good. I would be sooo insecure, I just need exact dimensions:)
Anyway, nice batman LeoDDC !!! The Ultimaker community is just crazy, I love how people help each other and get their their prints optimized!
Actually, after some tests, I must admit I'm not a huge fan of the keys because they ad new problems to solve.
If it's a negative key, it's pretty OK wherever it ends up, but when it comes to positive keys, here comes the troubles because if it's on the bottom, then you'll end up with a total overhang and sometimes it's just easier to glue two perfectly flat surfaces and then get rid of the gap by sanding and "epoxing" it, operation that you'll need to do anyway with keys.
I also hate supports, they slow down too much the print so I simply end up by slicing the model in order to get as less overhangs as possible.
I did this way on a puppet without using keys and it ended up quite ok.
It's made of 2 pieces for the body and other 2 pieces for the arms.
Forgive the links flood but it's just to show an example (that maybe it's more on the postproduction side).
Here you can see the line between the top and the bottom
http://instagram.com/p/m5GLTTFdNy/
after I glued/epoxy putty/sanded/primered it:
http://instagram.com/p/m-z2djFdAj/
first copy after I molded it:
http://instagram.com/p/nLq-snldH9/
The overall surface came out smoother than expected.
The only "key" I used is on the arms and it's not actually a key, it's just a boolean of the arm into the sleeves, so it will be easy to attach the arms on the body (once painted) without having to deal with seams
http://instagram.com/p/n0TyW9ldHS/
BTW, this one was printed at 0.06 and it's something like 15cm tall so I had to sand it a lot, since then I'm printing at 0.04, I'm lazy and I just dream of a world with a simple primer pass to get a smooth surface, which is pretty much all you need on a good print at 0.04.
Sorry for the long post, hope it helps.
Good points, and I love your stuff.
I had that scenario with the tail, but in that case, the supports were a perfect solution.
Keys are good if you want to produce resin kits, there's no guess work with lining parts up.

Actually, after some tests, I must admit I'm not a huge fan of the keys because they ad new problems to solve.
If it's a negative key, it's pretty OK wherever it ends up, but when it comes to positive keys, here comes the troubles because if it's on the bottom, then you'll end up with a total overhang and sometimes it's just easier to glue two perfectly flat surfaces and then get rid of the gap by sanding and "epoxing" it, operation that you'll need to do anyway with keys.
I also hate supports, they slow down too much the print so I simply end up by slicing the model in order to get as less overhangs as possible.
I did this way on a puppet without using keys and it ended up quite ok.
It's made of 2 pieces for the body and other 2 pieces for the arms.
Forgive the links flood but it's just to show an example (that maybe it's more on the postproduction side).
Here you can see the line between the top and the bottom
http://instagram.com/p/m5GLTTFdNy/
after I glued/epoxy putty/sanded/primered it:
http://instagram.com/p/m-z2djFdAj/
first copy after I molded it:
http://instagram.com/p/nLq-snldH9/
The overall surface came out smoother than expected.
The only "key" I used is on the arms and it's not actually a key, it's just a boolean of the arm into the sleeves, so it will be easy to attach the arms on the body (once painted) without having to deal with seams
http://instagram.com/p/n0TyW9ldHS/
BTW, this one was printed at 0.06 and it's something like 15cm tall so I had to sand it a lot, since then I'm printing at 0.04, I'm lazy and I just dream of a world with a simple primer pass to get a smooth surface, which is pretty much all you need on a good print at 0.04.
Sorry for the long post, hope it helps.
Take a look at this... printing laying on it's back, so the entire back is an overhung surface. The little dots are were the supports were joined. Printed on a Form1


Thanks Paul, I feel pretty bad now. 
Well, at least my next one won't be a FFF/FDM printer.
Take a look at this... printing laying on it's back, so the entire back is an overhung surface. The little dots are were the supports were joined. Printed on a Form1
don't feel bad... I'm using my UM2 for larger things, and parts that would be too expensive, or too brittle if printed in resin... but yeah, my next printer won't be filament based.
Thanks Paul,
you know your amazing work is the reason why I bought an UM2.
Your point on keys is correct but I've been thinking if it wouldn't be easier to create it in post production rather than directly by the printer.
I'll do some tests with just keys printed at lowres, to see if I end up with something decent.
About the supports, I don't know, every time I try to print something with supports, it ends up with a "not that much better" result, maybe I do something wrong, I'd like to see some more detailed photos about other people results because sometimes I see people happy with prints that I wouldn't be so happy about.
Good points, and I love your stuff.
I had that scenario with the tail, but in that case, the supports were a perfect solution.
Keys are good if you want to produce resin kits, there's no guess work with lining parts up.
Yep, the technique is simply copied over from traditional model making, so you're right, no reason you can't make keys in post.
Thanks Paul,
you know your amazing work is the reason why I bought an UM2.
Your point on keys is correct but I've been thinking if it wouldn't be easier to create it in post production rather than directly by the printer.
I'll do some tests with just keys printed at lowres, to see if I end up with something decent.
About the supports, I don't know, every time I try to print something with supports, it ends up with a "not that much better" result, maybe I do something wrong, I'd like to see some more detailed photos about other people results because sometimes I see people happy with prints that I wouldn't be so happy about.
I've used a piece of filament for keying sometimes. Just make holes in the model and stick a piece of snipped off filament in there.

Nothing spectacular but a fun model to print:
http://www.thingiverse.com/thing:331035
Printed in Colorfabb shining grey at 0.2mm layers, a bit to big for this model but i wanted to see it fast. Will do it again a 0.1mm if i have time.
The legs are articulated and it's printed in one piece


MariMakes posted a topic in UltiMaker Cura,


ArunC posted a topic in UltiMaker 3D printers,


Recommended Posts
Top Posters In This Topic
362
282
221
179
Popular Days
Jan 5
30
May 12
26
Jan 13
23
May 1
22
Top Posters In This Topic
ian 362 posts
cloakfiend 282 posts
skint 221 posts
SandervG 179 posts
Popular Days
Jan 5 2014
30 posts
May 12 2014
26 posts
Jan 13 2014
23 posts
May 1 2014
22 posts
Popular Posts
kmanstudios
Took me forever to do this. And it is still rougher than I would have liked. 3D concept rendering: Finished piece:
kmanstudios
I just finished this. It was a multi-part print for ease of painting. Some of it I am not sure what happened...but hey, it is purty....And, I am unanimous in that ? Test Render Parts
gr5
Bath interferometers. I have made about 20 of these for people who use them to test their telescope mirrors. They are amazingly accurate and can do better than a $40,000 Zygo PSI optical tester. Th
Posted Images
skint 62
Hey Fabio, that looks great, turned out really nice! How long did your print take ( don't say 14 seconds like the video lol )
Link to post
Share on other sites