

I find the WedgeBot an indispensable tool when working with feeder problems.
https://www.youmagine.com/designs/wedgebot-for-ultimaker2
Here's a video on it's use.
-
 3
3

I find the WedgeBot an indispensable tool when working with feeder problems.
https://www.youmagine.com/designs/wedgebot-for-ultimaker2
Here's a video on it's use.
 3
3
@whoneyc - what are you printing? If it has tons of retractions that could be the issue. Look at the part in layer view and check the "blue" checkbox to see travel moves - the lighter blue lines (lilac?) are retraction moves [correction - the other way around - dark blue are retraction]. If you have too many of those on the same spot of filament you will get the grinding you describe.
Or if you just print too fast and too cold you will get grinding.
If you have too many retractions on the same piece of filament you can grind it to dust. 10 is usually safe. 20 is in the danger zone. 50 should guarantee failure. You can tell cura to limit retractions to 10 per a given spot of filament. Do this by setting "maximum retration count" to 10 and "minimum extrusion distance" to your retraction distance (4.5mm for UM2 and 6.5 for UM3).
Maybe you should post how fast you are printing to see if you are going too fast (things speed up on the second layer). Please post
layer height
print speed (all of them)
line width (all of them)
nozzle size (is it AA 0.4?)
nozzle temperature (all of them)
1
59 minutes ago, gr5 said:Maybe you should post how fast you are printing to see if you are going too fast (things speed up on the second layer).
Sure thing. This print is a combo of PLA in core 1 (AA 0.4mm) and Breakaway in core 2 (AA 0.4mm)
Layer Height: 0.2 mm
Print Speed: 70 mm/s
Travel Speed: 250 mm/s
Print Accel: 4000 mm/s^2
Travel Accel: 5000 mm/s^2
Print Jerk: 25 mm/s
Travel Jerk: 30 mm/s
Line Widths: 0.35 mm unless noted below
Inner Wall Line Width: 0.3 mm
Infill Line Width: 0.5 mm
Initial Layer Line Width: 100%
Printing Temperature: 205C/230C for each respective core.
1 hour ago, gr5 said:If you have too many retractions on the same piece of filament you can grind it to dust.
There are quite a few retractions. I assume this is a necessity when swapping cores for the breakaway. See attached image for retractions. I can't post the gcode due to NDA issues, but this image alone shouldn't violate that.

Supporting images added.
I decided to twiddle with the tensioner again and try to print. I'm on a deadline for this project, so I have to keep trying. Perhaps I will have done things the right way by adjusting the tension a bit or gave sacrifices to the correct unholy entity.

In this image there are snips of the failed filament. Clockwise from top left is: the ground down area that ended the run, a section from the middle of the remaining filament which appears to have had grinding issues, and the filament next to the final failure point which shows repeated grinding spots which support the sputtering look I observed.

This image shows the state of the feeder when I removed the casing. Note the tensioner is in the topmost position, as this run was an experiment to see if I could print in this position (I'm back to trying 3/4 at the moment). The dust is from a single run, as it was cleaned prior to this attempt.


I have made some more observations about my ongoing issue.
On 4/15/2018 at 1:50 PM, XYZDesignPro said:I find the WedgeBot an indispensable tool when working with feeder problems.
This method is useful to know. I used a large screwdriver to hold the gate open on the feeder rather than a WedgeBot (which requires a printer to use). I have some notes. DO NOT use the unassisted pulling method if you have had grinding issues. It makes them worse. How? The filament snaps off at the weak point created by the grinding. This puts about 2 mm of filament sticking out of the PTFE tube to grab hold of with pliers. Pulling with that small amount of grip is impossible. When attempting to remove filament from a feeder with grinding issues, I recommend attempting to do an "assisted reverse" of the filament. To perform the assisted reverse, if it is not obvious from the name, you must: slightly increase the grip from the screw to account for the divot in the filament, then use the "Move" function on the printer to reverse the filament. While that is occurring, apply a gentle pulling force to the filament near the reel. The goal is not to yank the filament free, just to get it out of the divot so the feeder can remove it properly. After you are out of the grindhole, reset your tensioner screw to the position you had set it at and let the go about the usual "Change" process.
If your filament breaks off inside the PTFE tube, you should remove the PTFE tube from the print head (pain in the ass) and remove the filament from the head end. This is not ideal. Disassembling the head (for me) is an awkward process. Who's bright idea was it to put his tall Ultimaker on top of a double tall Lack-rack where it is hard to get at from the top?
On 4/15/2018 at 12:26 PM, Dim3nsioneer said:The third thing you can check is if your Bowden tube is somehow damaged. Take a one meter long piece of filament which has not yet run through the feeder (aka without bitemarks) and run it through the detached Bowden tube from the back to the front. If you feel a sudden increase in resistance, then exchanging the Bowden tube might be a good idea.
As a result of the constant stream of plastic grind pushed up the tube as the feeder stops and starts having problems during a run, there is a new problem. On my latest attempt, the filament broke inside of the Bowden tube, but not because of any breakage I learned from in the first part of this post. No, the filament was STUCK inside the Bowden. No amount of pliers, raw strength, or yelling could dislodge pull it out in the direction of the feeder. Indeed, when I took apart the print head and pulled the filament (with pliers) from the other end, it took a solid minute for it to budge. After the filament was removed (and after the swearing had subsided), I attempted to use canned air to blow the particles out. This time they would not budge.
My theory is that static is building up inside the Bowden tube as the extra friction from the grinding occurs. I am ruling out humidity issues causing sticking inside the tube. The humidity in my shop is moderate currently. Additionally, I observed static problems at the extruder head. Any extruded filament curves UP and SIDEWAYS during the static issues. This causes the filament to stick to the printer head and glob up. I used some wire to connect the metal extruder head to a metal desk and that temporarily relieves the up-and-sideways issue, but it does not fix the overall static issues. Obviously I will be making attempts to better ground the machine.
------------------------------
I have requested some help from the supplier. More input and suggestions from the community are very welcome.

1. Not all PLA is equal, what brand?
2. When you clean out the feeder, did you also really clean off the knurled wheel? That thing can grab and build up filament parts and eventually make it very slick and not grab, but grind.
3. When you notice it is grinding, are you making sure to pull any and all lengths of PLA out of the bowden tube that were ground down? If not, the ground down parts create little flanges on even the most minor grindings that help add friction. I make sure to pull the filament all the way out of the bowden tube (That will show you how much friction it creates because I have had to heave real hard sometimes to get it through) until I see absolutely no more tooth marks on the filament.
4. When you clean out the filament fluff, did you pull the bowden tube off and clean it out very well? Do so by taking a piece of tissue or paper towel and 'plunging' it through the tube with waste filament. If that gets dragged into the bowden tube, it will help create friction.
Edited by kmanstudios
1
Thanks for the suggestions! I hadn't heard these specific ones before.
1 minute ago, kmanstudios said:1. Not all PLA is equal, what brand?
This has occurred with Ultimaker brand filament and Colorfabb.
2 minutes ago, kmanstudios said:2. When you clean out the feeder, did you also really clean off the knurled wheel? That thing can grab and build up filament parts and eventually make it very slick and not grab, but grind.
I have not observed any slickness when I brushed it off by hand. On your advice, I will find something with stiff bristles and give it a good once over.
4 minutes ago, kmanstudios said:3. When you notice it is grinding, are you making sure to pull any and all lengths of PLA out of the bowden tube that were ground down? If not, the ground down parts create little flanges on even the most minor grindings that help add friction. I make sure to pull the filament all the way out of the bowden tube (That will show you how much friction it creates because I have had to heave real hard sometimes to get it through) until I see absolutely no more tooth marks on the filament.
4. When you clean out the filament fluff, did you pull the bowden tube off and clean it out very well? Do so by taking a piece of tissue or paper towel and 'plunging' it through the tube with waste filament. If that gets dragged into the bowden tube, it will help create friction.
The filament leavings you describe in (3) may be a chief cause of the filament stuck in the Bowden tube described near the end of my diatribeinformative and succinct post. On your recommendation in (4), I will try plunging it. I hope my rifle cleaning kit is a thin enough bore.
4 minutes ago, whoneyc said:I have not observed any slickness when I brushed it off by hand. On your advice, I will find something with stiff bristles and give it a good once over.
Bristle it good ")
5 minutes ago, whoneyc said:I will try plunging it. I hope my rifle cleaning kit is a thin enough bore.
A bit of clean filament and tissue is sufficient. You would be surprised how tiny that hole through the tube really is.
6 minutes ago, whoneyc said:This has occurred with Ultimaker brand filament and Colorfabb.
Wow...that is really wackadoodle.
Here is something I have noticed and it may help you:
When you load the filament, make sure it is not too far into the tube when it starts to feed. What will happen is that if it is too far into the tube, it will continue to slam that filament into the hot end faster than it can melt the plastic and create a small grinding. THEN it will just cascade into grinding hell. This will happen on ALL filament. Take it from da clumsy noob......took me a while to figure that one out.
1
Update: Still having problems.
It takes time since I have a busy schedule, but I finally got around to doing the suggestions @kmanstudios. I have pictures and I will address the attempts.
First, cleaning the Bowden tube was a difficult endeavor. That thing was tight. The print attempt afterwards had no changes.
I then made an upgrade. I replaced the PFA Bowden tube with PTFE. I had always assumed that the tubes were PTFE to begin with, but I was wrong. The swap was easy, and took no time. You can check out the tube I chose on Amazon at this link. The PTFE does seem to be much nicer to use. Filament glides through this tube like a hot knife through butter. The PFA tube had seen some stress from use, and the filament actually got stuck, without being damaged. This still did not fix my problems, but it does seem to be a worthwhile upgrade.
Second, cleaning the knurled wheel had no effect. I cleaned with a brass bristle brush. It did not produce much plastic when I cleaned it. After running a print which had red filament (which contrasts much better than the gray/white/black I usually use), I took a before and after shot of the extruder.
Before:

After:

Like I said, the only difference between those two photos is the application of air duster. If there was plastic on the knurled wheel, we would see the red on the after picture.
So now we are back to where we started. I'm still having problems. I thought the problem was fixed after the PTFE upgrade, because I got something to print with 0 issues. The settings on the printer were 0.2 mm thickness and 40% infill. So, I got ambitious and attempted a larger print. This time with 0.15 thickness and 20% infill. Failure. But, it was an interesting failure.


What you are looking at is a Cthulhu Idol printed with multicolored PLA. The multicolored filament is all Colorfabb filament which has been welded together. As you can see, the first few layers are perfect. But, suddenly one layer in the gray section fails. It appears to drop a daub of PLA, then skip for a moment, and drop another daub. It does this with a regular pattern. As the print progressed (before I noticed and aborted it), the plastic deposits with the same periodicity. While this looks really neato and makes a fun spongy print, it is not a good thing. The filament is clearly feeding, as it goes through the color sections eventually, but it is doing so incorrectly.
Any new thoughts on what is happening here?
I recently bought a Filastruder, so at least I can begin recouping some of the cost of failed filament. I have about 5 gallons of scrap ready to recycle from this blasted problem (and all my other personal failures).
Bonus: A picture of my well used extruder head.

On 4/15/2018 at 7:48 PM, whoneyc said:ure thing. This print is a combo of PLA in core 1 (AA 0.4mm) and Breakaway in core 2 (AA 0.4mm)
Layer Height: 0.2 mm
Print Speed: 70 mm/s
Travel Speed: 250 mm/s
Print Accel: 4000 mm/s^2
Travel Accel: 5000 mm/s^2
Print Jerk: 25 mm/s
Travel Jerk: 30 mm/s
Line Widths: 0.35 mm unless noted below
Inner Wall Line Width: 0.3 mm
Infill Line Width: 0.5 mm
Initial Layer Line Width: 100%
Printing Temperature: 205C/230C for each respective core.
Sorry I didn't see this earlier. If I don't answer you feel free to post simply a "@gr5" once per day until I notice. I check the forums > 5 times per day but the forum is not designed in a way that I notice everything.
70mm/sec X 0.35 X 0.2mm is (if you multiply these 3 numbers) 4.9 cubic mm per second.
4.9 is pushing it. My notes say you can do that at 230C but no way at 205C. So you need to either:
reduce layer height to 0.1
reduce speed to 30mm/sec (max for .2 layers, .4 nozzle and 205C print temp
increase temp to 230C (and suffer bad overhang quality)
You don't have to do all 3! Just one of those. Or you can do a 4th thing - use a 0.6 or 0.8 nozzle.
I suggest you either relax and live with much slower printing times or use a larger nozzle.
Regarding retractions - that's nothing. You should see the amount of retractions when printing the eiffel tower or a voronai vase.
5

I agree with @gr5 on this one. If you want to print at that sort of volume per second with PLA and a .4 nozzle, you have to increase the temperature. As a result, overhangs won't look as good probably because of the cooling.
Several years ago, @illuminarti wrote an extrusion test for the UM2 that lets you take the extrusion up to 10 cubic mm/s as a means of pinpointing the level of under-extrusion you're seeing. It takes you from 3 cubic mm to 10. However, you can only successfully get it printing at the upper levels if you're printing at 230 C, which is what we built into the gcode for that test.
Increase your temperature, increase the nozzle size, or decrease the speed.
2
and maybe a test to eliminate some things.
You have 2 AA 0.4 cores, right? When you do a single material print, do you have the problem with both cores?
Test with a simple model and recommend profiles. If both prints come out bad, the problem lies elsewhere, like settings or other hardware down the line. If one print comes out bad, then that core is the problem.
2
11 hours ago, fbrc8-erin said:I agree with @gr5 on this one. If you want to print at that sort of volume per second with PLA and a .4 nozzle, you have to increase the temperature. As a result, overhangs won't look as good probably because of the cooling.
Several years ago, @illuminarti wrote an extrusion test for the UM2 that lets you take the extrusion up to 10 cubic mm/s as a means of pinpointing the level of under-extrusion you're seeing. It takes you from 3 cubic mm to 10. However, you can only successfully get it printing at the upper levels if you're printing at 230 C, which is what we built into the gcode for that test.
Increase your temperature, increase the nozzle size, or decrease the speed.
I don’t agree with this assessment. Just mainly because the acceleration/jerk it’s set very low on the um3. Even changing the speed to 100mm/s for a foot print that small would force a real speed way lower since the print has many curves on the outside. Ofc the infill will look bad, but even so, the print area it’s too small to reach the set speed because the acceleration/jerk cura settings. I would try to increase a bit the feeder, so it slips less and causes less grinding (too little feeder tension for the um knurled bolts is as bad as too much).
Also, try to print something with the default profiles to see if keeps failing or works, that will give the moderators and others a base point to compare.
1
On 5/19/2018 at 10:09 PM, gr5 said:Sorry I didn't see this earlier. If I don't answer you feel free to post simply a "@gr5" once per day until I notice. I check the forums > 5 times per day but the forum is not designed in a way that I notice everything.
*looks into mirror* Beetlejuice @gr5 @gr5 @gr5
So you need to either:
reduce layer height to 0.1
reduce speed to 30mm/sec (max for .2 layers, .4 nozzle and 205C print temp
increase temp to 230C (and suffer bad overhang quality)
You don't have to do all 3! Just one of those. Or you can do a 4th thing - use a 0.6 or 0.8 nozzle.
I suggest you either relax and live with much slower printing times or use a larger nozzle.
On 5/19/2018 at 10:46 PM, fbrc8-erin said:I agree with @gr5 on this one. If you want to print at that sort of volume per second with PLA and a .4 nozzle, you have to increase the temperature. As a result, overhangs won't look as good probably because of the cooling.
The 0.2mm speed is listed as a default in the manufacturer settings. I have personally seen nothing from them to the contrary on this matter. If this is a capability of the printer, I don't want to forever be stuck using 0.1mm for unknown reasons.
I have attempted temperature increases, and they did not work. I have recently had failures at 225C, 230C, and 235C. This does not appear to be a temperature dependent issue.
Can you provide some information about the extrusion rates? I am hesitant to think this is an issue. If the extrusion rate was too high, I would expect to see some surface deformation of the extruded polymer. While a change in temperature can remedy overextrusion related stick-slip regimes, it is ultimately a problem with shot pressure (citation PDF WARNING). I'm not attempting to start an argument here, I would just love to see more information so I can learn while I am fiddling with these issues.
Regarding retractions - that's nothing. You should see the amount of retractions when printing the eiffel tower or a voronai vase.
I can confirm that this not a retraction based issue. I recently ran a model which only had retractions above a certain point, and the print failed before reaching those retractions.
Sorry I didn't see this earlier. If I don't answer you feel free to post simply a "@gr5" once per day until I notice. I check the forums > 5 times per day but the forum is not designed in a way that I notice everything.
70mm/sec X 0.35 X 0.2mm is (if you multiply these 3 numbers) 4.9 cubic mm per second.
4.9 is pushing it. My notes say you can do that at 230C but no way at 205C.
On 5/19/2018 at 10:46 PM, fbrc8-erin said:Several years ago, @illuminarti wrote an extrusion test for the UM2 that lets you take the extrusion up to 10 cubic mm/s as a means of pinpointing the level of under-extrusion you're seeing. It takes you from 3 cubic mm to 10. However, you can only successfully get it printing at the upper levels if you're printing at 230 C, which is what we built into the gcode for that test.
Is there more information on this which you could provide? I'd love to be able to look at a tech sheet from a polymer and determine important values before I end up wasting my time and material. While the relationship for ideal mass flow is quite simple, I assume it deviates a great deal for non-newtonian fluids. I suspect there is a relationship to Young's modulus which would show a maximum extrusion rate, but I confess it has been a few years since I did much rheology.
On 5/20/2018 at 2:14 AM, peggyb said:and maybe a test to eliminate some things.
You have 2 AA 0.4 cores, right? When you do a single material print, do you have the problem with both cores?
Test with a simple model and recommend profiles. If both prints come out bad, the problem lies elsewhere, like settings or other hardware down the line. If one print comes out bad, then that core is the problem.
I would love to do the core swapping test if I could, but my second core has been committed to a different polymer. The current core has been PLA only. I fear that the other polymers and any clean out I would need to do would interfere with the test. I may just need to buy a third core to perform this test, but that takes money.
I will add that the only suggestion that the Ultimaker support group could give at this juncture was to perform an atomic burnout of the core. Presumably, this would cause it to come out like a 'new' suggested by your comment. However, I have already performed this burnout some time ago, and the problems linger.
Thanks again for all the suggestions folks. I hope I don't seem like I'm being negative to anyone. All of your suggestions have been lovely.
It's not a problem of the polymer. The problem is viscocity, pressure, and the strength of the feeder. The feeder can only push so hard on the filament until it grinds up into dust. The UM3 feeders can push with about 10 to 15 pounds of force. Getting the filament with a consistency of toothpaste to go through a 0.4mm nozzle at 5 mm^3/sec at 230C requries a lot of pressure - around 1000psi. The UM3 feeder can't always achieve this (by the way is your feeder set to the middle position? you want it in the middle position).
You say 235C made no difference but that's hard to believe. I'd like to see a print where the nozzles were at 235C or where you printed at half speed or half the layer height. It might not be perfect but it should have a significant improvement. In the UM3 tune menu you should be able to set the speed to 30%. And you should be able to increase the temp by up to 25C. I'd like to see what happens when you do that first. You could print for 5 minutes at a time with different settings all in the same print to get some ideas of how bad your situation is so I can get an idea if this is a hardware issue or just that you are printing too cold/fast.
I'll give you some speed numbers next - from old experiments...
2
This is some old data from a UM2 but UM3 can't extrude much faster. These are absolute limits - I recommend printing at half these but a well tuned printer can print at these rates.
This graph made me wonder if maybe you are printing ABS by mistake? If you put the filament in boiling water does it go completely soft like PLA or is it still just as strong as at room temp (like ABS)? At 60C PLA is about as stiff as string. It flops around under it's own weight.
My other thought is maybe there is some abs in your core's nozzle that needs some serious cleaning from an earlier print. I'd love to see a photograph of the tip of the filament that you pull out of a core when doing an atomic pull (it's in the menu of the UM3 - I may have told you that - sorry if I'm repeating myself).
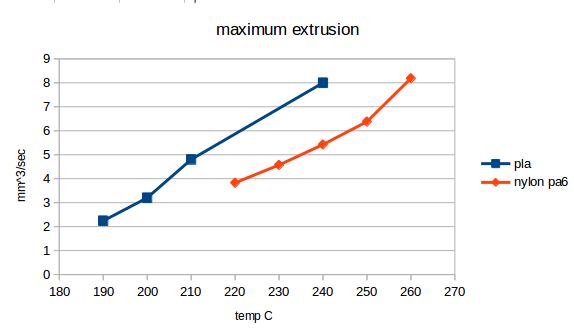
I calculated these values by printing a part at 0.2mm layer height and 0.4 nozzle and 100mm/sec and then changing the print speed % in the tune menu until it was underextruding pretty badly (enough that the feeder was slipping) and noted the speed then tweaked the temperature and repeated. Then I converted the print speed to volume (line width X layer height X print speed). Illuminarti's tests are with a 0.65mm nozzle so they are harder to interpret for your particular situation.
2
By the way once it grinds up like this you might want to manually push/assist the filament for a while until the feeder can get a grip on some better quality (not ground up) filament.
@gr5, you are crazy prompt. I'm also amused that I beetlejuiced you three times and you left three posts.
There is a lot to get to on these posts. I will address everything after I have had time to experiment a bit.
1 hour ago, gr5 said:You say 235C made no difference but that's hard to believe. I'd like to see a print where the nozzles were at 235C or where you printed at half speed or half the layer height.

The left was a failure at 230C, the right was a failure at 235C.

This is my failure du jour. It was also printed at 235C
29 minutes ago, gr5 said:This graph made me wonder if maybe you are printing ABS by mistake?
The only ABS I own is a batch of cleaning polymer that came with my new Filastruder. If this is ABS, then I need to have a talk with my supplier.
The rest will be addressed later.

okay well you need to separate out "doesn't work" into multiple categories or you'll never get anywhere. That gray print that looks kind of mayan to me has little or even zero underextrusion so whatever you were doing there is a LOT better than the very first photo of a print you showed that was white and red and was severely (<50% extrusion) underextruded.
Okay maybe the gray print failed but not because of massive underextrusion. The red print just above was looking great for a while but then starts massive underextrusion. Rather suddenly. Something very strange is happening there.
I would check that your 3rd fan is working - the one in the door that swings open. If that stopped working it would explain a lot. Anyway I'm going to give you a list of underextrusion causes for Um3.
I think #1 may have caused most of the issue on your first white print but makes no sense for the red print. So let's keep looking. #5 is a good thing to check especially 5b. Actually just try changing coress. #6 worries me. You can ignore #9,#10 as the red print was fine at first. #16 worries me. #18 is likely the problem with the gray print. Maybe. It looks like it might have a lot of retractions with all the detail. I think the red print is a good one to concentrate on as it looks just fine at first down where the air is warmer. Also another thing that bothers me is extruder driver could be over heating which would explain the red print. Is the air warmish in the room where you have your UM3? Maybe take off the cover to the larger board and get a little breeze (just a little is enough but more is better) under there. Maybe lower the stepper current for the E axis down to around 1000ma. Or crank the AC to see if that helps. Did these issues get worse with warmer weather?
CAUSES FOR UNDEREXTRUSION ON UM3 AND HOW TO TEST FOR THEM AND REMEDY THEM
As far as underextrusion causes - there's just so damn many. none of the issues seem to cause more than 20% of problems so you need to know the top 5 issues to cover 75% of the possibilities and 1/4 people still won't have the right issue. Some of the top issues:
1) Print slower and hotter! Here are top recommended speeds for .2mm layers (twice as fast for .1mm layers) and .4mm nozzle:
20mm/sec at 200C
30mm/sec at 210C
40mm/sec at 225C
50mm/sec at 240C
The printer can do double these speeds but with huge difficulty and usually with a loss in part quality due to underextrusion. Different colors print best at quite different temperatures and due to imperfect temp sensors, some printers print 10C cool so use these values as an initial starting guideline and if you are still underextruding try raising the temp. But don't go over 240C with PLA.
2) Line Width larger than nozzle. In cura 3.X search in settings for all line widths. If any of them are larger than the nozzle diameter this can cause underextrusion. There are 8 of these in cura 3.2.1.
3) Curved filament at end of spool - if you are past half way on spool, try a fresh spool as a test.
4) curved angle feeding into feeder - put the filament on the floor -makes a MASSIVE difference.
5) Bad core. Try a different core. It could be clogged, or something more complex like the temp sensor in the core.
5a) clogged nozzle - the number one most suspected problem of course. Sometimes a grain of sand gets in there but that's more obvious (it just won't print). Atomic method (cold pull) is the cure - from the menu do a few cold pulls. The result should be filament that is the exact shape of the interior of the nozzle including the tiny passage to the tip of the nozzle. If it doesn't look like that you need to pull at a colder temperature. You can do it manually instead of through the menu if it's not working right but learn through the menu initially. 95C is roughly the correct "cold" temperature for PLA. Higher temps for other filaments.
5b) Temp Sensor bad - even the good ones vary by +/- 5C and bad ones can be any amount off - they usually read high and a working sensor can (rarely) fail high slowly over time. Meaning the sensor thinks you are at 220C but actually you are at 170C. At 170C the plastic is so viscous it can barely get out of the nozzle. You can verify your temp sensor using this simple video at youtube - on you tube search for this: mrZbX-SfftU
6) feeder spring issues - too tight, too loose. You want the tension such that you can clearly see the diamond pattern biting into the filament. You want to see at least 2 columns of diamonds. 4 columns is too much. You usually want the tension in the center.
7) Other feeder issues, one of the nuts holding UM2 and UM3 together often interferes with the feeder motor tilting it enough so that it still works but not very well. Other things that tilt the feeder motor, sleeve misaligned so it doesn't get a good grip. Gunk clogging the mechanism in there.
? Filament diameter too big - 3mm is too much. 3mm filament is usually 2.85mm nominal or sometimes 2.9mm +/- .05. But some manufacturers (especially in china) make true 3.0mm filament with a tolerance of .1mm which is useless in an Ultimaker. It will print for a few meters and then clog so tight in the bowden you will have to remove the bowden from both ends to get the filament out. Throw that filament in the trash! It will save you weeks of pain
8b) Something wedged in with the filament. I was setting up 5 printers at once and ran filament change on all of them. One was slowly moving the filament through the tube and was almost to the head when I pushed the button and it sped up and ground the filament badly. I didn't think it was a problem and went ahead and printed something but there was a ground up spot followed by a flap of filament that got jammed in the bowden tube. Having the wedgebot (link below) helps you feel this with your hand by sliding the filament through the bowden a bit to see if it is stuck.
https://www.youmagine.com/designs/wedgebot-for-ultimaker2
9) Extruder mis calibrated. Maybe you changed equipment or a wire fell off. Try commanding the filament to move exactly 100mm and then measureing with a ruler that it moved 100mm within 10% accuracy. If not adjust the steps/mm (this is done by editing a json file on the UM3).
10) Z axis steps/mm. it's easier than you might think to double or half the Z axis movement as there is a jumper on the circuit board that can be added or removed. If the Z axis is moving 2X you will get 50% underextrusion. Your parts will also be 2X as tall.
11) Crimped bowden. At least one person had an issue where the bowden was crimped a bit too much at the feeder end although the printer worked fine when new it eventually got worse and had underextrusion on random layers. it's easy to pull the bowden out of the feeder end and examine it. Similar to 8b above - use the wedgebot to feel how much friction there is in the bowden.
12) Worn Bowden. After a lot of printing (or a little printing with abrasive filaments) the bowden resistance can be significant. It's easy to test by removing it completely from the machine and inserting some filament through it while one person holds it in the U shape. Preferably insert filament that has the pattern from the feeder and fight the movement by applying 2kg force on both ends at the same time and then seeing how much harder you have to push it on top of 1kg force. UM2 feeders can push with 5kg force. UM3 can push quite a bit more. 5kg is plenty.
13) Small nozzle. Rumor has it some of the .4mm nozzles are closer to .35mm. Not sure if this is actually true. I'm a bit skeptical but try a .6mm nozzle maybe. This shouldn't be a problem on the UM3 which has very good quality control but try a different core.
14) CF filament. The knurled sleeve in the extruder can get ground down smooth - particularly from carbon fill. 4 spools of CF will destroy not just nozzles but the knurled sleeve also. Look at it visually where the filament touches the "pyramids". Make sure the pyramids are sharp.
15) Hot feeder driver. I've seen a more recent problem in the forums (>=2015) where people's stepper drivers get too hot - this is mostly a problem with the Z axis but also with the feeder. The high temps means the driver appears to shut down for a well under a second - there is a temp sensor built into the driver chip. The solution from Ultimaker for the um2 is that they lowered all the currents to their stepper drivers in the newer firmware. Another solution is to remove the cover and use desk fan to get a tiny bit of air movement under there. This doesn't seem to be a problem on UM3 even though it's the exact same circuitry but they lowered the current in the firmware. But it's worth considering if air temp is 30C or hotter. It would probably happen only after printing for a while (air heats up slowly under the printer).
16) third fan broken. This tends to cause complete non-extrusion part way through a print. In the door of the head. You can hear it come on when cores get above 40C. Without this fan several things can go wrong. It can take a while as usually you also need several retractions to carry the heat upwards. There are a few failure mechanisms and I don't understand them all. One of them is probably that the molten PLA spreads out above the teflon and sticks to the metal in a core or fills the gap at the base of the bowden in UM2. Later it cools enough to keep the filament from moving up or down.
17) Spiralize/vase mode. This is a rarely used feature of Cura but you might have left it on by accident? In this mode the wall of your part is printed in a single pass. So if you have a .4mm core and the wall is .8mm thick it will try to over extrude by 2X. This is difficult to do and may instead lead to underextrusion.
18) too many retractions (this causes complete failure) - if you have too many retractions on the same piece of filament you can grind it to dust. 10 is usually safe. 20 is in the danger zone. 50 should guarantee failure. You can tell cura to limit retractions to 10 per a given spot of filament. Do this by setting "maximum retration count" to 10 and "minimum extrusion distance" to your retraction distance (4.5mm for UM2 and 6.5 for UM3).
1
Ok @gr5 and everyone else, I've run some more tests without finding a solution.
On 5/24/2018 at 11:08 PM, gr5 said:That gray print that looks kind of mayan to me has little or even zero underextrusion so whatever you were doing there is a LOT better than the very first photo of a print you showed that was white and red and was severely (<50% extrusion) underextruded.
Okay maybe the gray print failed but not because of massive underextrusion. The red print just above was looking great for a while but then starts massive underextrusion. Rather suddenly. Something very strange is happening there.
I do not agree with this assessment. The top surface of the gray had under extrusion artifacts and wisps. It just has significantly less. It may be more apparent in the following photos. The gray and red filaments are both from the same supplier (Colorfabb purchased from 3D Universe). So, I can't explain why it is doing this.
Moving on, I have performed adjustments to test individual possible issues.
First, I tried the atomic pull method.

The first pull is at the top, and each pull is in order. The first pull brought lots of the previous red filament out with it. The 1-3 pull have black banding which I assume is just carbonized crud. The final pull looked pretty clean. There were no major inclusions that looked like a big cloggy thing. I followed this test with a print. It failed with "red" underextrusion mesh mess.
Next, I tried swapping AA cores. This was a gray filament test, and the resulting print exhibited what I will call "gray" underextrusion. This is where it daubs on the surface, but not enough to build on top of itself. I swapped the cores back when I was done. See picture below.

The failure occurred for a moment, then righted itself before failing again (at which point I stopped the print).
The latest change was one I was dreading--slowing the print speed. The speed was set to 40mm/s. The all prints listed here, including this one, were attempted at 235C. All walls were <0.4mm thick. This failed. I did not bother taking a picture, as it looked similar to the above gray failure.
During one of the gray failures, I can't remember which, I chanced to obtain the extruded filament right after I stopped the print. I put it under the dissecting scope just for fun. I apologize for the quality of the image, my home microscope is an old binocular type which is not suited for photography.

The filament strand exhibits an irregular stick-slip regime. Remembering my time when I worked with polymers, I believe this indicates an inconsistent pressure or heating regime. This is different to the high pressure stick-slip regime which is colloquially called "sharkskin", in that it is not regular. This image, in concert with my print core swap and some temperature measurements I will discuss in a moment, leads me to believe that the problem is not in the extruder head. Instead, I believe it to be a pressure issue at the extruder wheel or Bowden tube.
On 5/24/2018 at 11:08 PM, gr5 said:1) Print slower and hotter!
2) Line Width larger than nozzle.
3) Curved filament at end of spool
4) curved angle feeding into feeder
5) Bad core.
5a) clogged nozzle
5b) Temp Sensor bad
6) feeder spring issues7) Other feeder issues
? Filament diameter too big
8b) Something wedged in with the filament.
9) Extruder mis calibrated.
10) Z axis steps/mm.
11) Crimped bowden.
12) Worn Bowden.
13) Small nozzle.
14) CF filament.
15) Hot feeder driver.
16) third fan broken.17) Spiralize/vase mode.
18) too many retractions
1) Tested to no avail (yet)
2) Checked, n/a
3) Checked, n/a
4) Maybe. The filament is currently on the back of my UM3+. I will have to rig something up to try the floor method.
5) Tested, no luck
5a) Tested atomic pull and core swap.
5b) Core temperature confirmed with IR and thermocouple. It is reading correctly.
6) I am running with two rows of tooth marks. Thanks for this by the way, this is the first metric I've seen for tension besides "It should be in the middle"
7) Maybe. My shop is hot and poorly insulated with no AC. The cold temperature of the nozzle reads 35C. Alignment issues are difficult for me to diagnose.
8.) Filament 2.85mm.
8b) Nope, all clear. Fresh tubes.
9) No clue on this one.
10) set correctly
11) Not crimped. Fresh PTFE tube is in to replace the PFA original (which was pretty beat up)
12) See 11
13) Doubtful. These cores have worked fine before.
14) N/A, I've never used filled filament. I have a sealed bronzefill sitting on my shelf.
15) I can take the thing apart to measure this. According to other posts, as long as I'm under 80C, I should be fine.
16) Fan is working just fine.
17) N/A
18) Nope. Even prints with 0 retractions fail.
Let's concentrate on the 35C issue. I stronglyl suggest removing the cover on the larger board under the printer, put a brick or a book or something under the printer so it is tilted (the printer can print sideways or upside down or any angle no problem - no difference - I used to think it would help with overhangs but it doesn't). and get some breeze under your printer - use a desk fan or window fan or anything. 35C is fine but you need more airflow I think.
In other words 20C with no airflow is similar to 35C with a tiny bit of airflow is similar to 45C with a strong airflow - all should be cool enough normally (these numbers are basically guesses but airflow is almost more important than ambient temp). The part we care about is the 4 stepper drivers particularly the extruder driver. It has a temperature overload circuit which shuts off the extruder but only for a few milliseconds so you might not have noticed. If this helps then also consider lowering the current to the extruder quite a bit. Maybe to 800ma (default around 1250ma maybe). I think you can do that in the menu maybe? Maybe not. It's in the UM2 menu I think but maybe not in the UM3 - but there are other ways to set the current. Step 1 is to see if some fan blowing under there helps.
1
FYI Ultimaker headquarters is in The Netherlands which is normally quite cold except for a few days per year. If the temp hits 35C they think it's a disaster of earthquake proportions and close all the businesses (kidding - a little) and shut down the cities. Just kidding - I don't think it's ever gotten that hot in The Netherlands. Plus they turn on the air conditioner when it gets up to 20C. They just don't like weather above around 20C.
I've seen women bicycling wearing skirts (skirts!) when the air temp is 0C. No hats. Just a jacket. And not just one per hour - one with skirt or shorts every 5 minutes will zip by. The cold doesn't bother them so much.
So although they test these printers at higher temps, they do that rarely I suspect. In other words, the "warm environment" testing could be improved.
1
 1
1

ArunC posted a topic in UltiMaker Cura,
.thumb.jpeg.0b7a05eafc09add17b8338efde5852e9.jpeg)
Dustin posted a topic in Firmware,


Recommended Posts
Top Posters In This Topic
30
19
5
5
Popular Days
Jun 12
8
Jul 1
6
Apr 15
5
May 25
5
Top Posters In This Topic
whoneyc 30 posts
gr5 19 posts
fbrc8-erin 5 posts
kmanstudios 5 posts
Popular Days
Jun 12 2018
8 posts
Jul 1 2018
6 posts
Apr 15 2018
5 posts
May 25 2018
5 posts
Popular Posts
gr5
Sorry I didn't see this earlier. If I don't answer you feel free to post simply a "@gr5" once per day until I notice. I check the forums > 5 times per day but the forum is not designed in a way t
fbrc8-erin
It's a spot where wear and tear can occur on the lever if the filament isn't quite sitting straight on the bearing; it's not super common but we've seen a few cases. I just put the label on the box ac
XYZDesignPro
I find the WedgeBot an indispensable tool when working with feeder problems. https://www.youmagine.com/designs/wedgebot-for-ultimaker2 Here's a video on it's use.
Posted Images
Dim3nsioneer 557
The feeder gauge should be in the middle or for very hard filament at 3/4 versus the bottom.
I recommend to set the feeder gauge to the minimum, then open the feeder case (if you don't set the feeder to the minimum then good luck looking for the spring and other parts ;-) ), take a brush and thoroughly clean the knurled bolt. Then close the feeder again and set it to 1/2.
You also may want to check if you can push PLA through the AA core in question easily. For that move the head into a corner at the front, then remove the bowden tube and gently push PLA directly into the printcore while heated to something like 210°C. You should not have to push hard.
The third thing you can check is if your Bowden tube is somehow damaged. Take a one meter long piece of filament which has not yet run through the feeder (aka without bitemarks) and run it through the detached Bowden tube from the back to the front. If you feel a sudden increase in resistance, then exchanging the Bowden tube might be a good idea.
Link to post
Share on other sites
whoneyc 10
I have tried 1/4, 1/2, 3/4, and full settings for on the feeder gauge, all have had problems.
As stated in my original post, I have cleaned the knurled bolt with canned air. I'm not sure if "canned air" or "air duster" are terms used in your regional version of English, but the product I am referring to can be seen in this image.
The PLA was hand-pushed through the extruder core during execution of the hot pull cleaning method.
Edit:
I forgot to add that the Bowden tube appears undamaged. There are no crimps in the PTFE tubing and filament has no problems getting to the print head during the initial filament loading.
Edited by whoneycForgot to respond to last part of comment.
Link to post
Share on other sites