


peetersm
-
Posts
377 -
Joined
-
Last visited
-
Days Won
2
Content Type
Forums
Events
3D Prints
Everything posted by peetersm
-
I saw this both on my ipad IOS 7.0.6 and my Win7 machine in chrome-latest
-
 Right about the assemble vs pre assembled differences, but also the um2 family (I'm pretty sure) is not as easy to work on, fix, or add modifications. Which is a noteworthy difference, since at some point you will need to fix something, replace a loose belt, re-tighten a pulley set screw, realign the axes on the print head with the sticks, add an improvement or mod to make it better, etc... And these will not be as easy on the um2 family since they were not made to be as easily end user serviced or moded like the UMO. Full disclosure , I don't have experience doing these tasks on an um2 , I just have the videos and forum info to go on. So maybe I am overstating the UM2 serviceability difference.
 -
I thought it was working but now I'm seeing that some notification links are behaving and some are not. :-(
-
I think they have re-fixed "notifications link going to 1st unread post" that was broken by the last update . Thanks
-
Wow, what a range. It is certainly not as attractive at those prices.
-
where are you shopping? UMO+ is 995USD UM2+ is 2,499USD that is a 151% more if you're paying that much for a UMO+ you should find a new store.
-
The stock prices has come down of the UMO+ kit. I think that is a really good printer, more end user serviceable than the 2. Also I don't think the 2 prints 1.5x the money better than the UMO+ Buy one of those.
-
I did not notice the menus, since I don't use them I can't compare. Glad to hear you'll fix the things the update broke. Also since you brought up the manuals. When will you correct all the errors in the manuals, there have been several posts highlighting the issues and almost 2 years later , I'm still having people use my annotated UMO+ manual for assembly since the one on the website is has not been updated.
-
Same here, no jump to unread, no line of unread displayed when I scroll down to the posts I have not seen. Also seems like it's very slow again.
-
How to get rid of this string? retraction?
peetersm replied to almberg's topic in Improve your 3D prints
I typically get a sting at the last point the nozzle was on the print. Are you using z hop, that might be making those other blobs and stings. Retraction blobs are something I still can not eliminate. -
I wanted to share with the forum folks a great thing UM is doing at the San Francisco Maker Faire this year. They are inspiring school kids to rise to a challenge, the Ultimaker Bay Area Maker Faire Gumball Machine Challenge! I think that is the official name. ANYWAY kids from 4 selected schools in the US will design 3D printed items to be put inside 2-inch(48mm) gum ball machine capsules. The students' designs will be loaded into one of the 4 gumball machines at the San Francisco Bay Area Maker Faire May 21-22. Attendees will be able to buy these for 50 cents each! The schools will get all the money collected from their machine, AND who ever sells the most will win a new Ultimaker 3D printer! This also feels a shameless brag (20% maybe) since my school was honored to be selected. AND we are certainly going to use this fact to brag and issue press stories as much as we can. :-) We are a small school district with a fairly high poverty rate who needs all the good press we can get. Read more about our excitement here: www.comstockps.org/gumball Thank you UM for sponsoring this awesome fun challenge for our kids!
-
This beautiful 3D printer belongs on a spaceship
peetersm replied to frederiekpascal's topic in Coffee corner
The dual extruder is a mixing single nozzle. Like the e3d Cyclops, BUT they say their software can do "experimental limited material mixing". That sounds fun to play with. But not at that price. -
Today, my bell shows zero new posts in "post you latest print" for the past 18hours. (I only know that because I did not clear it yesterday) BUT there have been at least 2 new posts these since 4-15 11:37am EDT (current local time 4-16 7:37am EDT)
-
Coming to this post from the bell (showing 5 unread) did not take me to the unread but the top of the page #47. Scrolling down the unread line was not displayed either. -also- Bell was showing 1 unread for this post, and it took me to page #3 (currently at 4 pages) and when going to the 4th page no unread notification. https://ultimaker.com/en/community/20017-community-contest-win-an-extrusion-upgrade?page=3#unread -but the bell link to this post showing 1 new unread, worked perfect. https://ultimaker.com/en/community/18879-sharing-some-exciting-news-the-ultimaker-2?page=11#unread
-
ended Community Contest | Win an Extrusion upgrade!
peetersm replied to SandervG's topic in Coffee corner
I have been working on this improvement for my UMO+ for some time now, and I think it's finally done. I take care of a bunch of UMO+ at different schools and I wanted a clean way to add cameras to the printers so kids could watch their prints from the web and see time-lapse videos too. I did not like the way we had web cams hanging off the printer, getting bumped, and losing video when someone turned off the lights in the room. SO my goal was to mount a Raspberry Pi camera+wide angle lens+ LED lights inside the printer. I made this design to solve/address the following: 1. Clean looking mount for RasPi camera and lights inside frame. 2. Increase viewing angle of camera. 3. Light the print bed for camera. 4. As little modification to the actual printer as possible (small drill holes). SO this is what I made. I found that when the camera is inside the frame it needs the help of a wide angle lens to see the whole print bed, turns out those cheap smartphone lens work great. I also decided to power the LEDs from the Pi to reduce the power supplies I would need. There are a bunch of photos to show my process. I will try to add better instructions later. AND as an added bonus !!! here's the bin of prototypes I ran thought while designing and perfecting this assembly.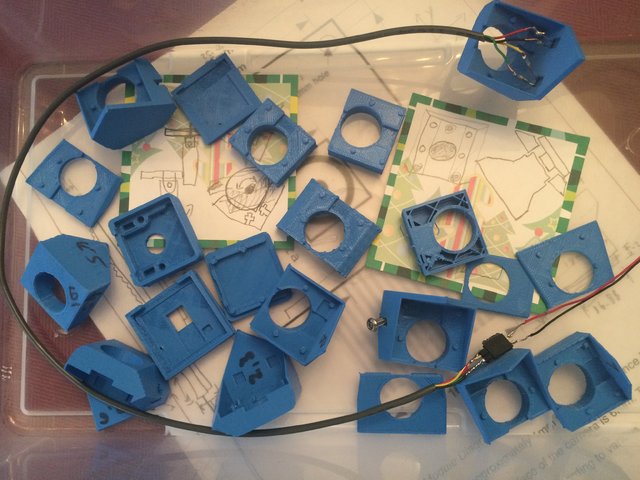
-

Version 1.0
1,878 downloads
Mount a Raspberry Pi camera+wide angle lens+ LED lights inside your printer. I made this design to solve/address the following: 1. Clean looking mount for RasPi camera and lights inside frame. 2. Increase viewing angle of camera. 3. Light the print bed for camera. I like Octoprint for viewing my prints AND taking time-lapse movies of print jobs. I did not want a camera hanging off outside of the printer, I wanted it to be inside the frame if possible. I also wanted to have light since sometimes the room is dark. I wanted as little hacking to the printer as possible (just a few drill holes in the frame). SO this is what I made. When the camera is inside the frame it needs the help of a wide angle lens to see the whole print bed. I also decided to power the LEDs from the Pi to reduce the power supplies I would need. There are a bunch of photos to show my process. I will try to add better instructions later. -
ok, I need to bump this topic again, since I was just reminded how bad the search situation is for people trying to come here for help. I talk with people about UM and tell them to use this site, and often they respond "how to you use that site? I can never find what I am looking for, so I gave up." This horribly malfunctioning search box has been driving people away since the release of the new site. I would implore you to use some common sense and turn it off or make it into a link that explains how to use google to search the site, syntax like this: site:ultimaker.com -search string here- this would be the sensible thing to do since: 1. People who use the site never use that search box, they use google. 2. New people who accidentally try to use it end up leaving since it's a total failure.
-
ended Community Contest | Win an Extrusion upgrade!
peetersm replied to SandervG's topic in Coffee corner
My push lawn mower (Stormbringer) kept needing repair to the clutch gears that change wheel rotation to blade rotation. I made these replacement gears to replace the original gears that had stripped out many times and been repaired with epoxy putty. When I got my 1st 3D printer (UMO) I decided to make these. The PLA worked great and I got about 2 years of mowing out of the 1st pair before I had to print a fresh set. -

Version 1.0
1,352 downloads
The clutch gears on my push lawn mower (Stormbringer) kept stripping out, after trying to repair them with epoxy putty I designed these to 3D print. The PLA worked gears for about 2 years worth of mowing then I had to preint new replacements again. -
ended Community Contest | Win an Extrusion upgrade!
peetersm replied to SandervG's topic in Coffee corner
In this case data = numbers. maybe "données expérimentales" would be a better? I'm talking about the measurements you made to show the improvements. Like the temperature graph you made, and the dB measurements. It's great to have this information to show the improvements. -
ended Community Contest | Win an Extrusion upgrade!
peetersm replied to SandervG's topic in Coffee corner
I like all the photos , great post . Nice write up and good info on the process. I give it high marks for reusing materials and solving a problem all at once. Also love your data , I'm a sucker for data. :-) -
how to print flower with single layer petals?
peetersm replied to lance-greene's topic in Design for Additive Manufacturing
Make a modle of the petal that is 0.35mm thick , the default setting for 1st layer is 0.3 so that should make a single layer print. Also if I misunderstood, post the link to the file your trying to print. This would help. If you mean "single wall" then try "spiralize" setting in the expert menu. -
I think you're just having 1st layer sticking issues. raise the bed so the 1st layer is flat on top. Also are you using blue tape, or heated glass? The STL looks fine and so does the gcode, you just need to get the bed adjusted and fix the sticking issue. Also the brim is crazy huge, for an object like this I would change the brim to 3 or 4 in the expert settings, for some reason the default brim is 30.
-
+1 for Dichloromethane (DCM, or methylene chloride)!! I have not had good results with CA, but have had perfect results with this solvent. (wear gloves and have tons of ventilation) I buy it at my local hobby store but you can get it here: http://www.amazon.com/Tenax-7R/dp/B00EMXTBG0
-
I just solved some z ridging by printing hotter, I went up 10C. It's an easy test to see if that helps you. it did for me (although I'm still trying to find a real fix for my issue, since printing hotter is a band aid not a fix) here's the same print just changing the temp by 10C here's the on going testing.


