


LePaul
-
Posts
2,075 -
Joined
-
Last visited
-
Days Won
17
Content Type
Forums
Events
3D Prints
Everything posted by LePaul
-
Is this your first time using PETG? Stringing can be notoriously challenging to fine tune! I'm going through that now with both my UM2+ and CR-10S.
-
This thread has been fascinating to follow. I also can't find a single review on the Ultimaker S5 on YouTube ?
-
Is anyone else using Matterhacker Pro Series PETG? I am still trying to dial it in. I started with the CPE Profile included on the Ultimaker 2+ (LCD Menu, Material setting). I am also using the CPE profile in Cura 3.5.1 Like most PETG materials, I am trying to battle stringing. I have lowered the temperature to as low as 235 (started at 245), increased the Retraction Speed to 45 mm/sec and also increased the Retraction Distance all the way up to 11 mm/sec Apparently I have a ways to go!
-

DXU - Efficient Dual Extrusion Upgrade for UM2+
LePaul replied to yyh1002's topic in Third party products & modifications
Very interesting, so to fit the UM2+, it's dual 1.75mm nozzles? Are those nozzles pretty easy to source? -
colorFabb nGen - Cant get it to work properly
LePaul replied to TMicke's topic in Improve your 3D prints
I used Cura 3.5 Beta Latest print attempt -
colorFabb nGen - Cant get it to work properly
LePaul replied to TMicke's topic in Improve your 3D prints
I had to give up on ColorFabb HT. I can not seem to resolve the massive stringing. I upped the retraction a bit more and it's still going on. Meanwhile I have a $14 roll of PETG printing like a champ on another printer. I won't waste $45 on anything ColorFabb ever again. -
colorFabb nGen - Cant get it to work properly
LePaul replied to TMicke's topic in Improve your 3D prints
I had a rough go with nGen too. I found 235 to be the magic temp for the parts I was printing. It's ColorFabb HT that's proving very difficult for me to nail down! -
I decided to go with brim and the changes I posted above. 79% into the print and the area that failed previously is working very well. I'll let you know how the finished print does but so far (20 hour print), the big problem area seems to be working well. I think the brim gives a stronger base for the support and added the one wall helped too.
-
This model (refer link) has two versions Using the one without support
-
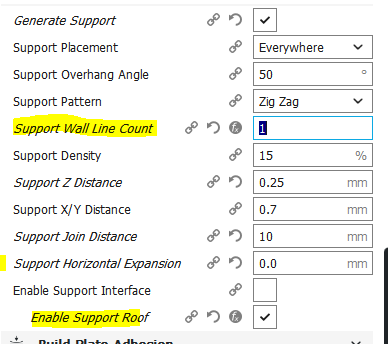
Okay those look promising....here's what I've added in...appreciate your thoughts
-
Ultimaker 2+ ?
-
"Put a box over it" Can you elaborate? Never utilized that feature before
-
That's interesting. So there's no way for a set some solid layers first to strengthen the support to the bed?
-
Ok, I've been looking at those settings. I think the problem is the foundation. Even if I set a brim, the supports would be weak. It looks like the wings have good support but the base would again be the weak spot. Can you offer some tips on the Join Distance and Horizontal expansion that might be good to try?

-
Thanks for your reply. Yes the supports came off from the base and I know in S3D I can set how many layers are solid. (I supposed I could have opted for brim too) I'll investigate those settings.
-
Yes, Toothless from "How to Train Your Dragon" is a favorite of mine. And there's a great model (without supports one) on Thingiverse. (https://www.thingiverse.com/thing:2335797) However no matter what I've done, the supports fail on the wings on the back Using the latest Cura.... and really stumped as to how to get this little fella printed successfully! It's eluded me a few times!
-
Ultimaker 2+ grinding filament...bad TFT Coupler?
LePaul replied to LePaul's topic in UltiMaker 3D printers
Thanks guys...I'll have to wait until pay day to order a replacement TFT and Bowden tube. The TFT has hundreds of hours on it so that's my guess.... -
 That's hilarious....it's on Thingiverse. Search for Squirrel :) Really...people need to lighten up!
 -
Has anyone experienced filament grinding from an old TFT? I have repeated grinding going on with my Ultimaker brand PLA using the default Cura/Ultimaker PLA settings recently. I have repeatedly disassembled, cleaned with a brass brush and tooth brush the hobbed knob/feeder and removed all the debris. I also see little pieces of debris in the Bowden I can't seem to remove. I have the feeder tension at 3/4 (following documentation provided by Fabrc8) I have several hundred hours on my UM2+ and all I can figure out is that there's some backpressure somewhere...my thoughts are replace the TFT and Bowden tube at this point. But before doing so, I am curious if my "theory" is correct...bad TFT.
-
Hi I used Simplify3D and used 215 for the first layer then 210 for the rest. I didn't have any blobbing issues you mention. I bought 2.85 and 1.75 versions and for the latter, used it on my CR-10S using the same temp. That first priming if the nozzle is so weird, as I mention in the video I can't recall if I used Cura or not for any of the prints. My Ultimaker 2+ is down right now, I keep grinding up filament in the feeder....I think my TFT has finally gone bad on me so I have to replace that.
-
Hi Im aware of that, it popped out after I opened up the housing. I wish that was the root cause since I did put it back upon reassembly. Now if the level indication goes up, that’s less tension? For some reason I’m having trouble with Ultimaker filament. The previous types I had in there printed very well.
-
205 definitely came out much better. I concur slowing the speed down will help with overhangs and more complicated objects
-
I'm a bit stumped on this and I think I have a solution...but thought I would ask my friends here for their thoughts. I had a print display extrusion issues and then fail, air printing for a while before I noticed it. The back of the machine under the extruder was full of chewed up filament. I have the extruder tensioner set to the middle, which I think....I could be wrong...has always been the default position. I was using a spool of Ultimaker black PLA that had been sitting out for a year. I don't think PLA is susceptible to absorbing moisture as much as other filaments....but it's worth mentioning as we debug this! I cleaned out the extruder by removing it and cleaning it, using the steps documented here and those provided by Fabrc8. I put everything back together, re-attached to the Ultimaker 2+ and as a precaution, did 3 Atomic pulls to clean out the nozzle/make sure no issues existed there. I opened a new package of Ultimaker Black PLA...everything was sealed and new! Started a new print and a while into the print, the same thing happened. Now I suspect I have a simple case of too much tension on the filament, causing the grinding. What position should it be at by default (if such a thing exists)? Back to cleaning this fella out again!
-
Printing at 60 mm/s and 0.10 layer height The cat model came out great. But printing a piece for another printer, it really failed badly. Trying again at a warmer temp (205) I'll report back in 5 hours!
-
I've had mixed results with it, I bought some 1.75mm by accident and using it on my CR-10. It indicates "195 is ideal" but my prints at that temperature show poor adhesion....you can rip the piece apart with ease. I had tried higher temps but overhangs suffered as a result. The areas it prints well look nice, no "shine" we're used to with regular filaments I'm trying 205C this time...perhaps that will be a good balance of strength and able to do overhangs well.


