

Here Is a key holder I designed and printed in bronzefill for a friend who Is into gardening.


Here Is a key holder I designed and printed in bronzefill for a friend who Is into gardening.
...and sewing 
Nico ...your so biased .... who says he not into sewing himself 
I tried printing small with my E3D 0.25mm nozzle and Olsson Block on my UM2

Far from perfect, but still impressive for the size.
(yes, the orange thing to the right is a foam earplug)
I tried printing small with my E3D 0.25mm nozzle and Olsson Block on my UM2
I was just considering maybe purchasing one of those nozzles for some experimentation. Would you recommend it?
I was just considering maybe purchasing one of those nozzles for some experimentation. Would you recommend it?
Yes
Its fun to play around with the array of nozzle sizes. The problem is you will then have heaps more settings to check and go through.
but changing just takes a few seconds and you can print detailed or fast
If you use cura just add one or more machines (rename something like UM2-0.6) so you don't have to change all preferred settings all the time, just select the right machine.
@Labern: Congrats on the Gizmodo/Sploid exposure
http://sploid.gizmodo.com/this-is-the-cutest-and-possibly-smallest-3d-printed-d-1692348672
with the new nozzle i've got prints like never before.The stucture comes out very nicely.
for everone with old styled nozzle buy the new one from the shop. Its worth the money
.


Checkout the topic too: http://umforum.ultimaker.com/index.php?/topic/10320-winged-victory-of-the-supports/
 1
1
@Labern: Congrats on the Gizmodo/Sploid exposure
http://sploid.gizmodo.com/this-is-the-cutest-and-possibly-smallest-3d-printed-d-1692348672
Thanks
Its everywhere now. I cant believe how fast stuff travels like this. Some twisted facts added by some though. I made sure UM got their name in and 3ders.com has added how the community (you guys) have played a part. Because really if I didn't have the guidance from people here then I (and a lot of others) wouldn't be able to make things as good as we can now.
If you use cura just add one or more machines (rename something like UM2-0.6) so you don't have to change all preferred settings all the time, just select the right machine.
thanks for the tip
One for the category practical printing:

I've shown the print here before, but not "in use".
The model on duty is my extremely handsome godchild
And another one:

My ulti-bot army
Just installed the Anders Olsson block this morning and I've abused the E3D 0.8mm nozzle to print all those little yellow fellows. I'm coaching a coderdojo tomorrow and because it's the 12th dojo for that location (1 year anniversary) we wanted to do something special. So I'm going to bring the UM2. Wanted something to give to the kids when they go home. Since it is all about coding, arduino and lego mindstorm, what better than the ulti-bot
Printed (only the yellow ones) with 0.8 nozzle on 0.3mm layers. 15% infill. About 9 minutes per unit (printed them per 10 obviously )
Blizz - that is lovely! Why would you need infill on those robots?
Now to my latest prints - was trying the Colorfabb Bronzefill for the first time. Lovely stuff in general, I need to get to know how to post-process it.


Tried to print my wife's sculpture, made from 123D Catch photos. Tried to polish it with my Dremel equipped with soft polishind disk. In general, it worked well. How do I get rid of the dark recessed areas? They are hard to reach with anything.
Shurik, dunno, I think they'll come out just as good without... I just feel safer with some infill
wow the .8mm bots look just as detailed as 0.4mm ones. crazy!!
I think the darker areas are actually burned. A dremel creates loads of friction and heat if you stay in the same spot for too long.
I love how that stuff prints, like magic  Need less support, lines dissapear, details are great with 0.2mm layer and 0.6 nozzle even.
Valcrow they actually look quite good but you can clearly see the difference on the stars on the belly, almost not visible on de 0.8 version. Although that might also be because of the printing speed.
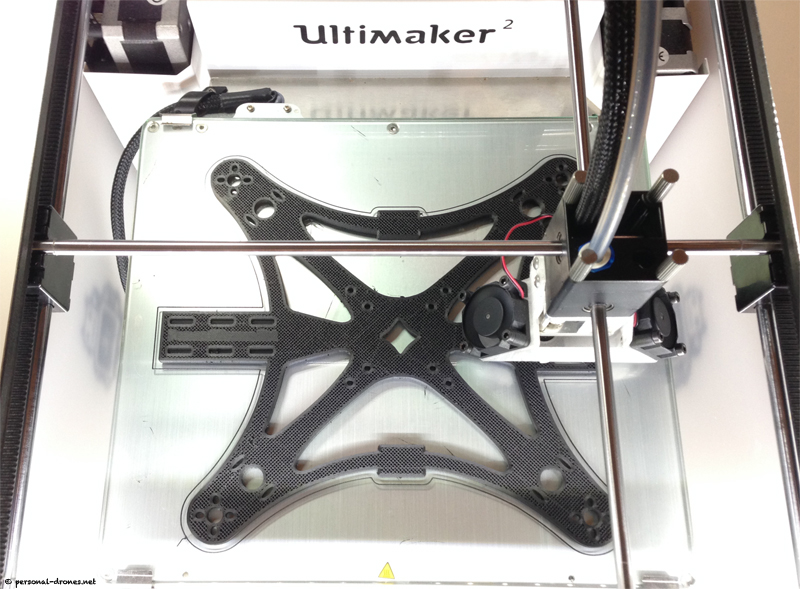
Printing a quadcoper frame I designed based on the Ecks Fibre model. With respect to the original design I added two little platforms for the video camera and video transmitter at the front and back.
I had already built one from plexiglas, cut "by hand" with a dremel (see the second photo). Amazing now to be able to design it, print it and possibly share it thanks to my UM2.
Colorfabb XT CF20, most appropriate for a quadcopter in general and for the Ecks Fibre in particular
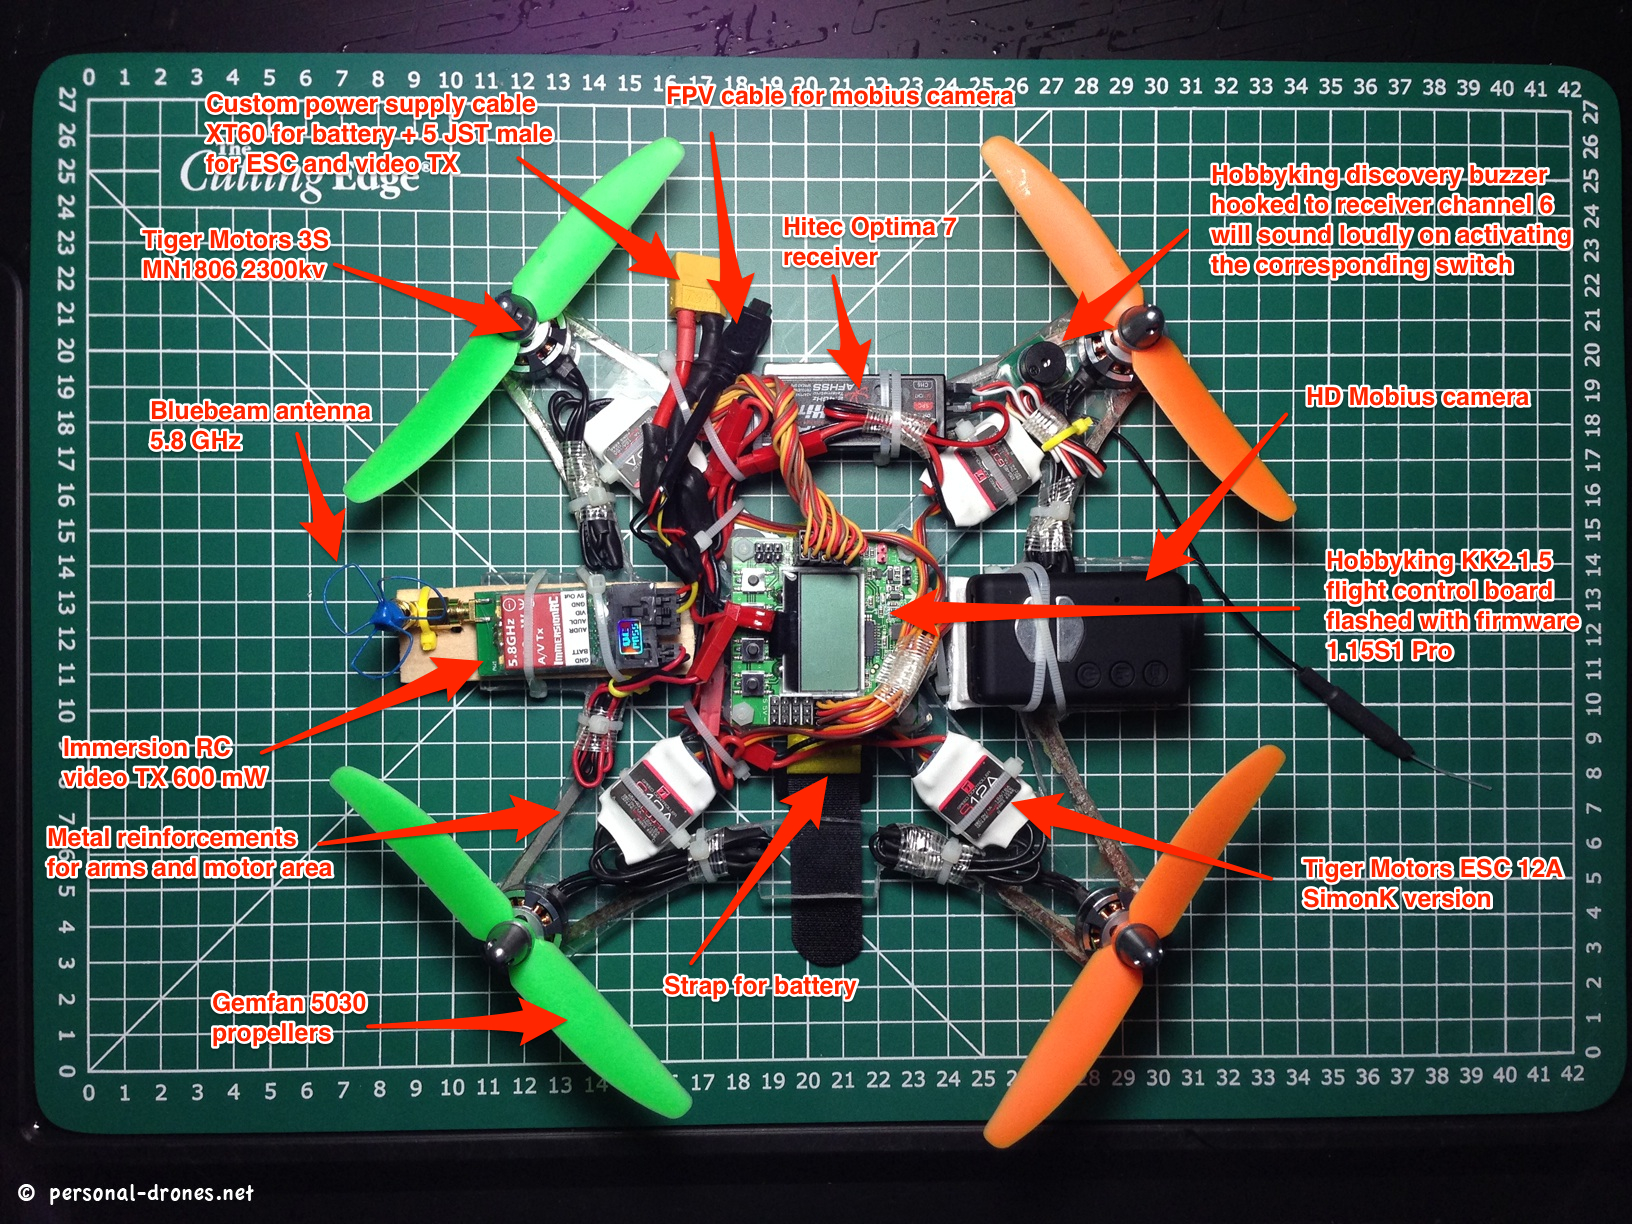
If you are curious about how to make one of these things, you will find a full description of this build here: http://www.personal-drones.net/plexiglas-mini-fpv-quadcopter-experimental-build-based-on-the-ecksfibre-design/.
Nice!
Flight photos and videos as well, please.
Inspired by Personal Drones post, I'd like to show some pictures of a redesign of Spidex Micro (on Thingiverse: http://www.thingiverse.com/thing:326062).
The lateral parts got extended to mount the base plate upside down (for my understanding the correct orientation), the base plate got adjusted to be more stronger at the motor mounts, the mount for the FPV antenna got adjusted.
Printed with PLA.
Flying like a speedy bumblebee! :-P :-P :-P
A first flight video will be available on Youtube soon (just uploading):


Ultmaker2
Colorfabb XT
4.7 kilo
38 pieces
nozzle 0.8
layer height 0.5
printing time 92.5 hours
2

MariMakes posted a topic in UltiMaker Cura,


ArunC posted a topic in UltiMaker 3D printers,


Recommended Posts
Top Posters In This Topic
362
282
221
179
Popular Days
Jan 5
30
May 12
26
Jan 13
23
May 1
22
Top Posters In This Topic
ian 362 posts
cloakfiend 282 posts
skint 221 posts
SandervG 179 posts
Popular Days
Jan 5 2014
30 posts
May 12 2014
26 posts
Jan 13 2014
23 posts
May 1 2014
22 posts
Popular Posts
kmanstudios
Took me forever to do this. And it is still rougher than I would have liked. 3D concept rendering: Finished piece:
kmanstudios
I just finished this. It was a multi-part print for ease of painting. Some of it I am not sure what happened...but hey, it is purty....And, I am unanimous in that ? Test Render Parts
gr5
Bath interferometers. I have made about 20 of these for people who use them to test their telescope mirrors. They are amazingly accurate and can do better than a $40,000 Zygo PSI optical tester. Th
Posted Images
Labern 775
I did a search and found one that was the second worlds smallest , as mine looks even smaller. :grin:
but who knows. I'm sure its the smallest 3D printed one so that's all I'm claiming. I actually found a smaller battery and I'm sure i can find a smaller button. the problem is, it took me 3 hours to solder it as the wires kept breaking off and was hard to hold all the little bits.
Link to post
Share on other sites