


43915
-
Posts
52 -
Joined
-
Last visited
-
Days Won
1
Content Type
Forums
Events
3D Prints
Everything posted by 43915
-
I've been using an UM2+, so 2.85mm PEBA-S filament. And I think that has helped a bit, since flexible materials tend to give problems with bowden printers. I would think that 2.85mm filament is easier to push through the bowden tube than 1.75mm filament would be, because it feels like a thicker filament should be a bit more stiff. That's just a guess though. Good luck!
-
Another option is to tweak the "Minimum Infill Area" setting. That way you would get 100% infill with skin pattern in the leg. And if you find a value that fits well with the model it would do the same thing to other parts of the model that could also turn out too small to work with the 20% infill. 100% infill instead of 80% shouldn't make that much difference in print time and material use on such a small model, but it will probably be stronger.

-
I have printed quite a bit with Kimya's PEBA specifically. It's a tricky material in my opinion. Lots of stringing and hard to get good overhangs. Bridging was a big no-no for me, I couldn't get them to print in any acceptable quality. I've tried printing a bunch of phone cases with it and while they mostly came out just fine I couldn't get a good result on the holes for changer and AUX where there needed to be bridging. I ended up printing a few sets of coasters, simple discs with 0 bottom thickness/layers and gyroid infill. Those turned out pretty cool. But as Mari wrote, I think you have to raise the temperatures a bit, the filament seems prone to under-extrusion (while still oozing and stringing a lot, which is frustrating). I also concluded that a little bit shorter retraction distance but with higher retraction speed helped me get better results in most cases, to counter some of the stringing and oozing.. And an enclosed printer with front door and a box on top. The one instance where it worked notably well was on prints without any overhangs or bridges where I could crank the heat a bit extra and have minimal retractions. Prints like that came out really good. I rarely got it to print perfectly though, but I thought I would share my experiences and keep an eye on this thread to see if I can find some tips as well. It's a really interesting material that I can imagine has a bunch of usage if you manage to get good print quality. It's crazy strong with good layer adhesion and has a really nice flex to it, much more "swung" compared to TPU for example. I made a mouse-bungee for my work computer, printing one with TPU and one with PEBA, and while the TPU one turned out pretty "meh" and kind of just sagged, the PEBA one worked like a charm thanks to it being kind of stiff while still having good flex. Good luck with your prints!
-

Ultimaker and MakerBot Announce Closing of Merger
43915 replied to MariMakes's topic in Official news
Are there any plans for what types of printers we can expect? Will they all be high end and pricey, or will there be cheaper models as well? Is this merge going to affect the number of new printer models released, as in new printer models released more frequently? Will new printers come in black or white? Or will there be Black Edition and White Edition to chose from on each printer? I get that it would complicate things a bit, but I for one would really appreciate the ability to chose the color of my printer even if it's only a matter of 2 options. And most importantly, will there be a new mascot to replace the UltiBot? -
I tried your suggestion and loaded the PETG at 250C and raised it to 252-253C when starting the first print, and it actually does print now. Funnily enough, now that it loaded properly at the higher temp I could lower the temp all the way to 225C during the first print without problem. Strange since it basically refused to extrude at all at 240C at earlier tries without any signs of a clogged nozzle. Not sure why it works fine at lower temps now after loading it at a much higher temp first. But I'm not complaining, it seems to work and I'm getting great prints out of it now. Thank you for the help!
-
Hello, We have an UM2+ at work and I just received a spool of Polymaker Polylite PETG and decided to try it out. I unloaded the PLA I was printing with before with a pull and tried to load the PETG. However, when the filament reached the nozzle it just barely managed to squeeze a tiny bit of filament out very slowly and after a while stopped all together while the extruder started carving away at the filament. I figured that there had to be something clogging the nozzle, so I did a few pulls to clean the inside of the nozzle (with no signs of any debris or dirt) as well as wiping off the outside of it and sticking a small needle through the hole to clean it out. I tried loading the PETG again but the same thing happened again. When I helped push the filament behind the extruder it managed to slowly extrude a little bit of filament, but still basically nothing. I adjusted the tension in the extruder in case it wasn't getting a good enough grip, but even at the highest tension the problem persisted. After that I tried adjusting the nozzle temp to see if it would make a difference, but going from 10C below the recommended temperature to 10C above it still didn't solve it. I then tried switching to a new nozzle and while I had the old nozzle removed I took a bit of filament and tried to push it through the print head. I went through, but it wanted to catch on to some edge down inside the head after entering the teflon coupler, and when I got it past that point it felt like something was scraping against the filament and making some resistance on the way through. I changed the teflon coupler a few weeks ago making sure to use the printhead spacer, so I doubt that that's the issue. But given the distance I could feed the filament before it hit the edge I mentioned I would like to think that it's right where the teflon coupler connects to hot end isolator. As if they aren't entirely flush on the inside. Is this something that can happen or could something else be causing this? Anyway, after mounting the new nozzle I tried again with the PETG but the problem persisted. I then unloaded the PETG and loaded regular PLA again, and it prints perfectly right away. I'm having a hard time figuring out why PLA (and also ABS) works just fine while the PETG is a total failure. I can't even start a print with it since the prime blob basically just becomes a 4-5mm long string instead of a blob on the bed, and then the print gets heavily under extruded to the point where there's basically no printing getting done. I guess there must be something wierd with the printhead given what I found when changing nozzles, but since both PLA and ABS prints normally I don't understand why the PETG is having so much trouble. Has someone else had similar problems, or can someone help me troubleshoot this? Regards, Jocke
-
Well, this is a bit embarassing. Using the speed layerview I realized that the part of the print that I referred to as infill was in fact the top/bottom layers, which I had previously lowered the speed of quite a bit. That's why the inner wall seemed so fast compared to it. But at least I learned that there's such a thing as speed layerview, have never used that before! Thank you for helping me clear it out.
-
I've noticed that the print speed of inner walls seem much faster than specified in Cura. For my current print I have outer walls at 30, inner walls at 40 and infill at 50, but I can swear that the inner walls print much faster than the infill. Never noticed this in previous releases. The inner wall speed seem rediculously fast even though it's only at 40 in Cura. From the looks of it I'd guess it's closer to 70-80 instead of 40. All other print speeds seem to match what I enter in Cura. Is there something that I'm missing or could this be a bug?
-
I don't know what kind of printer you have, but on my Ultimaker 2+ I can change the settings for different materials in the printer itself and change the printing temperature there(as well as many other useful settings). These act as the "default" settings that the printer use when I start a print with a specific material. I can also change print settings on the fly through a menu that I can access while printing, such as nozzle temperature/buildplate temperature/print speed etc. This is what I usually use to make my prints as good as possible, when you change on the fly it's often really easy to see the effects of the changed settings directly as the print is working. For example, if I raise the nozzle temperature by 10C while printing I can just look at the following layers to see what difference it made. I can also go to machine settings in the Cura software and change the G-code flavor from Ultimaker 2 to one called Marlin. With Marlin active I can change print temperatures under the "Materials" tab in the advanced print settings. I'm not sure what the different G-code flavors do, I think they can override the default printer settings, and I assume that Marlin should work with basically any printer. Don't quote me on that though. Those are the different ways that I tend to change my temperatures. I change the material settings in the printer if I find that I want a different "default" temperature, as when I use the standard Ultimaker 2 G-code flavor that's the temperature that the printer uses when I start a print with that material. I then use the menu on the printer and change the temperature there on the fly when I want to experiment with different temperatures or if I notice on the ongoing print that it needs higher or lower print temperature. Lastly I rarely use the Marlin G-code flavor, but sometimes I know that I want to start a print with a different temperature than the default one I have on the printer, or have some other setting that the printer normally controls instead of Cura. Those times it's convenient to use Marlin.
-
Ah, it looked like the problem was on the bottom of the print, as in issues with the first layer. If it keeps doing it on following layers I'm not sure what could be the cause. Maybe your nozzle is too hot? Considering that it looks like you get quite a bit of burned blobs here and there on the print. If not you might have to wait for one of the experts here on the site to respond.
-
I've had issues with this before with ABS, and for me it turned out that I had the nozzle too close to the bed. At first I figured that I didn't get it close enough and I leveled it countless times both with a paper in between and also by eye and feel to try to make it work. Then after I applied gluestick to the glass bed the nozzle came slightly closer to the bed because of the glue layer and the prints ended up looking like on your pictures. Moved the bed closer and closer thinking it was too big of a gap causing the plastic to not squish against it properly, but the result only got worse. What ended up working for me was increasing the distance between the nozzle and the bed quite a bit. I'm guessing that when the nozzle gets too close to the bed it kind of drags on the plastic causing it to curl up behind the nozzle. Kind of like if you put a rubber band on a flat surface and push your finger down on it hard while also pulling it along the table, the rubber band will raise off of the surface behind your finger. There's a really fine line between having the nozzle to far from the bed and too close to the bed, and it can be very frustrating to get it right. Especially with glue on the bed and with certain filaments.
-
Can I use Cura with a Snapmaker A350
43915 replied to matefish's topic in Third party products & modifications
That makes sense, thank you for explaining it! -
Can I use Cura with a Snapmaker A350
43915 replied to matefish's topic in Third party products & modifications
I figured that since it says "Ultimaker" as author on the Snapmaker profiles they were made by Ultimaker, especially since most of the other profiles have other authors. My bad! -
Was some part of the print you started still stuck to the bed when you found the printer like that or was the whole part stuck to the print head? If none of it was still on the buildplate one could assume that it has come loose from the bed during the print and gotten stuck to the print head instead, like Smithy said. Or if it doesn't look like it's caused by the print getting stuck to the print head it could be a leak where the nozzle is screwed on to the hotend, I've had issues with that before. I didn't have a torque wrench and was afraid to tighten the nozzle too much, so it ended up too loose instead and filament slowly started to leak out through the threads. But it doesn't look like that's the problem on the picture. You might have to keep an eye on the printer regularly instead of leaving it overnight to see if you can find out when the problem starts, or maybe set up a camera to film all your prints until it happens again.
-
Can I use Cura with a Snapmaker A350
43915 replied to matefish's topic in Third party products & modifications
If I open Cura and click to add a new printer and check the list under "Add a non-networked printer" there's a row for Snapmaker, where Snapmaker 2 A150/250/350 is available when you expand it. So you should be able to use it with Cura since there are profiles for it made by Ultimaker. Since the Snapmaker has a WIFI connection you might be able to just connect the printer to your computer and go to "Settings > Printer > Add a printer" in Cura and see if it appears in the list. If not you can add it manually like I described above. -
Ultimaker Breakaway -- too MUCH bed adhesion
43915 replied to RFrancis's topic in Improve your 3D prints
Good to know, then I'll stick to glue when it comes to ABS to be on the safe side. We have a few different brands of PLA at work and I'll make sure to report back if I end up trying the salt on any of them. -
Ultimaker Breakaway -- too MUCH bed adhesion
43915 replied to RFrancis's topic in Improve your 3D prints
I'm definitely going to try the salt method for PLA. I rarely have issues with it not sticking to the buildplate with a clean glass plate, but every now and then there's an extra hard print where it might be useful, and I'd never heard of using salted water before. What effect does it have on ABS, if you've tried it? Could it be used instead of gluestick to prevent those prints from sticking too much? -
Ultimaker Breakaway -- too MUCH bed adhesion
43915 replied to RFrancis's topic in Improve your 3D prints
You could try printing with gluestick on the bed. While it can help by giving better bed adhesion it can also help preventing prints from sticking too well to the glass bed. I've seen colleagues print ABS directly on the glass bed and having the print rip a big thin piece out of the glass when removing it. With gluestick on the bed you never have to worry about that. I have had some issues getting PLA to stick to glue though and with that I always use a clean glass plate, but it might be worth a try if the breakaway sticks too much to the glass. -
Question Support parameter to avoid support in threads
43915 replied to Ataraxie42's topic in UltiMaker Cura
I'm not sure if it's the best way to get around the problem, but when I have a model where I want support on a specific area and not the rest of the print (or the other way around) I just add another model like a simple cube for example. Then I go to to the "per model settings" and enable "modify settings for overlaps" for the cube which lets you change the print settings where that model overlaps other models. And then, if you disable the "automatically drop models to the build plate" setting you can just scale the cube and move it to fit the area you want and change the support settings for that overlap. You might have to click on "Select settings" and look for the support settings in the list if they're not already visible. So in your case I would make and add a cylider shaped model and scale it to precisely fit the threads on your model where you don't want any support and disable supports in the settings for those overlaps while enabling supports for the main model. This also works for other settings like infill, so if you want more or less infill on a specific area of a model you can use this method as well. I wouldn't be surprised if there are easier ways to deal with this kind of thing, but that's how I usually do it.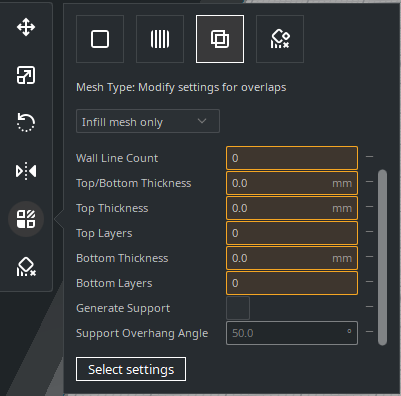
-
I've noticed that it looks like that when there's an area that can't be printed for some reason. For example, if there's an edge that's too thin for the printer to be physically able to print (because of it being thinner than the nozzle) Cura will show it like on your picture with the gray area being the actual outline of the model. Not sure if it's the case for you, but if those edges are very thin it could be why.
-
Yes, I found a comment about it in the RawMouse post by burtoogle. I had to switch negative values to positive and vice versa on "axes" for spacemouse in the config. Thank you for the help!
-
Ah, I'll take a look at that. I searched through the info provided on the Github page but couldn't see anything about changing direction there, so I assumed it wasn't possible. Thanks for clarifying!
-
I'd like to bump this suggestion for 2021 as well. I have tried the RawMouse plugin but everything moves in reverse compared to when I'm in any other 3D software. I've tried changing the mouse settings while in Cura and checking the "reverse" option on all the different movements, but it doesn't change anything when I try using it in Cura, it still moves in the same directions. Not sure if it's something I'm doing wrong or if my Spacemouse settings are acting up and not applying after changes, but I can't get it to work properly. If someone knows what I'm doing wrong feel free to tell me. In any case, official support from Cura would be fantastic, and as far as I can tell the program is stable right now, at least on the latest update, so maybe there's time left to get the Spacemouse support working now?
-
A quick google search gives you this article: https://support.ultimaker.com/hc/en-us/articles/360012090199-Ultimaker-S3-vs-Ultimaker-S5 Along with an older thread from this forum: As for S6, there doesn't seem to be any announcements or news regarding a new model as far as I can find. Therefore I'm doubtful that one would be released before the end of this year.
-
I have been using the preset settings for temperatures initially but later I've managed to get better results through tips I've read here on the forum. Firstly I'm raising the bed temp to about 100-110C since that seems to be the consensus here to work best with ABS. Nozzle temp is preset from the machine at 260C, but lately I've started lowering it to 250 because it seems to work better. And I have front cover on the printer but no top cover. With PLA I usually stick to the preset bed heat since it's been working fine, but I'm usually changing the nozzle temp and print speed on the fly when it's printing depending on the amount of details at that point of the print. On these larger prints with larger nozzles I do however often stick to a higher temp of around 220-230 and a bit higher speed. Unfortunately I'm currently treating the part with acetone vapor, but I can assure you the bottom layer stuck to the bed, I do use the method with glue wiped out to a very thin layer with a wet tissue and I've never had issues with prints not sticking properly except for the 0.25 nozzle before I learned to level the bed by eye. Every time I print with these nozzles I check the bottom too since I had the same thought that you have, but the prints are always completely flat on the bottom and impossible to remove from the bed before it cools down. Nice smooth surface on the bottom once it snapps off at around 40C. It does seem to bond well between layers, I do however think it looks like it overextrudes partially because on smaller areas of prints it kind of "smears" the plastic around as if there's too much plastic or the head moves too low. That was also an idea I had earlier to why the uneven surfaces happen, but the seemingly overextruding areas only happen on small surfaces, as in about 1cm^2 or less. Those areas also end up good at the end of the print. On larger surfaces it rather looks like the nozzle extrudes "uneven", as if the plastic "wiggles" a bit as it exits the nozzle, but it only happens on very specific places, the same place on every new line of plastic. The only other thing I can think of is if the first layer overextrudes and makes an uneven surface right from the start which then transfers to every new layer onwards. On smaller surfaces the plastic has time to melt together with each layer but on the larger ones it might harden too much, I guess. That would explain why the problem areas remain on the exact same place throughout the print as well. I'll try experimenting more with lower temp or changing the speed and see if it works. I'll try to get some images once the part has hardened again, I doubt the acetone will remove the uneven surface on the lower part of the print. Otherwise I'll make another piece and get some images then. Thanks for helping me brainstorm in any case, I'm the only one familiar with the printer on my workplace, so I have no one to discuss these kinds of problems with. EDIT: I've experimented a bit more now and kept an eye on the printer when it make the first layers, and it did look like over extrution on the first layer which then stuck with every following layer. I tried messing with temperatures, speed and fans for a while but it kept doing the same thing. Finally I lowered the initial layer height to much less and it finally worked like it should. It almost looks like the printer puts the head too close to the bed when you print with higher initial layer height, and hence drags through the plastic it extrudes. I tried leveling the bed with more distance between the nozzle and bed, but after a certain point it just stopped adhering to the bed instead while still somehow getting the plastic semi-stuck to the nozzle when it moves. But since it works with lower initial layer height I'm satisfied, I can work with that. Thanks for the help!


