
Hi,
I only just emailed them to ask for a quote !
Will post prices as soon as I get a response. Its in the USA unfortunately, but I cannot believe
that a similar product is not available in the European union...somewhere.
C.

Hi,
I only just emailed them to ask for a quote !
Will post prices as soon as I get a response. Its in the USA unfortunately, but I cannot believe
that a similar product is not available in the European union...somewhere.
C.
Mine make the same sound
however they also feel 'uneven' even when I detach the belts- I know it's a silly question but have you tried this?
Good question !
No I have not tried will all the belts off...its such a pain to take apart to that leve I dont know if I can face testing your idea ! :lol:
I suppose I should test that before I spend out on new parts though.
I did spend a while to align the XY rods because certainly if there is any misalignment the linear ball bearings
in the printhead they sound like very unhappy fellows. But that was more a constant grumbling sound than a varying one.
C.
Pffff !!!!!
"Unfortunately the largest bore size for that bushing size would be 6mm or .250”. To move up to an 8mm bore size the smallest standard pulley/bushing combination would be CMT36-2MR09-0909.8, if that item would work in your application it is priced as follows:
1-9 pieces @ $49.75
10-24 @ $32.34
25-49 @ $22.39
50+ @ $19.90
Thank you for your interest in CMT’s products and services, please feel free to call or reply with any questions"
Thats THAT plan down the drain !
I guess 1/5th the value of the original machine is a bit of a steep price to pay.
One of the issues surrounding eccentricity is that for these types of couplings normally the fit needs to be a interference fit, which on the ultimaker (as I remember it during assembly anyway) it's not.
This is a bit difficult to achieve when the shaft is shared with the bushing, but in any case you would need to have the shafts modified. Probably the most straightforward way would be to have the ends of the ground shaft linear knurled and press the pulleys on that way. Obviously your bronze bushing is never going to come out ever again if you choose this route though. Probably not an issue unless you want to upgrade the bushing.
ED- mind you this also means your linear blocks are never going to come out again, too.
Holy, that's expensive. Normal pulleys are around $2 in large quantities I think. (As you can buy them for $4 for single pieces) So that's about 10x as expensive.
I can see the pulleys 'wobble' on some of the machines. But want to argue that it won't effect printing quality much. Possibly it causes some a-linear movements, which you could test by printing square boxes at different locations and measure them. But my gut feeling says the effect is very limited. Maybe someone could do some simulations or math to figure out the effect?
I think this really illustrates a big gap in the market here:
For people like me, alot of the time we are keen to upgrade parts whenever its possible to do so, however
at the moment we have only 2 kinds of parts-
1) Stuff from china which functions, but is not exactly prescision engineering
2) Industrial grade automation components, which are way overkill for 3D printer loads and duty cycles.
Hopefully someone will come to fill the gap.....
I think this really illustrates a big gap in the market here:For people like me, alot of the time we are keen to upgrade parts whenever its possible to do so, however
at the moment we have only 2 kinds of parts-
1) Stuff from china which functions, but is not exactly prescision engineering
2) Industrial grade automation components, which are way overkill for 3D printer loads and duty cycles.
Hopefully someone will come to fill the gap.....
http://www.sdp-si.com has plenty of pulleys to choose from ($5-20), and even the polycarbonate ones should be a great replacement... in regards to the axle diameter, finding the perfect one is probably the most difficult, and simply getting a smaller ID and drilling them out to spec shouldn't be so hard.
Please keep us updated. I noticed the same 'problem' with mine after assembly, it's hard to tell if it's just due to the whole in the stock pulleys being too large or if they become distorted when you try to tighten the grub screw. It can be made better by aligning the offset like you mentioned (reducing the tight spots in the x or y motion), but it also adds a cam-effect to the motion. If I was buying new pulleys, it might be a good time to upgrade the belt as well, or at least install one that's ~2 teeth shorter so I could eliminate the extra tensioners.
can I suggest we make a test calibration piece so we can both see and quantify the effect
I don't have any smart ideas what it would look like but perhaps Someone could Suggest?
Hi Nik,
Can you explain a bit more, are you proposing to test the before and after effects of changing the pulleys ?
Or just a test piece to show the effect of the eccentricity of the current ones ?
Anyway here are some measurements:
Original Pulley bore diameters = Ø8.10mm
Original Shaft Diameters= Ø7.94 > Ø7.99mm (maybe mine have worn down a bit in places)
So we have a total clearance of up to 0.16mm
When I assemble a pulley to a shaft (a replacement shaft which is Ø7.99mm )
then tighten the grub-screw, then measure from the edge of the pulley to the shaft on both sides I get:
4.42mm
4.62mm
So the pulley is eccentric on the shaft by 0.1mm. This is matching up pretty well to the numbers suggested by measuring the bits separately.
It doesnt SOUND much, but this is with a tighter tolerance shaft than the original printer. So I would think that on
an original ultimaker maybe 0.15mm eccentricity per pulley is possible.
If the belts are tensioned up tight, this would be enough to generate noticable force variations in tension as the printhead moves.
I tried pulling the print head across it's range of motion using a spring-type fish scale. Where the cams/gears are out of phase (tightening the belt), the force more than doubles (jumps off the little scale).
I liked the previous version of Cura (pre 12.12) because it let me select the center of the machine to start the parts at so I could try to avoid spending too much time in the overly tight area (the rest of the updates to 12.12a are very nice). The little stepper motors are more than strong enough to power through the tension variations, but when printing a big part, overheating the motors can lead to some missed steps. If we can lower the stress on the motors, that should reduce the heat build up which should reduce those glitches.
Hi Kristen,
A big improvement for me (one of those really obvious ones that I just never thought of) was replacing
the shaft end caps.
http://www.thingiverse.com/thing:23835
The wooden ones, when tightened down can really rub on the end of the bearings and shaft ends.
I recommend printing these ASAP, and replacing. This will not fix everything, but its a very noticable
reduction in overall drive system friction.
C.
EDIT: For reference some printhead force friction measurements for you from my printer.
Force to start printhead moving from static = 0.9kg = 9 Newtons = 2lbf
Average force to move printhead full 200mm in 4 seconds = 0.7Kg = 7N = 1.5lbf
really good discussion going here -
SG - I was being a bit vague-sorry
I think the latter -quantify the error by observing its effect on a simple print
0.1mm should be easy to see- perhaps a simple octagon vase would show it on the faces that align with the axes?
just thinking aloud here really...
I noticed the same problem with my new UM. I measured one of my pulleys was wobbling by 0.38mm, very noticeable. Which means the hole is 0.19mm off from centre. The other pulleys seem ok. I don't think it is caused by the deformation pressure from the grub screw. I think the bore hole is drilled off centre.
I will definitely need to replace it, as this will cause my models to be in error up to +/-0.19mm at the point closest to the bad pulley.
has plenty of pulleys to choose from ($5-20), and even the polycarbonate ones should be a great replacement... in regards to the axle diameter, finding the perfect one is probably the most difficult, and simply getting a smaller ID and drilling them out to spec shouldn't be so hard.
I've looked around for a stock replacement pulley (in the US) and cannot find any 20 tooth MXL pulleys with a 8mm bore. It makes me think an off the shelf replacement is not available. The nearest I can find is a 20 tooth MXL with 6mm bore (or 0.25"). I agree drilling it out to 8mm accurately should not be too difficult.
I would not be surprised if the UM supplied pulleys are in fact 6mm pulleys specially drilled out to 8mm. Does anyone know?
Anyway if anyone is interested I found these 6mm/0.25" bore pulleys (in the US):
http://www.mcmaster.com/#timing-belt-pulleys/=lagn79
part# 1375K39 $10.77ea
https://sdp-si.com/eStore/Direct.asp?GroupID=346
part# A6A16-020DF2508 $9.17ea (out of stock)
https://sdp-si.com/eStore/Direct.asp?GroupID=346
part# A6A16M020DF6006 $9.17ea (out of stock)

Finally they arrived.
A nearby CNC turning shop produces some thousand gas burner jets for my wok burners each year. So I asked them, if they see a way to produce tailored pulleys for a reasonable price. For this reason it had to be a one-part-pulley instead of the three-part-pulleys, which are commonly available - and fall into pieces when drilled to 8mm, as I had to learn...
Production samples arrived today.
From left to right: Ulimaker pulley, standard pulley with pilot borehole, "new" pulley
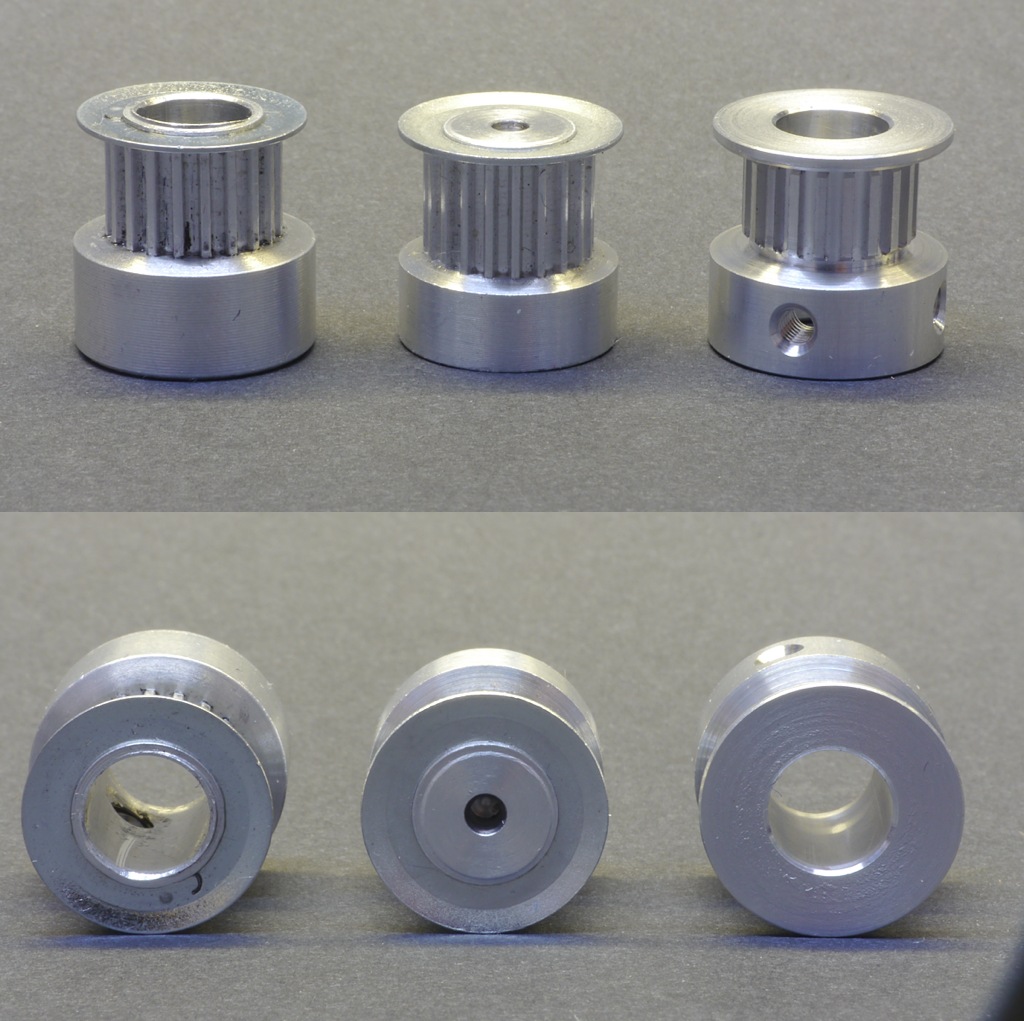
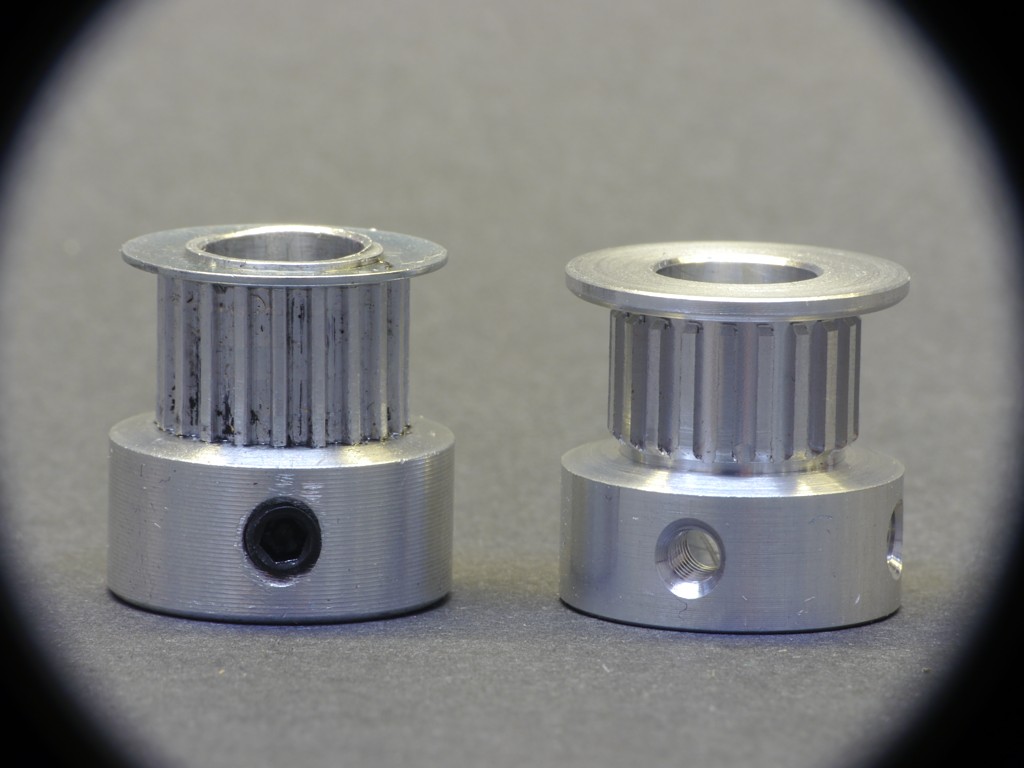
Ultimaker pulley, new pulley
We tested the fitting by hand with an Ultimaker short belt, which I don't need anymore (thanks Calum). You can feel no play, whereas the original pulleys slightly move with a belt wound tightly around them.
The pulleys feature a 8h7 center bore and two M3 threads. The small gap between the cogging and the flange is a trade-off of the one-pice design. I'm not sure whether this will increase belt wearing (if so, it should be possible to design and mount some split spacers to fill the gap). But compared to the wobbling original pulleys (hey, really ugly in closeup), which even seem to feature a slightly contorted cogging, it is definitely worth a try.
I will be mounting the new pulleys the next days and keep you informed.
Markus
Looks like hopefully an improvement, looking forward to seeing results.
I dont think the standard ones have a particuarly well cut toothform...so might be a good jump
in removing play in the system.
So if I understand correctly you went to some machine shop and asked them to machine it for you. Do you have a cad file? And what did you pay?
Well, not just some machine shop but the one where I am already placing orders for several thousands € a year.
I had nothing but the original pulley and a belt. But the master craftsman and owner, who is approaching his 70s I think, is well versed and very cooperative. So he did me a favor. They make a lot of miniaturized stuff for the medical device industry and are used to deliver utmost precision.
I have no exact price tag yet. But if I will manage to place an order of at least 100 pieces, they will be less expensive as anything else, mentioned in this thread (except Chinese bulk ware). My intention was just this:
Hopefully someone will come to fill the gap.....
Markus
Ahh, I see 
Have you contacted Ultimaker about switching to these pulleys? Seems like a nice improvement. Either way I'd be interested in buying a few if they turn out nicely
Markus, this is really cool!
I just got my UM a few days ago, and the pulley runout has been bothering the hell out of me!
Please keep us updated, and I would definitely be interested in purchasing a set.
Thanks,
Lars
Finally they arrived.
A nearby CNC turning shop produces some thousand gas burner jets for my wok burners each year. So I asked them, if they see a way to produce tailored pulleys for a reasonable price. For this reason it had to be a one-part-pulley instead of the three-part-pulleys, which are commonly available - and fall into pieces when drilled to 8mm, as I had to learn...
Production samples arrived today.
From left to right: Ulimaker pulley, standard pulley with pilot borehole, "new" pulley
Ultimaker pulley, new pulley
We tested the fitting by hand with an Ultimaker short belt, which I don't need anymore (thanks Calum). You can feel no play, whereas the original pulleys slightly move with a belt wound tightly around them.
The pulleys feature a 8h7 center bore and two M3 threads. The small gap between the cogging and the flange is a trade-off of the one-pice design. I'm not sure whether this will increase belt wearing (if so, it should be possible to design and mount some split spacers to fill the gap). But compared to the wobbling original pulleys (hey, really ugly in closeup), which even seem to feature a slightly contorted cogging, it is definitely worth a try.
I will be mounting the new pulleys the next days and keep you informed.
Markus
Same here, the wobbling of the pulleys is irritating.
and sign me up for the list for a set
Why not switch to GT2 belts and pulleys, when puting so much time and money into an upgrade?
Johan

ArunC posted a topic in UltiMaker Cura,


ArunC posted a topic in UltiMaker 3D printers,


Recommended Posts
Top Posters In This Topic
35
19
14
12
Popular Days
May 23
9
Jun 6
8
Aug 19
8
Apr 20
7
Top Posters In This Topic
foehnsturm 35 posts
snowygrouch 19 posts
zumfab 14 posts
lars86 12 posts
Popular Days
May 23 2013
9 posts
Jun 6 2013
8 posts
Aug 19 2014
8 posts
Apr 20 2013
7 posts
IRobertI 521
How much more is way more? My gut is telling me it's a bit overkill but it will be interesting to see your results.
Link to post
Share on other sites