


kmanstudios
-
Posts
4,052 -
Joined
-
Last visited
-
Days Won
119
Content Type
Forums
Events
3D Prints
Everything posted by kmanstudios
-
Other than this, which is spot on, you may also want to play a bit with the overhang angle. I am not aware of what printer you are using, but on my UM3 and S5, I can get away with up to 65° angle with no issues.
-
yup..... OK, that was helpful, for me at least. I could see your settings within the confines of your printer. The project file contains everything that you setup, even the printer. And, since I do not have a non UM printer, anything I did would be useless for you. This is a screenshot of the slice and settings I wanted to check. According to my slice, it should print just fine. The layers are represented in the sliced view (Layers) as well as proper bottom settings. Now, just in case there is something that happens on my system that does not happen on your system, I have included the sliced gcode for you to try. If this does not work, I would be at a loss. Bear in mind, I did slice this on 3.6 and I am wondering if that may have been an issue as well. The 3.5 releases were a tad buggy. CE3_projectfile.gcode Hope this works for you.

-
I do not read g-code. So, this is not for me to be able to help. Is there a reason you do not wish to post the project file?
-
The scaling gizmo stays in orientation of the Cura workspace. The actual scaling is happening on the original model's x,y,z axis. Wanna really mess with your head? Take original orientation, rotate 90° on an axis as you mentioned above, then rotate on the (local space axis) by any amount other than 90° *then* scale again. You will see two axis respond to the scaling.
-
I will take a look at the file, but a screen shot of your settings would be more helpful. Or, better yet, a copy of your project file..... I just took a look at the file and did a slice. All looked fine. So, would definitely need to see your project file.
-
A screenshot or even the model to inspect would be good to evaluate. It sounds like the walls are too thin to get picked up. Or, the model may not be watertight. To keep from having an issue with printing, check the layer view first. It will show if there are error.
-

Excellent site but I have a photo question
kmanstudios replied to TwoDrunkOwls's topic in UltiMaker.com
Ummmmm.... Not in my experience. Noting that browser choice can be an influence, but I think not so far from what I am about to show though.... 1. Choose 'Insert other media." 2. Choose "Insert existing attachment." 3. Dialogue box pops up with attachments in chronological order, starting from last to first posted images. Unless I am missing something, but this is how I have used it when reposting an image in another thread to illustrate an idea.


-
Excellent site but I have a photo question
kmanstudios replied to TwoDrunkOwls's topic in UltiMaker.com
I just usually drag from my desktop folder to the space (say next line with the blinking cursor on that line) on the forum post I make and I have not seen any issues when doing that. -
The "Print Object as Support" is not working. What it does is fail to confine support to the boundary of the "print as Support Object.' In the first image, I had the 'Custom Support' installed. Second image, I uninstalled it to see if that made a difference. Third image is a previous version that had consistent behaviour from inception until this version, in which is misbehaves. This is changed behaviour for that. Below is a series of images I made to illustrate this as well as how it behaved in a previous version.

-
This is a good guide for printing transparents filaments. It is valid for all transparent filaments. http://taulman3d.com/t-glase-features.html And, yes, definitely the post processing. http://taulman3d.com/t-glase-optics.html
-
Environment is something that I find to be a very important factor in printing. I am very happy that you got your issues sussed out and moving along. And, yeah, FBRC8 folk are really good.
-
Used it as a large bore nozzle to compliment my AA 0.8. Really any materials would have sufficed so I left it up to people to arrive at their own conclusions. In this case, PLA. Edfit: What was accomplished was the use of the CC core as a large bore for other materials other than what UM has set it for. Oh yeah, and it does work in the UM3E even though it is listed as 'incompatible.'
-
OK, I got my CC core and have been playing. So, here are the particulars. THIS IS NOT SANCTIONED BY UM!! Ultimaker says that the CC core is incompatible with the UM3. Well, yes and no. And, I agree with their statement for this reason. Someone would otherwise ruin their UM3(E) feeders with abrasives and then blame UM for not telling them. People have a tendency to not read fine print. So, here is my take on it: It is a core. All cores can swap between the two, so it will work. DO NOT use any abrasive materials in the UM. You will kill your feeders very quickly So, Cura really has an issue with slicing for the CC core, so, just tell it that it is a AA0.8. Then choose your material. Play with line widths etc at your pleasure and slice. Now, when you send it to the machine, it will throw up warnings about incompatibilities and such. Ignore it. Print. At least at this time, UM still allows a choice on this. So, those of you who may get a CC core, it is not limited to abrasive materials and you CAN multitask this expensive 'niche' product to better apply your investments in equipment. And here is proof in the reality. This has no post processing on it. Will be putting that smooth-on stuff if I can get it to work. I am trying it out on smaller prints. That and brush on polyurethane. Infill CC core, walls, AA 0.8.


-
I am finding this to be the largest contributor to a margin of error. And the myriad printers that are being used with Cura.
-
I do know....At least for me....I made that mistake and learned very quickly how to put in air holes that did not get into the visible parts. The windows and other clear parts are vacuum formed. It was the windows I found out about making proper holes.....

-
This actually really good to know as I am starting to vacuum form over prints to get clean windows for my models. Using PETG for the most part as a forming plastic. My heat gun is hot air from my SMD work station and it can get hot, but not as hot as a flame.
-
Will wait to see....I am hoping so. That was a bit of a drag to see. Can you please be more clear? If I am using Cura Connect, then I am on a network, yes? Wifi in my case 5.1.7
-
Suggestions for XTRAND Strength test models
kmanstudios replied to JohnInOttawa's topic in Materials & profiles
As long as you ain't ruining a good core just for the sake of experimentation. And, yeah, it is nice that the S5 has the abrasive ready feeders. I am having fun with Zytel at the moment and will be reporting results here as well. Man, these new filaments are expensive..... -
Suggestions for XTRAND Strength test models
kmanstudios replied to JohnInOttawa's topic in Materials & profiles
Are you waiting for the CC core to come out before moving forward? I hope so because I believe that stuff is very abrasive. -
Well, this is a major issue: I purchased some Zytel, which is a loadable 'profile' through the marketplace. And, guess what, it is faulty on the Cura end as well as Cura Connect. Oh, and 3.6 did not like it at all. It wanted to reset all my printers and stuff, so I gave up on that and rolled back to an earlier version. This did not throw the same error. 1. Loaded it up and it is not fully supported. Never one to be daunted by these type of messages I configured it anyway based on what I can find about printer temps. This is even though it is 'available' on the marketplace. 2. Even though it is part of the market place, which by my thinking should be 'ready' to go if it is there, I cannot directly support it through Cura Connect or the S5. So, I have to choose CPE+ (On the S5) to make sure I hit the temp range for proper loading and such. 3. Then it tells me to Load "Zytel', but, there is no 'Zytel' to choose from. OK. 4. It cannot load it in Cura Connect. I hit override and it just bombs out and queues up the next print after that. At least I can load it from the USB drive, but that negates the use of the software and firmware as it exists at this time. We shall see if my kluge has worked, but wow, this is expensive stuff (Zytel) and it seems to not be really ready to go even though there is a push on the material partnerships. So, yayyyyyy.........?
-
Ultimaker S5 - one material appears to be empty
kmanstudios replied to Stefania Dinea's topic in UltiMaker 3D printers
I find about 57% - 62% is ok in general. But humidity is a bit of a misnomer. I have not taken time to calculate an actual dew point that would be more accurate. -
Ultimaker S5 - one material appears to be empty
kmanstudios replied to Stefania Dinea's topic in UltiMaker 3D printers
I would not say always. Here would be the thought behind that. Find out what angle your printer can do without supports. For instance, this is a two colour print without supports. I printed several 'overhang tests' from Thingiverse when I got the printer to find out what I could get away with. But, I will completely concur that you cannot print on air....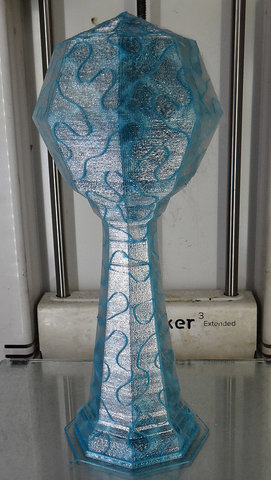
-
The old term was "Drawing with a bar of soap." ?
-
Ultimaker S5 - one material appears to be empty
kmanstudios replied to Stefania Dinea's topic in UltiMaker 3D printers
Sometimes, a lot of difficult clean up. Also, depending on crevasses and spindly parts, may be a real problem. I suggest solving your PVA issues for those parts. But, in a nutshell, PVA works great if you can keep it dry. This really may not be possible in certain environments. I do have an occasional failure in an area or two, but some people just have a constant failure and I chalk it up to not being able to keep the stuff dry. It is a pain to work with. -
Then I guess I would be very comfortable telling people that it is a niche product and only for abrasives and not a doable solution for large bore prints and to buy the cheaper options if needed for more materials.


