


SandervG
-
Posts
6,438 -
Joined
-
Days Won
124
Content Type
Forums
Events
3D Prints
Everything posted by SandervG
-
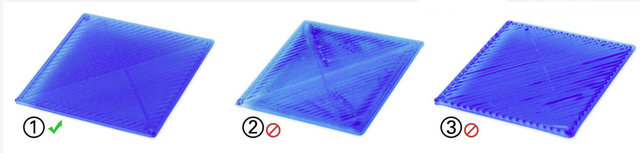
Good bed adhesion is one of the most important facets of 3D printing. When your print properly adhered to your bed you can sit back and relax while your print finishes. At the same time, when it does not adhere properly you are guaranteed of a fail. So, how can you ensure good bed adhesion? A few ingredients are important. 1) Bed leveling. Make sure your bed is level, and the space between your nozzle is not too much and not too tight. An Ultimaker 3 has active leveling which can help you achieve proper leveling. It is advised to manually level your bed before active leveling, so a potential offset is reduced to a minimum already. The less it has to compensate for, the better. For an Ultimaker 2, 2+ and Ultimaker Original you can use a calibration card supplied with the Ultimaker. The calibration card has a thickness of 0.15mm, which is exactly how much space you want between your nozzle and bed. 2) The first layer Ultimaker Cura has default settings for the first layer. In Cura, they're called 'initial layer' if you want to find them. This concerns among others the speed and thickness. We recommend printing your first layer at 20mm/s. A slower first layer gives the filament time to be squeezed onto the bed through the pressure it receives from the nozzle. Even when printing a high detailed 3D print, we recommend to print a thicker first layer, for the same reason as mentioned above. You want the first layer to squeezed on the glass plate. If the distance between your nozzle and build plate are correct and your first layer is printed at the right speed and thickness; your first print should look like #1. The layers are spread out and squeezed on the build plate evenly. In example #2 you can see some transparency in the first layer, this is usually an indication that the build plate was too tight to the nozzle. You can see near the edges how the excessive material is being pushed to the outside. In #3 there was too much space in between the nozzle and build plate because of the roundish layers you see at the top. They are not squeezed on your build plate. 3) Heat. Heat can be a great source of adhesion. Different materials require different temperatures to ensure good adhesion. What temperature exactly may differ between filament manufacturers. For Ultimaker filament we recommend using the values proposed to you in Cura. As a rule of thumb, you could use these values as a starting point: PLA: 60ºC - ABS: 80ºC - CPE: 70ºC - CPE+: 107ºC - Nylon: 60ºC - PC: 107ºC - PP: 85ºC - PVA: 60ºC - TPU:60ºC. 4) Adhesives Some materials are more prone to warping than others. Warping is when a material shrinks when it cools down. This shrinking can apply forces on the base of your 3D printed model which can result in the corners pulling up. To prevent this, you want to prevent a material from cooling down too fast (like by adding a door) and you can apply an additional adhesive. This can be a thin layer of glue applied with a glue stick, an adhesion sheet or other appliances like spray or partially dissolved material substances like ABS-slurry. Make sure you inform yourself if your material requires an additional adhesive. Your supplier should know. These tips should help you nail that first layer. Do you have any other tips or questions about your bed adhesion? Post them below!
-
Hi @Woody , yes it is. Via 'tune' (a menu item on the screen of the Ultimaker) you can pause your print, replace filament and then press 'continue'.
-
It means that when you create a thread, you may select a tag. It is not automated nor mandatory. Here is an example of the tags for this category, giving feedback about our platform. In hardware for example, and many other categories, you can select nog UM.com or Mobile, but UM3, UM2+, UMO etc. When applied, it looks like this in a category. I'm sure it must look familiar to you. When you click any of these tags, you search the whole forum for threads labeled with this tag. So if you are in a helpful mood, you can click 'HELP' and start answering all topics of users who are in need of help The exception is 'Solved', only the OP can label this one and make it into a prefix. A prefix looks like this:


-
Hi @kmanstudios, I mean when you start a new thread you have the option to add a tag, below where you enter the title of your thread. This tag allows you to specify a machine that concerns your post. It is not so good of an alternative because it is disruptive from a workflow we were all familiar with, but it also has its benefits because you can also use these tags to search the forum and you could for example see all posts that are tagged with 'UM2+' which could be convenient when you search for something concerning an Ultimaker 2+. So it is not connected to your profile, but to the thread you write.
-

Z wobble because of bad Auto-leveling?
SandervG replied to Dragon2781's topic in UltiMaker 3D printers
That is how it measures any offset in your bed leveling. That is correct. It does this during the first 10 layers of a print. Do you have a photo of what you considered to be Z wobble? You can define in what frequency you what active leveling to happen, which can also be never. I.e., turned off. But not during a print. You have to decide if you want to change your active leveling frequency before your print starts. Can you elaborate what you mean that you have to make a manual leveling to overwrite the saved alignment. What do you mean by overwrite it? -
What do you mean? You can't click on page 4, 5, 6 or the last page? If the page is out of scope, did you know you can also click on 'Page 8 of 8' and type in which page you want to go to directly?
-
How are things going with the anchor points for you Nilrog? Using internal links and notifications should work however using the pagination it does not yet (and the prospect to fix that element does not look good). But if you are navigating using the pagination, you probably know what topic you are in.
-
SOLVED always rotating model by 90degrees in the same axis after open
SandervG replied to Andreasw's topic in UltiMaker Cura
@SteveCox3D , you are a Fusion 360 expert aren't you? Do you know how to change the point of origin for a model? -
It is now
-
So you tried a bunch of abrasive material when everything worked fine, and now you are switching back to PLA and it is not fine anymore? Any idea how much abrasive material you have used approximately? Perhaps worth looking if your knurled feeder wheel has not worn down from the abrasive material, and it now can't grip PLA as good as it could before.
-
You and me both. The best 'second best' we could offer, was to educate people to use a tag in their post which told us what printer they had / asked a question about. In the past there were also plenty of people we had to 'tell' to update their profile, now we have to ask sometimes to add the tags to their post.
-
SOLVED always rotating model by 90degrees in the same axis after open
SandervG replied to Andreasw's topic in UltiMaker Cura
I think it has to do with how you export your model, and the point of origin is at the wrong/not where you mean it place. This point decides what is up and what is down in your model. How to change this 0,0,0 position may depend on what software you use. Do you design the models yourself, where this happens? -
Hi @Dragon2781 , welcome to the forums! Hopefully you'll feel right at home and we'll be able to learn a lot from each other. I think the Ultimaker 3 is definitely a workhorse (first users that come to mind are @korneel and @kmanstudios) but just like every piece of machinery it comes with a manual and intended use. In order to figure out whether or not we can help you in the way you use the Ultimaker, or in your expectations, could you tell us a little bit more about your print settings and could you share some photo's of your prints? What do you expect of your Ultimaker and its prints? Did you do any maintenance or modifications already? Looking forward hearing from you
-
The video could also be cut up in smaller sections, few minutes per feature. This requires more time to edit it all, but I'll suggest it. Perhaps like an agenda which features are being covered before you watch it could also help. one the user end I hear this more often than I would want, on the Ultimaker side I usually hear it shouldn't happen anymore. @Msuurmond, any idea why the experiences are so far apart?
-
I thought these would be preserved, I asked for our dear modified mark-2 users. Let me double check which is it. (could be very well that I'm wrong). Any idea how one could find out what to remove or where to look to find the single part that fixes this crash? Besides, what did you think of my proposal regarding the next video?
-
The button is right there, in the menu. It is what I understood as a recommended action. What would you suggest otherwise, as a more subtle solution?
-
Oh, and for whoever is interested; I understood that the problem our dear Vulcan was dealing with was most likely a third party printer profile with incorrect values that caused the error. At one point a screenshot was shared with 'Backup and reset configuration', this should have prompted Cura to remove all third party machine profiles and reload them according to the latest profiles. Supposedly, this should have fixed it. So, if someone runs into a similar issue, please give this a try
-
'I'm not really sure about the threshold, perhaps @ctbeke could elaborate on that more. Yes. I also had to check; so here it goes: Adaptive layer maximum variation: How much adaptive layer height may deviate from your base line layer height. So if your base line is 0.2 micron, and your adaptive variation is 0.05, adaptive layers will vary from 0.15 - 0.25. Adaptive layers step size will determine how big the steps are from which Cura will switch from 0.15 to 0.2 for example. With a value of 0.01 it will go from 0.15 to 0.16 to 0.17 etc. Adaptive threshold is a bit more complicated. As a rule of thumb, the value 200 references to a degree of approx 45º. The lower the number (lets see 100), the more adaptive layer height will lean towards thinner layers on vertical/slightly skewed walls. Quoting Ctbeke: ' The formula is layer_height / tan(steepest_slope_in_layer) <= threshold. So the threshold value is compared to the potential layer height divided by the tangens of the steepest slope in the potential layer. In this case an angle of 0 is a horizontal flat surface and 90 is a vertical surface (i.e. the steepest possible slope). The 90 degree offset is there to make sure the algorithm works in the right direction for the threshold comparison. Code details: https://github.com/Ultimaker/CuraEngine/blob/master/src/settings/AdaptiveLayerHeights.cpp#L158.' I think it is a great feature but it is in experimental for a reason. For example, I also understood it is more inclined to print overhangs with thinner layers, where in theory thicker layers should give better results. I don't think it can differentiate inwards from outwards slopes yet. Hopefully this helps!
-
@ahoeben, I believe this video was made before you informed us that we overlooked your (indeed) valuable contribution of mesh types. We acknowledged this should have been there from the start. The purpose of these lengthier video's is to inform users, in a more elaborate way than the short description new features usually get in a typical blog. It is not considered promotional in that regard. How about this, I just talked with Jeroen who made the video, during the next beta phase you can tag me in that Beta thread with a request for a certain feature to be explained in this video. As a starting point you have the forum/blog post and the software itself to base your requests on. I will share these requests with Jeroen and he will try to cover questions/features that were requested, alongside other input we get left and right. The scope of these video's is to make them 10-15min so if it there would be too much we have to prioritize what will end up in there. We can give this a try next release, see how it goes and go from there?
-
I think one of our developers Ctbeke explained it here
-
For the snappy quick overview of new features, doesn't the blog, forum post and release notes suffice? The purpose of the video would be to explain more in depth (and also show) what features can do and how they work with some more background knowledge and context.
-
Hi Aldo, it could be that the video was already made before you recently reminded us about a feature that we should include in our blog. A lot of features are usually introduced with a new version of Cura and I don't think we can cover them all. So a selection has to be made. Which of the new features do you miss? Any suggestions how we can make a better next video?
-
Ok, bye. Sorry guys for the inconvenience. Let's get back on topic.
-
Hey Everyone, I added a youtube video to my original post where one of our Cura experts explains the new features of Ultimaker Cura. Regardless if you gave Cura 3.2 a chance already, it may be an interesting video to watch. This video was originally meant for the Beta (which is mentioned a few times), but discussed content applies on the stable version too) We plan to make a new similar video for our community every release now, let us know if this is helpful.
-
You may also want to make sure your filament is clearly on the front or back of the reel holder, so the Ultimaker 3 knows which it has to read. I doesn't matter where the filament is placed on your reel.


