tinkergnome
-
Posts
2,774 -
Joined
-
Last visited
-
Days Won
61
Content Type
Forums
Events
3D Prints
Everything posted by tinkergnome
-
What's the problem with the profiles? Are you talking about the printing profiles (Fine, draft, Coarse...) and why can't you use them? Creating (and update) of custom profiles works fine for me too in Cura 3.1 and 3.2 BETA. Or did i missed something different?
-
Well.... test it! (i have... and it works)
-

Bottom comes out RED in Cura? (Overhang?)
tinkergnome replied to Wheelone's topic in Improve your 3D prints
@gr5 the screenshots are not from Ultimaker Cura, it looks like a customized old version, maybe 14.x or 15.x? The only way to change the z-pos was the option "Cut off object bottom" (AFAIK) @Wheelone The layer visualization was a bit different in Cura versions of these old days , but you can go through it layer by layer to ensure, that the chosen amount of bottom layers is actually printed (the amount depends on the chosen top/bottom height and the layer thickness). For the Windows version: hold the CTRL-key and use the arrow up/down keys (in layer view). But first: check your model: switch to the x-ray view and check for any red marked faces. If in doubt, post a screenshot of this view too. -
This is just a short relative movement to reduce the "stringing" line at the end of the print. Not strictly necessary, but consider it as an interrelated block with the surrounding "relative mode" switches(G91 / G90). Those switches are "sticky" and you probably don't want to keep the relative mode enabled all the time... G91 ;Relative movement G0 F15000 X8.0 Z0.5 E-4.5 ;Wiping+material retraction G0 F10000 Z1.5 E4.5 ;Compensation for the retraction G90 ;Disable relative movement M82 ; absolute extrusion mode The comments at the end are also not needed and do not change the state of the printer. Usually the line with is equal (or close) to the nozzle diameter, 2mm sounds a bit odd? Cura uses a default (wall) line width of 0.35 (for a 0.4mm nozzle) - and 0.5mm width for the infill lines. If i calculate your example with a line width of 0.4mm, i get an extrusion length of ~0.25mm for this segment (1,6mm³ and 2.85mm filament) - better?
-
@gr5 just remove the superseding point at the end of the url: http://files.fieldofview.com/temp/ZOffsetPlugin.curaplugin Manually copying to the plugin directory works too, the github link is in the first post.
-
The best source that i know, is still this post in the S3D forum: https://forum.simplify3d.com/viewtopic.php?f=8&t=1959&p=7574 Your particular example adds some commands to change the acceleration - dependent on the feature type.
-
Well, the M104 commands are disabling the heaters of the print cores, and M107 disables the fan. But i think, the firmware does this anyway after the end of a print (but i'm not sure). AFAIK the extruded volume is calculated as follows: layer_height * line_width * length_of_the_line_segment You need the filament diameter in addition to calculate the needed difference in length, that's all.
-
Awesome! That means you can teach us more of this stuff soon...
-
@ahoeben one observation: if you switch between printers, the offset setting is duplicated to the end of the panel. I assume this has something to do with the 'naughty' line?

-
I'm not that convinced about the actual move of the z-axis to the zero coordinate... Would it be possible to search the gcode for the first z-move (after homing with G28)? Than add the offset to the found value (G92) and repeat the move (i do the something similiar with a customized start code at the moment). ... G0 Zxx.xxxx ;the original line (first found z move after the homing) ;inserted by the plugin G92 Z[xx.xxx - offset] ;add the offset to the current position G0 Zxx.xxxx ;repeat the original move (the same effect as a relative move by the offset value) ;rest of the gcode starts here ...
-
If i understand you right, you want to use Custom Start Gcode (follow the link).
-
Burned out Driver: Swap Y-Axis with E2-Axis
tinkergnome replied to printhead's topic in UltiMaker Cura
Wait a minute... @Julian28010 asked for an UMO+, but now we are talking about the UM2-Firmware? I'm pretty sure, that the UMO+ uses the same electronics board, but a different firmware (and display), right? If you own an UM2, you made the changes on the wrong place. Search for MOTHERBOARD == 72 In case of an UMO+ it's the wrong firmware, it should be this one: https://github.com/Ultimaker/Marlin/tree/Marlin_UM_Original_Plus -
UM3e arrived - trouble w. filament grinding/not extruding
tinkergnome replied to Bossler's topic in UltiMaker 3D printers
Usually overhangs print better when thicker layers are used. Another point is the raised heat from the buildplate, especially near the bottom of the model. If possible, print those models on a cold buildplate. This will probably need some other kind of adhesion helpers - like painters tape or the adhesion sheets - but makes a big difference. Regarding the "zebra effect": rotate the model between 15 and 45 degrees around the z-axis (the blue handle in Cura) and the effect should disappear, see: https://community.ultimaker.com/topic/10226-why-does-my-print-have-tiny-zebra-stripes/?do=findComment&comment=113434 -
Printing Small Gaps
tinkergnome replied to CatamaranDan's topic in Design for Additive Manufacturing
I think, the OP is talking about inches, 0.012 inches are approx. 0.3mm -
@kmanstudios I made some python scripts based on the example from David (Inside the Ultimaker 3 - Day 3 - Remote access (part 2)) Those can be used as (kind of) an override for such things. I put them on my Google drive: python-scripts You would probably have to make a copy of "led_on.py" and "led_off.py" for each printer and change the ip address accordingly. And you would have to install Python 3.5 or newer (if you do not already have it). And you have to confirm access to the printer on the first use. Afterwards you can switch the light on and off at any time with a double click on the file (that's how i use it a.t.m.).
-
In my experience this effect depends not so much on acceleration, but more on the (so-called) jerk. I you want, try your test cube again with enabled acceleration control, but switch off jerk control or increase the (very low) wall jerks to values not lower than 10 (or 12) mm/s. It could be interesting to compare the results. BTW: what are your default settings for acceleration and jerk on the machine?
-
some possibilities: - share it with other Cura users around the world - take it as a backup - upload it to a version control repository - and so on... It's definitely not intended for the UM2, that's a complete independent thing. IMHO the "UltiGCode" approach (with the material settings on the printer) had it's benefits in former days but is obsolete nowadays. I think, you should consider to change the Gcode flavor for your UM2 to "Marlin" (it's in the "Machine Settings" of Cura). Afterwards only the material settings from Cura will be used and the settings on the printer do not matter anymore.
-
Nope. It's a pity, i guess it will only happen, if enough customers ask for it. The world is full of unused opportunities...
-
That's right, but as far i know this is not limited to Ultimaker materials. Every material manufacturer is called to take the efforts and to contribute material profiles for the UM3 and Cura (or even RFID tags), if he wants to make his material directly supported. It's a task of the particular manufacturer, that's the whole idea behind it. It's an open system after all.
-
@Nobima what about this: An uncaught exception has occurred! ... FileNotFoundError: Could not find resource ('Mark2_for_Ultimaker2_backplate.png',) it should be in the 'images' subfolder. Sigh - Cura is sooo nitpicky...!
-
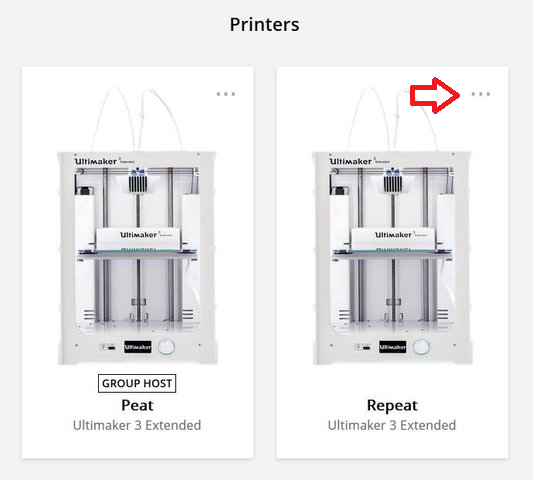
Designing a smooth UI is not an easy task (especially if it has to be accessible for people with a disability). I think, little 'playgrounds' are acceptable... The rare 'hidden' things are no problem once you get used to it, and those '3 point menus' are quite common nowadays (although the 'light grey-on-white' color scheme is generally worth a discussion ).
-
LOL - yep - this or... carefully read the manual... https://ultimaker.com/en/resources/51710-manuals (page 15)
-
Das, was Du dort im Browser siehst, _ist_ die Step-Datei - Du musst sie nur noch speichern... ...oder eben gleich einen Rechts-Klick auf den Link mit dem Dateinamen ausführen und "Ziel speichern unter..." auswählen. Man kann auch einfach das gesamte Repository als zip-Archiv herunterladen und dann ganz in Ruhe lokal darin herumstöbern: https://github.com/Ultimaker/Ultimaker2/archive/master.zip
-
AFAIK the definition files have not changed since Cura 2.4 (and are still working for Cura 3.1) (@foehnsturm, @ultiarjan: correct me, if i'm wrong...) Was the configuration imported from 3.04 during the installation of Cura 3.1, or do you have added the printer again? If you can upload the (shortened) cura.log file somewhere... we can try to help to nail this problem down.
-
@kmanstudios There should be an option in the printer's menu on the Cura Connect webpage: