


GregValiant
-
Posts
5,323 -
Joined
-
Last visited
-
Days Won
224
Content Type
Forums
Events
3D Prints
Everything posted by GregValiant
-
Thanks for getting back. At least it was something simple to understand and account for.
-
In Cura use "File | Save Project" and post the 3mf file here. Support blockers can be configured in different ways and when set to "overlaps" you can change the wall count, infill density, whatever.
-
 +1 on the 3mf file. All that motion is bizarre.
 -
If that earlier file name is appearing in the "comment" line of the LCD then ahoeben's suggestion is correct and a post-processor is passing the mesh name to the printer. If the earlier file name is appearing in the list of files you can choose from in the "Print from SD" menu then it could be the SD card. That would be an oddball though.
-
Unless you are doing something with a RaspPi /Octoprint I don't know how it could do that. The mainboards aren't very sophisticated and I'm sure that once the SD card is out of the slot that the mainboard doesn't remember what it saw. Here's Greg's Accel and Jerk Tool for Windows. I added printing utilities to it for printing from the SD card. That means you query the printer from your computer and it sends back the file names that are on the SD card. (Pick the one you want and print it). If nothing else it's a different way to get the names back from the printer and it bypasses the LCD. Somehow your problem has gotta be the SD card. Bad sectors, something didn't erase correctly, random bits of files...I really can't see it being the printer but who knows. Some of the things that happen with my Ender 3 Pro are odd. I have had to do a factory reset twice when it got stuck-on-stupid.
-
I can put the models together fine. Using MS 3dBuilder for STL's or back to Mechanical Desktop for solids. I was playing with Cura to see if I could manage the same task without having to jump to different softwares. I guess it's the word "Merge" that has me confused about what the command actually was designed to do.
-
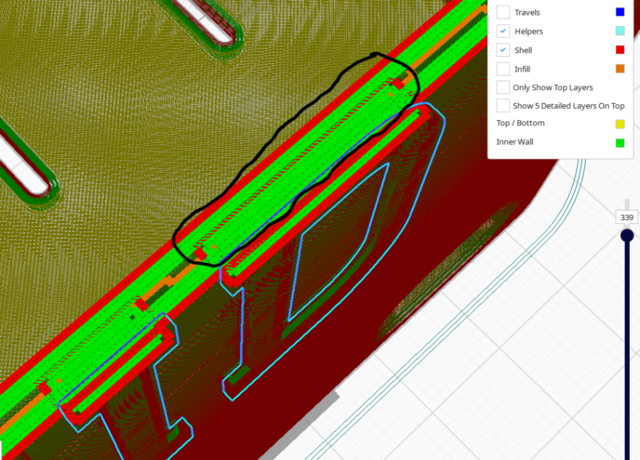
This isn't a questions of settings, but rather the right click command "Merge". With two models placed in the build area, and positioned where I want them, and locked in place... If I slice them in their over-lapped position, the overlapped areas for both models print "intertwined" so the overlap areas contain plastic for both models. Double outside walls, double inside walls, etc...it doesn't fit. When I select "Merge" from the right click menu the models jump independent of each other. Rather than being "married" and becoming as one, they get divorced and move to different cities. The following images show the parts "merged". (I had to use my X-ray vision to actually see the parts.) My expectation was that the meshes would merge together creating a single mesh. Instead, the mesh is a mish mash. They are locked together and l did move them to 0,0,0. What am I missing or doing wrong here? Is my definition of "Merge" in error? It's a visor for a tablet and it's supposed to end up something like this. It does when I use other software to "merge" the two models.


-
The printers don't "look ahead" into a file. Whatever the file name is should be displayed on the LCD as that's all the printer knows. Additionally, they don't pay any attention to a line that starts with a semi-colon as a comment is not a command. You might try re-formatting that SD card. They can act strangely at times but formatting usually brings them back to life. The early Creality printers also had a limit to the length of a file name. The prefix was limited to 16 characters. I don't know if they got away from that with the 32 bit boards.
-
A layer height of .8 is really pushing it. At 1/2 nozzle diameter you would do better. The nozzle has to "squish" the plastic on to the bed in order to get it to stick. That brings up problem #2... "So once set, it should print the whole stack. Once printed, these layers will be separated, kind of making wireframe/stencil. Is that possible?" Poor layer adhesion and a resultant failure of a printed part is the most popular failure mode of FDM. A lot of research has gone into getting layers to adhere to each other better. It is necessary to get the first layer to adhere to the bed (popular problem) and then get the subsequent layers to adhere one-on-another. I don't see any way to "separate" them later. The layers are effectively super-glued together (at least that's the plan). Printing multiple models on the build plate would give you numerous stencils at once and there would be no need to "separate" them. That would also allow you to go to a 2 layer thick stencil using .4 layer height.
-
Warping on a flat part after it is finished
GregValiant replied to helmut92's topic in Improve your 3D prints
The G4 command is "Dwell" and yes, "S" is in seconds. When the printer is in "Dwell" mode it won't accept any other commands. M0/M1 can be interrupted with a button click, but there is no timer and consequently the temperature would not continue to drop until a button click. It would simply sit on the last temp it was told. -
Possible setting addition for better printing results
GregValiant replied to TMan05's topic in UltiMaker Cura
Has someone been able to get a QIDI printer to work using Cura? Although the QIDI files say the gcode flavor is Marlin, there are commands that aren't supported by Marlin. A case in point is that according to the MarlinFW.org list of commands G92 does not take an A or B parameter. The M4010 lines appear to be a bitmap image. M2100 I have no idea. It's very possible that QIDI took Marlin and made a proprietary version. Regarding this request, why not have a purge line or two? Things would get complicated if the layer start point was in the back right corner and the initial extrusion had to jog around the print before starting the skirt/brim. -
Cura 4.8.0 ignores hotend temperature settings
GregValiant replied to Relexey's topic in UltiMaker Cura
Have you been able to print anything? Within your gcode file should be an M104 and/or M109 to set the hot end temperature. M109 is "wait for hot end" to get to temperature and the M104 merely sets the temp. They need to be before any gcode lines with an "E" extrusion. What firmware is the printer running? -
If the heat commands are in the Start Gcode with variable names (Cura keywords), then Cura will use them. They would need to be first in the start-up gcode. In this case Cura will not add additional heating commands. ; Ender 3 Custom Start G-code M109 S{material_bed_temperature_layer_0} M190 S{material_bed_temperature_layer_0} M104 S{material_print_temperature_layer_0} M140 S{material_print_temperature_layer_0} results in: ;Generated with Cura_SteamEngine 4.9.0 M82 ;absolute extrusion mode ; Ender 3 Custom Start G-code M109 S50 M190 S50 M104 S210 M140 S210 G92 E0 ; Reset Extruder G28 ; Home all axes If the heat commands are in the start Gcode and are hard coded then Cura will add it's own heat commands in front of the Start Gcode. It would look like this: ;Generated with Cura_SteamEngine 4.9.0 M140 S50 M104 S210 M105 M190 S50 M109 S210 M82 ;absolute extrusion mode ; Ender 3 Custom Start G-code M104 S199 ;from the start gcode M140 S199 ;from the start gcode M109 S27 ;from the start gcode M190 S27 ;from the start gcode G92 E0 ; Reset Extruder G28 ; Home all axes If the heat commands are absent from the start Gcode then Cura will add heat commands in front of the Start Gcode. ;Generated with Cura_SteamEngine 4.9.0 M140 S50 M104 S210 M105 ;this is a temperature check M190 S50 M109 S210 M82 ;absolute extrusion mode ; Ender 3 Custom Start G-code G92 E0 ; Reset Extruder G28 ; Home all axes The listing of Cura keywords are HERE. Much thanks to @ahoeben for putting the list together.
-
How wide is the line? How thick is each stencil? What material do you anticipate using?
-
Your welcome. What's your useable build plate diameter?
-
Warping on a flat part after it is finished
GregValiant replied to helmut92's topic in Improve your 3D prints
If it doesn't work then it isn't enabled in the firmware. You can try it with an S instead of the R as M190 S50. That will set the temp and then the dwell command should still take effect. The R parameter would keep the buffer from reading a bunch of following commands but it may not be necessary if the Dwell works to keep commands from executing until the dwell ends. -
Warping on a flat part after it is finished
GregValiant replied to helmut92's topic in Improve your 3D prints
"Then I can directly put a microwave cover over the printed part, which I stole from the kitchen." Make sure your supervisor knows how cost conscious you are. His/her acknowledgement will give you some comfort when your wife berates you for using that lid. -
As @nallath notes, your nozzle size/line width coupled with the layer height just can't make certain areas of the letters because they are too thin. A different font (something san-serif?) would be a better choice. You could make the letters larger too if that is an option for you. You could also try enabling "Print Thin Walls" and see if that makes a difference. If the lettering is vertical (like on the side of a box) then beveled letters print better because the bevel angle eliminates the the need for any support. There are two lines of text here and both say SS Greg (I'm a modest man). The lower wording is just too small for the .4 nozzle at .2 layer height. Changing to a .2 nozzle and .1 layer height allows the smaller text to print. (This at the cost of having an 8 hour benchy.) Another thing you could try to to repair the model at Service.Netfabb.com. I'm not saying there is anything wrong with it, but sometimes there is and it affects how Cura slices an object.


-
Can you add a couple lines to the end of your start gcode like maybe: G1 F{machine_max_feedrate_x} X-100 Y0 ;move to far left G1 F{machine_max_feedrate_z} Z1.2 ;move down that would move the head out of the center and then drop the head at the faster rate. I have a similar situation but it's a retraction that Cura adds "G1 F1800 E-6". I use the Search and Replace plugin to change that line to G92 E-4 and any skirt or brim now starts correctly. That trick only works because the "search" line only appears once in the gcode. Your line might appear multiple times and they would all be replaced.
-
See if Optimize Wall Printing Order makes a difference. It can effect the print order of inner and outer walls around holes. When enabled it will print the inner wall and proceed to the outer wall for each hole. When disabled it will do the inner walls and move on, then come back and do all the outer walls (that face the centerline of each hole). gr5's video is very good. It's Aquanet Superhold hairspray that is the ticket for me.
-
Warping on a flat part after it is finished
GregValiant replied to helmut92's topic in Improve your 3D prints
@geert were your tests done before the part had cooled(?) or did you bring them back up after they had been to room temp? Now I'm curious is there would be a difference. I know PLA parts will flow in a hot car (so much for the wife's phone holder - it looked like something from a Salvador Dali painting). -
"I think I've tried to copy and rename the definition .json file" If it was that simple then anybody could play. Cura looks in the file to see what's going on. Along with renaming the file there are two lines you need to change within the file (which is a text file). Make a copy of the "Geeetech_20T.def.json file" and then rename the copy as "Geeetech_30T.def.json" and in that file there are "name": "Geeetech 20T" and "overrides": { "machine_name": { "default_value": "Geeetech 20T" }, You can see that the machine name is declared within the file and those names need to be changed as well. Change the "name" and the "machine_name" to "Geeetech 30T". You can also change the build plate size (and any other defaults you might want) in the "overrides" section. As with any programming language Python is fussy about punctuation. Regarding getting rid of "Draft..." profile, I don't know. If it's greyed out then it won't work with that printer but it's a built in profile.
-
QUESTION Pause Cura printing, insert nut in model, resume printing
GregValiant replied to RogueWave's topic in UltiMaker Cura
@RogueWave - Be advised that pausing "By Height" can be fooled by Z-hops in the file (the Z bounces up and down and the plug-in will react to the first instance of the Z height that it comes across). It will also not work with Adaptive Layers (because the Z might be some oddball number). Pause At Height works fine if set to "By Layer". (NOTE: Some late model Creality printers don't have "M0" enabled in their firmware and will blow through the pause command. The fix is to add G4 S180 in the "gcode after pause" box to "dwell" the code execution for 3 minutes. The downside to that is you have to be standing there when the dwell occurs since it is on a timer (S parameter is in seconds) rather than waiting for a button click). -
Warping on a flat part after it is finished
GregValiant replied to helmut92's topic in Improve your 3D prints
I looks like the Ultimaker adds the line from within Cura (rather than as an ending Gcode script). There are two ways to do it. If you think you would use the cool-down script all the time you could put it at the end of your "End Gcode" script in the printer Machine Settings in Cura. The M140 S0 line would still be there but the code will execute so fast in the printer that the bed won't have time to cool down before it hits the first M190 line. If it's a one-shot deal then open the gcode file and insert the cool-down code between the "M104 S0" line and the ";End of Gcode" line and also comment out the "M140 S0" line with a semi-colon in front. That will allow the print to complete, the hot end to turn off, and the bed will slowly cool over time. M190 with the R parameter should be enabled in your firmware (I'm not an Ultimaker guy). M140 S0 ; existing line that will turn off the bed. If you edit the gcode file this would become a comment. .... ; some already existing end-of-print-code M104 S0 ;existing line that turns off the hot end M190 R60 ; first new line that will turn the bed back on G4 S3000 M190 R50 G4 S3000 M190 R40 G4 S3000 M190 R30 G4 S3000 M140 S0 ; turn the bed off - is the last line of your cool down code. ;End of gcode You definitely want the hot end off so it doesn't ooze while the bed is cooling down. I still think a cover would be a good idea. Don't let your significant other know that you stole a pot lid for the printer. -
The definition files come from either a printer manufacturer or from the community at large. Ultimaker accepts them and adds them to Cura as a convenience. Ultimaker handles the definitions for their printers only. As to where Cura might store the names and any relationship to an existing definition it looks like they are in "...C:\Users\......\AppData\Roaming\cura\4.9\definition_changes". At least that looks like a record of changes. I don't know if Cura accesses the changes after writing them in. The more printers that come to market and the more people customize their existing printers means more and more of them are veering from the standard definitions. Fortunately even a hack like me can muddle through a bit of what's going on in a definition file and alter it to suit. I keep my own set of backups of definitions and PostProcessing plugins that I've altered and when I add a version of Cura I copy them into the appropriate folders.


