


Smithy
-
Posts
5,666 -
Joined
-
Last visited
-
Days Won
147
Content Type
Forums
Events
3D Prints
Everything posted by Smithy
-

UM S5 belt replacement and assembly diagrams
Smithy replied to Andy308's topic in UltiMaker 3D printers
Thats the advantage when a 3d printer is available 🙂 Good luck! -
UM S5 belt replacement and assembly diagrams
Smithy replied to Andy308's topic in UltiMaker 3D printers
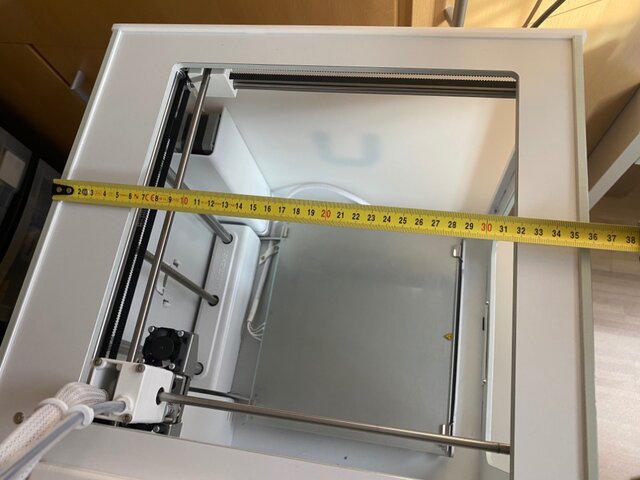
Hi I haven't seen such a diagram so I guess it is not available or not public available. But I took some pictures maybe it helps. If you need more details of a specific part, let me know.


-
You can remove the material manually via the printer api: http://<PRINTER-IP>/docs/api/#/Materials Read the upper part with authentication, you need to create an user first.
-
Printing with 0.2 should be no problem at all, so if you get under extrusion you have a different problem. Which material do you print? Do you print single your dual? I would first try to print with a default profile without changing anything. Do you print with PVA too? Do you use the BB core for PVA? Is you PVA material dry or is it soft and sticky? Have you cleaned your print cores with hot/cold pulls as described on the UM website?
-
There are several issues with your STL file. It is not watertight, so the object is "open" somewhere, the faces are not closed/watertight. It is possible but not the best solution to use Blender for modeling for 3D printing. Better you use a CAD software like Fusion360, Tinkercad, Onsape, etc. They are free or free for non commercial usage. If you still want to use Blender search YouTube how to model for 3D printing and what is important. I don't use Blender so I cannot give you some advices. If you want to rescue your current model you could try if a STL repair service is able to solve the problem. https://service.netfabb.com/login.php it is free you just need an account there.
-
I am glad I could help 🙂
-
There is a setting in the preferences called "Automatically drop models to the build plate" which should be checked. Then the model will be always dropped to the build plate during loading.
-
Viel mehr Geheimtipps gibt es nicht. Du kannst nur versuchen ihn mit einer Spitzzange hinten zu greifen, aber wenn du an die Kabeln kommst, dann sind die auch gleich draussen. Beim Einbau empfiehlt es sich, den Fühler und die Heizpatrone mit ganz wenig Kupferpaste einzuschmieren, dann kann er sich nicht so leicht festfressen.
-
@Torgeir So, the UM2C has the same dimensions on the top as the UM3. The UM2 is 1cm less deep, the width is the same as UM3/UM2C

-
A lithophane yes, but in my understanding he wants to print the coin from a photo and this is not possible.
-
Cura 4.8.0 beta does not run on MacOS Big Sur 11.0.1.beta
Smithy replied to frankdb's topic in UltiMaker Cura
I just updated two Macs to Big Sur and Cura 4.8 final is running fine. So it seems it was fixed in the final version. -
You mean the Cura software? No, for 3D printing you need a 3D model, just a picture is not enough.
-
User the custom printer to start: Or maybe better, choose an other Creality printer and just the change the values for your printer model.

-
Thanks! Yes the geek mode could be the reason I haven't seen it yet, I have turned it off.
-
The material is probably not compatible with your printer (per profile definition) and that could be the reason you don't see it in the list of available materials. You can add an Ultimaker S5 printer to your Cura installation and write down the parameter values you need.
-
Das es so schnell geht, hätte ich nicht gedacht.
-
Can you elaborate it a bit more? I also use 17.10.1 but haven't seen the bug yet.
-
The UM2C Air Manager is connected in the same way as the S5 version, so no separate power supply and on/off switch. The fan is controlled by the printer itself. It doesn't fit the S3 and due to the missing port in the UM2(+) you cannot use it there without making your own power supply and control logic. I can measure it later if the Air Manager would fit physically the UM2(+) - I don't know it out of my head.
-
Maybe your glass is not really flat? But you can also turn off the auto leveling completely, for the size of the bed it is not really needed and you are much faster with starting a new print without the leveling. I have turned it off and just do a manual leveling again after a few months. Another workaround would be to install the z offset plugin in Cura and adjust it to your needs.
-
You can always create your own profile with the custom printer or you ask your vendor if they can provide a working profile for Cura. The 3rd party profiles in Cura are created by the Vendors itself or by someone of the community.
-
Sieht zwar schlimm aus, sollte sich aber beheben lassen, da du beim UM2 alles gut zerlegen kannst. Ich würde folgendermaßen vorgehen: Beide Lüfter oben abschrauben Metallblende abschrauben (2 Schrauben links und 2 rechts) Falls das nicht geht wegen dem Filament, dann mit einer Heißluftpistole das Material erweichen. Das sollte es fast schon gewesen sein, wenn die Düse oder der Olsson Block auch betroffen ist, dann eventuell noch weiter zerlegen oder du bekommst es auch im montierten Zustand weg. Dazu eventuell die Düse aufheizen. Ansonsten mach einfach noch ein paar Fotos wenn du die Lüfter + Blende abmontiert hast, dann sehen wir weiter. Was ist das für ein Material? Falls PLA kannst du auch einen Haarfön verwenden falls du keine Heißluftpistole hast. Mit der Heißluftpistole aber aufpassen, die werden richtig heiß also klein anfangen bzw. weiter weghalten wenn sie sich nicht regulieren lässt.
-
Guter Wartungsplan, gefällt mir 🙂
-
The Air Manager is great for that purpose. When I print ABS for example which smells normally not very good during printing, I can now smell nothing in the room with the Air Manager. So the filter is doing a great job. When you print PLA you don't want to have too much heat inside the printer. Therefore the fan is working at 100% and you can keep the doors closed. I haven't had any problems with it yet and I print a lot of PLA too. But the Air Manager is not silent and when running at full speed it is loud. Not a disturbing sound, so I can still sit in the same room, but it is louder than without an Air Manager. So when you want to reduce the sound during printing, forget it, that's not the case and it's generally not possible in my opinion. You cannot just enclose the printer you need a powerful fan to move the warm air out of the enclosure. I have my Air Manager now for some time and haven't opened it once in that time. So there is basically no need to open it to reach the important parts inside. But if you really need to come from the top, then you can just open it, there are hinges on the back, so this is no problem. A big advantage is also that it reduces warping or bad layer adhesion nearly to zero, because with a covered top and front there is no chance for a cold airflow which could destroy your print. Not needed for PLA, but if you print something else it is important.
-
Ich vermute es liegt an der Z Schraube. Ist die sauber? Falls nicht, reinige die einmal mit einer Zahnbürste, Borsten halb abgeschnitten. Die Bürste ein wenig mit WD40 einsprühen anhalten und dann übers Menü das Bett rauf und runterfahren. (mehrmals). Danach noch schön abwischen und mit dem grünen Fett wieder ein wenig einfetten (Erbsengroß) und wieder rauf und runter fahren. Die beiden Achsen kannst du auch gleich reinigen, aber nicht mit dem grünen Fett behandeln. Entweder gar nicht ölen oder nur ganz ganz wenig. Ich tropfe immer ein paar Tropfen auf ein Tuch und wische dann damit die Achsen ab - das reicht. Das Problem könnte daran liegen, dass die Z Schritte nicht immer exakt 0.2mm sind. Einmal hast du vielleicht 0.18 dann wieder 0.22 and das könnte dann so aussehen wie auf deinem Bild. Aber generell kann ich dir auch sagen, dass weißes Filament am schlimmsten ist, dort siehst du immer Fehler.
-
I can only speak about my experiences with heating the bed. It takes long and even longer if you go higher with the temperature as you do when printing CPE+. It helps a lot if you cover the printer, close the front and even cover the top. Any cool air from the environment can result in a longer heating time. This is normal. The leveling process measures the capacity between the head and the build plate. So the build plate moves up and the value changes continuously. Then the nozzle touches the glas and the bed moves a little bit further but the value doesn't change anymore. That is the point the printer knows he has reached the glass and calculates the correct leveling. Hmm, strange issue, I cannot confirm this behavior. Yes the nozzle is close and the material is squeezed into the glas, but that is important for a good bed adhesion. But I haven't seen that the nozzle scratches the glass or is so close that nothing can be extruded.


